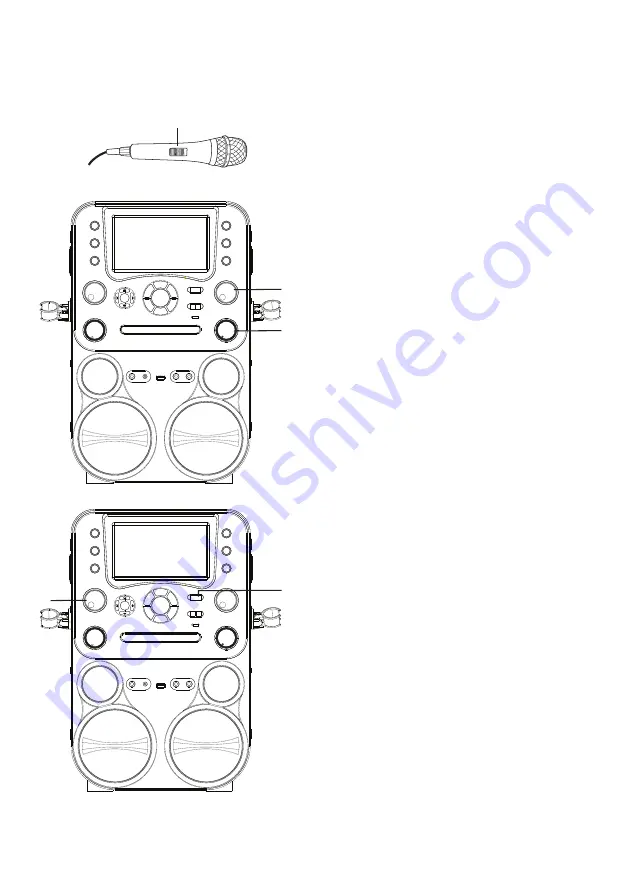
The Singing Machine STVG890BTBK Instruction Manual Download Page 13

12

Operation

6

  Connect microphone(s) and slide the 

ON/OFF

 switch on the microphone to 

the ON position.

7


Adjust the 

MIC VOLUME

 control 

as desired. Increasing this control 
will increase the volume of both 
microphones.

8

  Rotate the 

ECHO

 control to add an 

echo effect to your voice. Rotate 
towards MAX to increase the echo 
effect.

9

  AUTO VOICE CONTROL can be 

activated by pressing the 

AVC

 button. 

The vocals on the multiplex recording 
will be muted when the singer starts 
to sing through the microphone. When 
the singer stops singing, the recorded 
vocals on the multiplex recording will 
resume to normal.

10

 Rotate the 

BALANCE

 control clockwise 

to hear the music and recorded 
vocals from a multiplex recording or 
counterclockwise to hear the music 
only from a multiplex recording.

Playing Songs from the USB (Continued)

888

W

V

888

X

at

U

Summary of Contents for STVG890BTBK

Page 1: ...TM STVG890BTBK W INSTRUCTION MANUAL www singingmachine com The Singing Machine is a registered trademark of The Singing Machine Co Inc 888...

Page 2: ...adiate radio frequency energy and if not installed and used in accordance with the instructions may cause harmful interference to radio communications However there is no guarantee that interference w...

Page 3: ...2 What s in the box Wired Microphone Main Unit AC Adapter Audio Video Cables Manual Welcome Kit 888...

Page 4: ...ton Skip Search Forward Button REPEAT Button Skip Search Back 9 Button Stop Button 13 MASTER VOLUME Control 14 CD Compartment 15 GUITAR KEYBOARD IN Jack 16 Tweeters 17 LINE IN Jack 18 Speakers 19 FUNC...

Page 5: ...4 Location of Controls Rear 1 AUDIO OUT Right Jack 2 VIDEO OUT Jack 3 AUDIO OUT Left Jack 4 DC IN Jack 1 2 3 4...

Page 6: ...V perform the following steps Connect the RCA video cable Yellow to the VIDEO OUT jack and the audio cables White and Red to the AUDIO OUT jacks located on the back of the Singing Machine Connect the...

Page 7: ...able not included as shown Press the LIGHT button to switch on the lighting effect press again to switch off Insert the AC power cord into a conveniently located AC outlet having 120V AC 60Hz Note Mak...

Page 8: ...CD G CD Graphics is the standard format for most karaoke discs that will display the words on the screen Never place anything other than a CD in the compartment as foreign objects can damage the unit...

Page 9: ...UTO VOICE CONTROL can be activated by pressing the AVC button The vocals on the multiplex recording will be muted when the singer starts to sing through the microphone When the singer stops singing th...

Page 10: ...el Repeat function will display 15PROGRAM You can program up to 20 tracks on any disc for playback in any desired order While in the Stop mode press the PROGRAM button the Program indicator first trac...

Page 11: ...repeatedly play the whole CD A will display Press it again to cancel Repeat function will display 16PAUSE During playback if you wish to pause the disc momentarily press the Play Pause4 button Press...

Page 12: ...hen searching the drive and then the total number of files will appear Note The USB mode cannot be accessed until a flash drive is inserted 4 Press the Play Pause4 button to start playback if listenin...

Page 13: ...cho effect 9 AUTO VOICE CONTROL can be activated by pressing the AVC button The vocals on the multiplex recording will be muted when the singer starts to sing through the microphone When the singer st...

Page 14: ...layback press the REPEAT button once to repeatedly play the selected song 1 will display Press the REPEAT button a second time to repeatedly play all tracks A will display Press it again to cancel Rep...

Page 15: ...the Stop button TWICE to stop and clear the program 14 PAUSE During playback if you wish to pause the disc momentarily press the Play Pause4 button Press again to resume normal playback 15Press the St...

Page 16: ...uetooth option in settings to search for a discoverable device with a Bluetooth signal Select Singing Machine from the device results on the Bluetooth menu Note Also refer to the user manual of your B...

Page 17: ...the ON OFF switch on the microphone to the ON position 8 Adjust the MIC VOLUME control as desired Increasing this control will increase the volume of both microphones 9 Rotate the ECHO control to add...

Page 18: ...n to select the LINE IN mode AU will display and LINE IN will appear on the monitor 4 Connect the external unit to the LINE IN Jack on the front of this unit Connecting an external unit will allow the...

Page 19: ...this control will increase the volume of both microphones 8 Rotate the ECHO control to add an echo effect to your voice Rotate towards MAX to increase the echo effect 9 Adjust the balance between the...

Page 20: ...RD button again to stop RECORD BLUETOOTH MUSIC TO THE USB 4 Follow the Using a Bluetooth Device instruction to start the Bluetooth music playback 5 Insert a USB flash drive into the USB port on the un...

Page 21: ...ank CDR CDRW Where to Download MP3 G Files FAQ Where can I get additional help with the file formats While on the Singing Machine Store s web page simply click FILE FORMATS at the lower left Helpful H...

Page 22: ...e in circular motions This unit is designed to play only compact discs bearing the identification logos as shown here Other discs may not conform to the CD standard and may not play properly Compact d...

Page 23: ...clean the lens with a CD lens cleaner Moisture has formed Turn the unit off unplug the unit from the outlet and allow 20 30 minutes to dry No sound from the microphone Make sure it is firmly connected...

Page 24: ...0 240 V 50 60 Hz Dimensions 11 85 x 9 35 x 18 65 inches 301 0 x 237 5 x 473 8 mm Weight 11 57 lbs 5 25 kg with accessories Microphone 68 dB 600 Ohms impedance with 6 3 mm Dynamic Microphone Power DC12...

Page 25: ...The Singing Machine Company Inc 4060 E Jurupa Street Unit B Ontario CA 91761 1413 USA PRINTED IN CHINA 890BT 1708 ENG01 Visit Our Website www singingmachine com...

Reviews: