— E4 —
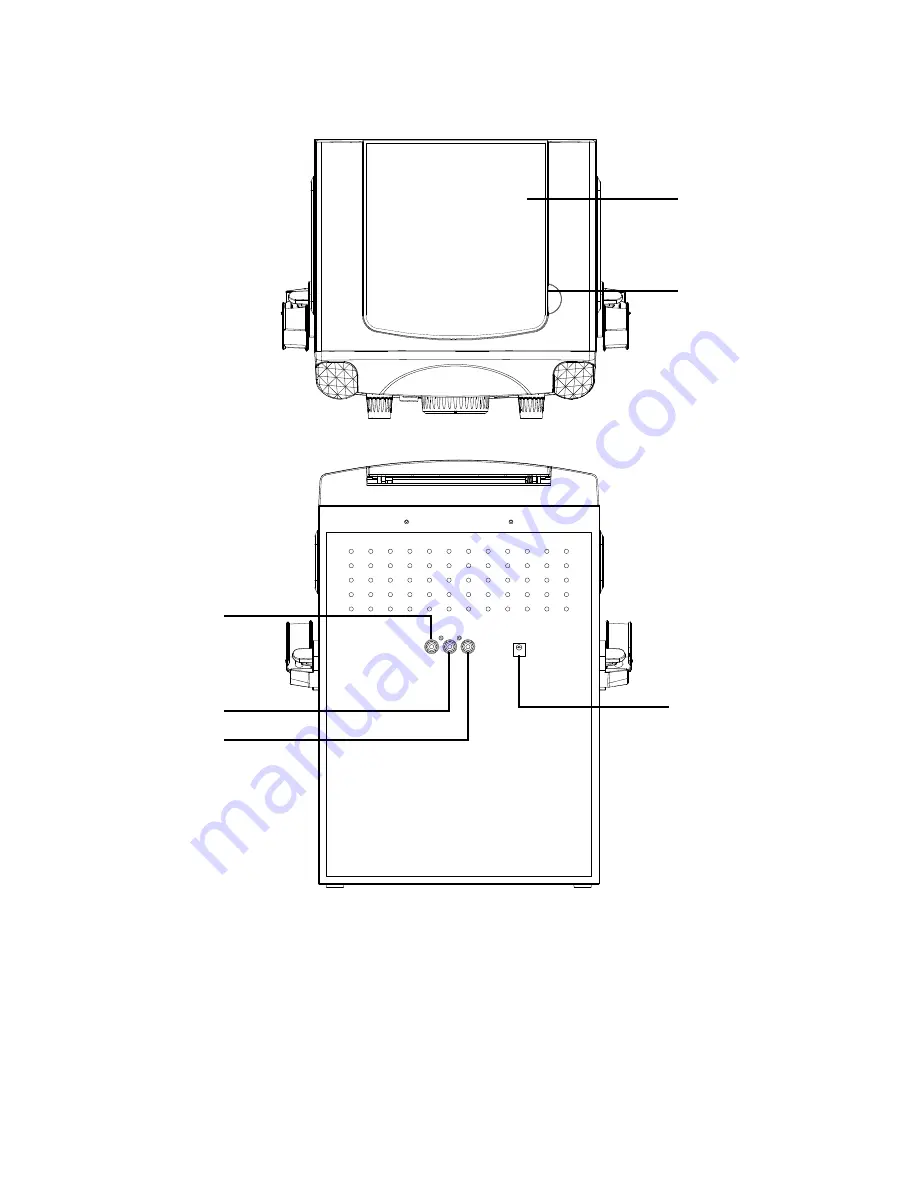
Location of Controls (Top/Rear)
REAR VIEW
3. VIDEO OUT Jack4. AUDIO OUT Jack (R)5. AUDIO OUT Jack (L)6. DC IN Jack (5.8V)
TOP VIEW
1. CD Door2. CD open
u
v
w
xy
U
Page 1: ...ONES MODE D EMPLOI www singingmachine com The Singing Machine is a registered trademark of The Singing Machine Co Inc The Singing Machine es una marca registrada de The Singing Machine Co Inc The Singing Machine est une marque déposée de The Singing Machine Co Inc ...
Page 2: ...can radiate radio frequency energy and if not installed and used in accordance with the instructions may cause harmful interference to radio communications However there is no guarantee that interference will not occur in a particular installation If this equipment does cause harmful interference to radio or television reception which can be determined by turning the equipment off and on the user ...
Page 3: ... E2 Included What s in the box Wired Microphone Main Unit Audio Video Cables AC Adapter Manual Welcome Kit ...
Page 4: ... LINE IN Jack 12 MASTER VOLUME Control 13 Play Pause Button 14 Stop Button 15 Skip Forward Button 16 MIC VOLUME control 17 RECORD Button 18 Record Indicator 19 DISCO LIGHT Button 20 Skip10 Button MP3 21 ECHO Control 22 Mic Holder 23 Mic 2 jack 24 Mic 1 jack 25 Speaker 26 CDG Indicator 27 Play Pause Indicator 28 Program Indicator 29 Repeat Indicator w v x y U V u X W W at ak al am an ao ap aq aras ...
Page 5: ... E4 Location of Controls Top Rear REAR VIEW 3 VIDEO OUT Jack 4 AUDIO OUT Jack R 5 AUDIO OUT Jack L 6 DC IN Jack 5 8V TOP VIEW 1 CD Door 2 CD open u v w x y U ...
Page 6: ... OF TV To output the video lyrics and audio to your TV perform the following steps Connect the RCA video cable Yellow to the VIDEO OUT jack and the audio cables White and Red to the AUDIO OUT jacks located on the back of the Singing Machine Connect the opposite end of the RCA video cable Yellow to the VIDEO IN jack and the audio cables White and Red to the AUDIO IN on your TV Notes This unit can b...
Page 7: ...Make all connections before connecting to AC power Connect an external device by using an appropriate cable 3 5mm audio cable not included as shown Note See page 17 to select and use the LINE IN function LINE IN To External Unit AUDIO OUTPUT HEADPHONE JACK Disco Lights 1 Press the LIGHT button to switch on the lighting effect press again to switch off u ...
Page 8: ... anything other than a CD in the compartment as foreign objects can damage the unit If no disc is inserted NO will appear on the display If connected to a TV and or other audio source adjust the volume of the external unit using its own volume control 3 Repeatedly press the CDG USB BT button to select the CDG mode will appear when searching the disc and then the total number of tracks will appear ...
Page 9: ...fect 9 AUTO VOICE CONTROL can be activated by rotating the AVC control The higher this control is set to the more the vocals on the multiplex recording will be muted when the singer starts to sing through the microphone When the singer stops singing the recorded vocals on the multiplex recording will resume to normal 10 Rotate the BALANCE control clockwise to hear the music and recorded vocals fro...
Page 10: ...u can program up to 20 tracks on any disc for playback in any desired order While in the Stop mode press the PROG REP button the Program indicator will blink and P00 will appear Select the first track using the Skip Back 9 Skip Forward buttons Press the PROG REP button again to confirm the entry After selecting the desired tracks the display will show P01 P02 etc recognizing the tracks selected ha...
Page 11: ...playback if you wish to pause the disc momentarily press the PLAY PAUSE button the PLAY PAUSE indicator will blink Press again to resume normal playback 15Press the STOP button to stop playback 16Press the power ON OFF button to turn the unit off an ao ap ...
Page 12: ...on to select the USB mode usb will appear when searching the drive and then the total number of files will appear Note The USB mode cannot be accessed until a flash drive is inserted 4 Press the PLAY PAUSE button to start playback if listening to an MP3 G file the image and lyrics will appear on the TV screen if connected 5 Adjust the volume to a comfortable level using the MASTER VOLUME control N...
Page 13: ...MAX to increase the echo effect 9 AUTO VOICE CONTROL can be activated by rotating the AVC control The higher this control is set to the more the vocals on the multiplex recording will be muted when the singer starts to sing through the microphone When the singer stops singing the recorded vocals on the multiplex recording will resume to normal 10Rotate the BALANCE control clockwise to hear the mus...
Page 14: ...continue when you release the button During Stop mode you can also select a file using the 9 or buttons to scroll right left 12REPEAT During playback press the REP PROG button once during playback the REP indicator will blink and the current track will be repeated Press the REP PROG button twice the REP indicator will blink all MP3 tracks inside the current folder will be repeated continuously Pre...
Page 15: ... 9 or buttons then press the REP PROG button Repeat to set up to 20 tracks into memory When done press the PLAY PAUSE button to start playback Note Press the STOP button TWICE to stop and clear the program 14PAUSE During playback if you wish to pause the music momentarily press the PLAY PAUSE ENTER button Press again to resume normal playback 15Press the STOP button to stop playback 16Press the ON...
Page 16: ...tooth menu bt will light solid in the display The Bluetooth indicator will light and a successful pairing sound will be heard Note Also refer to the user manual of your Bluetooth device for detailed instructions 4 The Bluetooth indicator will light and a successful pairing sound will be heard Notes If your Bluetooth prompts you for a passcode during the pairing process please enter 0000 to connect...
Page 17: ...ice 7 Connect microphone s and slide the ON OFF switch on the microphone to the ON position 8 Adjust the MIC VOLUME control as desired Increasing this control will increase the volume of both microphones 9 Rotate the ECHO control to add an echo effect to your voice Rotate towards MAX to increase the echo effect 10Adjust the balance between the speakers using the BALANCE control 11SKIP Advance or g...
Page 18: ...inging Machine LINE IN function is automatically selected once the audio cable is plugged in Notes It is highly recommended to set the volume on the auxiliary unit to 1 3 or lower to avoid distortion Skipping files tracks is not possible on this unit when using an external device 3 Adjust the volume using the MASTER VOLUME control on this unit or your external device s volume control 4 Connect mic...
Page 19: ...ing this control will increase the volume of both microphones 6 Rotate the ECHO control to add an echo effect to your voice Rotate towards MAX to increase the echo effect 7 Adjust the balance between the speakers using the BALANCE control 8 Press the power ON OFF button to turn the unit off y U W V ...
Page 20: ...ress the REC button the REC indicator will light up the song will start over and recording begin When recording is finished press the REC button again to stop RECORD BLUETOOTH MUSIC TO THE USB 4 Follow the Using a Bluetooth Device instruction described on page 15 page 16 to start the Bluetooth music playback 5 Insert a USB flash drive into the USB port on the unit press the REC button the REC indi...
Page 21: ...or will light up the song will be recording right the way When recording is finished press the REC button again to stop 9 All recorded music or recorded singing will be in the folder labelled REC CDG CD music or singing recording will be started naming from TRK01 If CDG music is recorded the graphic file will also be recorded Bluetooth music or singing recording will be started naming from BT and ...
Page 22: ...onnect the USB flash drive FAQ Where can I get additional help with the file formats While on the Singing Machine Store s web page simply click FILE FORMATS at the lower left To purchase and download karaoke music please visit http store singingmachine com to access over 12 000 of your favourite karaoke songs You will need a USB flash drive not in cluded to transfer the downloads to this unit Foll...
Page 23: ...allow you to view the lyrics on the TV screen Nothing will appear on the TV screen when using LINE IN or Bluetooth File s on USB Jack not playing The file is corrupted replace the file The file is not in a format this unit will play The connected USB device is not supported by the product No sound from the microphone Make sure the microphone is firmly connected to the MIC 1 or MIC 2 jack Make sure...
Page 24: ... Maximum Compatibility 32GB AUX IN SECTION 3 5 mm Stereo Headphone Jack MICROPHONE 74db 600 Ohm Impedance with 6 3 mm Dynamic Microphone POWER SECTION DC 5 8V 1 5A POWER CONSUMPTION 8 7 W DIMENSIONS HxWxD 12 8 x 7 8 x 8 5 inches 32 5 x 19 8 x 21 5 cm WEIGHT 5 0 lbs 2 2 kgs Specifications are subject to change without notice The Bluetooth word mark and logos are registered trademarks owned by Bluet...
Page 25: ...revisto VERIFICACIÓN DE SEGURIDAD Este dispositivo está fabricado y evaluado en cumplimiento de los estándares de seguridad de la FCC requisitos y cumplimiento de rendimiento de seguridad del Departamento de Salud y Servicios Humanos de EE UU y también la FDA Subcapítulo 21 del Código de reglamentos federales Estándares de rendimiento de radiación Advertencias Este reproductor de CD utiliza un haz...
Page 26: ... S2 Se incluyen Contenido de la caja Micrófono con cable Unidad principal Cables de Audio Video Adaptador de CA Manual Kit de bienvenida ...
Page 27: ...N PRINCIPAL MASTER VOLUME 13 Botón Reproducir Pausar Play Pause 14 Botón de Detener Stop 15 Botón Salto hacia adelante Skip Forward 16 Control de VOLUMEN DEL MICRÓFONO MIC VOLUME 17 Botón de GRABAR RECORD 18 Indicador de grabación 19 Botón LUZ DE DISCO 20 Botón de Saltar 10 MP3 21 Control de ECO ECHO 22 Porta micrófono 23 Conector para micrófono 2 24 Conector para micrófono 1 25 Altavoz 26 Indicad...
Page 28: ... S4 Ubicación de los controles Superior reverso Reverso 3 SALIDA DE VIDEO 4 SALIDA DE AUDIO R 5 SALIDA DE AUDIO L 6 Conector de entrada de CC 5 8V VISTA SUPERIOR 1 Tapa del CD 2 CD abierto u v w x y U ...
Page 29: ...ue se reproduzca el video las letras y el audio en su televisor siga los siguientes pasos Conecte el cable de video RCA amarillo a la SALIDA DE VIDEO VIDEO OUT y los cables de audio blanco y rojo a las SALIDAS DE AUDIO AUDIO OUT ubicadas en la parte trasera de la máquina Singing Machine Conecte el otro extremo del cable de video RCA amarillo a la ENTRADA DE VIDEO VIDEO IN y los cables de audio bla...
Page 30: ...hufar a la corriente de CA Conecte su dispositivo externo utilizando un cable adecuado no se incluye el cable de audio de 3 5mm como se muestra Nota Consulte la página S17 para seleccionar y utilizar la función de entrada de línea LINE IN A Unidad Externa SALIDA DE AUDIO AURICULARES Luces de disco 1 Oprima el botón LUZ LIGHT para encender el efecto de luz oprímalo nuevamente para apagarlo u ...
Page 31: ... un CD en el compartimiento como por ejemplo objetos extraños que puedan dañar la unidad Si no introdujo un disco NO DISC aparecerá en la pantalla de LCD Si se conecta a un televisor u otra fuente de audio ajuste el volumen del televisor con su propio control de volumen 3Presione varias veces el botón CDG USB BT para seleccionar el modo CDG CD aparecerá cuando busque el disco Luego aparecerá la ca...
Page 32: ...X para aumentar el efecto de eco 9 Puede activarse el control de AVC Control Automático de Voz girando este control Cuanto más alto se ajuste este control más se silenciarán las voces de la grabación multiplex cuando el cantante comience a cantar ante el micrófono Cuando el cantante deje de cantar las voces grabadas en la grabación multiplex volverán a la normalidad 10 Gire el control BALANCE haci...
Page 33: ...ente para cancelar la función Repetir el indicador REPETIR PROGRAMAR REPEAT PROGRAM se apagará 13 PROGRAMAR Puede programar hasta 20 pistas de cualquier disco para reproducir en el orden deseado Mientras se encuentre en el modo Detener Stop presione REPETIR PROGRAMAR REPEAT PROGRAM el indicador Programar Program parpadeará y aparecerá P00 Seleccione la primera pista con los botones Salto hacia atr...
Page 34: ...ima DOS VECES DETENER STOP para detener y eliminar el programa 14 PAUSAR PAUSE Durante la reproducción si desea pausar momentáneamente el disco oprima REPRODUCIR PAUSAR PLAY PAUSE el indicador REPRODUCIR PAUSAR PLAY PAUSE parpadeará Oprima nuevamente para reanudar la reproducción normal 15 Oprima DETENER STOP para detener la reproducción 16 Oprima ENCENDIDO APAGADO ON OFF para apagar la unidad an ...
Page 35: ...B aparecerá LEER USB READ USB cuando busque el dispositivo y después aparecerá la cantidad total de archivos Nota No se puede acceder al modo USB hasta que no se introduce un dispositivo flash 4 Presione el botón REPRODUCIR PAUSA PLAY PAUSE para comenzar la reproducción Si está escuchando un archivo MP3 G la imagen y la letra aparecerán en la pantalla del televisor si está conectado 5 Ajuste el vo...
Page 36: ...le un efecto de eco a su voz Gire hacia MAX para aumentar el efecto de eco 9 Puede activarse el control de AVC girando este control Cuanto más alto se ajuste este control más se silenciarán las voces de la grabación multiplex cuando el cantante comience a cantar ante el micrófono Cuando el cantante deje de cantar las voces grabadas en la grabación multiplex volverán a la normalidad 10 Gire el cont...
Page 37: ...te el modo Detener Stop puede seleccionar también un archivo usando los botones 9 o para desplazarse a la derecha izquierda 12 REPETIR REPEAT Durante la reproducción presione el botón REPETIR PROGRAMAR REP PROG una vez el indicador de REPETIR REP parpadeará y se repetirá la pista actual Oprima dos veces el botón REPETIR PROGRAMAR REP PROG el indicador de REPETIR REP parpadeará y todas las pistas M...
Page 38: ...REP PROG Repita hasta agregar un máximo de 20 pistas a la memoria Al finalizar presione el botón REPRODUCIR PAUSAR PLAY PAUSE para comenzar la reproducción Nota Oprima DOS VECES el botón de DETENER STOP para detener y eliminar el programa 14PAUSAR PAUSE Durante la reproducción si desea pausar momentáneamente el disco oprima REPRODUCIR PAUSAR PLAY PAUSE el indicador REPRODUCIR PAUSAR PLAY PAUSE par...
Page 39: ... los resultados del dispositivo en el menú de Bluetooth quedará encendido bt en la pantalla Nota También consulte el manual de usuario de su dispositivo con Bluetooth para más instrucciones 4 El indicador de Bluetooth se encenderá y se oirá un sonido que indicará emparejamiento exitoso Notas Si su dispositivo con Bluetooth le pide un código durante el proceso de emparejamiento ingrese 0000 para co...
Page 40: ... Bluetooth 7 Conecte los micrófonos y ubique el interruptor de ENCENDIDO APAGADO ON OFF del micrófono en la posición de ENCENDIDO ON 8 Ajuste el control de VOLUMEN DEL MICRÓFONO MIC VOLUME hasta el nivel deseado Al aumentar el nivel de este control se incrementará el volumen de los dos micrófonos 9 Gire el control de ECO ECHO para darle un efecto de eco a su voz Gire hacia MAX para aumentar el efe...
Page 41: ...Singing Machine La función ENTRADA DE LÍNEA LINE IN se selecciona automáticamente una vez que el cable de audio se enchufe Notas Se recomienda que configure el volumen en la unidad auxiliar a 1 3 o menos para evitar distorsiones No es posible saltar archivos o pistas cuando se usa un dispositivo externo 3Ajuste el volumen con el control de VOLUMEN PRINCIPAL MASTER VOLUME de esta unidad o con el co...
Page 42: ... deseado Al aumentar el nivel de este control se incrementará el volumen de los dos micrófonos 6Gire el control de ECO ECHO para darle un efecto de eco a su voz Gire hacia MAX para aumentar el efecto de eco 7Para regular el balance entre los altavoces utilice el control BALANCE 8Oprima ENCENDIDO APAGADO ON OFF para apagar la unidad y U W V ...
Page 43: ...indicador REC se encenderá la canción comenzará a reproducirse y se iniciará la grabación Cuando se finalice de grabar oprima nuevamente GRABACIÓN REC para detener la grabación GRABAR MÚSICA DE BLUETOOTH EN EL DISPOSITIVO USB 4Siga las instrucciones de Utilizar un dispositivo Bluetooth que aparecen en las páginas S15 y S16 para comenzar la reproducción de música de Bluetooth 5 Inserte un dispositi...
Page 44: ...á la grabación comenzará de inmediato Cuando finalice la grabación oprima nuevamente GRABACIÓN REC para detener la misma 9 La música grabada o las canciones que haya grabado estarán en la carpeta con la etiqueta REC La música o canciones de CDG CD que se hayan grabado se guardarán en orden comenzando por TRK01 Si se graba música de CDG el archivo gráfico también se grabará La música o canciones de...
Page 45: ...l Singing Machine Digital Locker a su dis positivo flash USB 4 Introduzca el dispositivo flash USB como se muestra en la página S11 y disfrute Nota Sus canciones descargadas también se pueden grabar en un CDR CDRW Recomendaciones útiles Los archivos mp3 y cdg están disponibles para descargarse en un único archivo comprimido MP3 G zip El archivo MP3 G no se puede reproducir como un archivo zip en u...
Page 46: ... las letras de las canciones en la pantalla del televisor No aparecerá nada en la pantalla del televisor cuando utilice Entrada de línea Line In o Bluetooth No se reproducen los archivos en la entrada USB El archivo está dañado reemplácelo El archivo no está en un formato que esta unidad pueda reproducir El producto no admite el dispositivo de USB conectado No hay sonido desde el micrófono Asegúre...
Page 47: ...d máxima 32GB Sección de entrada auxiliar aux in Entradas Para Micrófono De 3 5 mm Micrófono Impedancia Con Micrófono Dinámico 74 dB 600 Ohm Con 6 3 mm Energía DC 5 8V 1 5A Consumo de energía 8 7 W Dimensiones HxWxD 12 8 x 7 8 x 8 5 inches 32 5 x 19 8 x 21 5 cm Peso 5 0 lbs 2 2 kgs Las Especificaciones Están Sujetas A Cambios Sin Previo Aviso El nombre de la marca Bluetooth y los logotipos son mar...
Page 48: ...mes de sécurité de la FCC ainsi que les exigences et la conformité du rendement en matière de sécurité du ministère de la santé et des services sociaux des États Unis et des normes de rendement de radiation dans le sous chapitre du 21 CFR Mise en garde Ce lecteur de CD est muni d un faisceau de lumière au laser Seul un technicien qualifié devrait retirer le couvercle et tenter toute réparation ou ...
Page 49: ... F2 Contenu Qu y a t il dans la boîte Microphone câblé Unité principale Câbles audio vidéo Adaptateur CA Manuel Ensemble de bienvenue ...
Page 50: ... sortie 12 COMMANDE DE VOLUME MAITRE 13 Bouton Lecture Pause 14 Bouton Arrêt 15 Saut avant bouton 16 Contrôle du VOLUME du micro 17 Bouton d ENREGISTREMENT 18 Indicateur d enregistrement 19 Bouton de la lumière DISCO 20 SAUT 10 bouton MP3 21 Contrôle ECHO 22 Support du MIC 23 Prise MIC 2 24 Prise MIC 1 25 Haut parleur 26 Indicateur CDG 27 Indicateur Lecture Pause 28 Indicateur de programmes 29 Ind...
Page 51: ...mplacement des commandes arrière devant RÉTROVISEUR 3 Prise de SORTIE vidéo 4 Prise de SORTIE Audio D 5 Prise de SORTIE Audio G 6 Prise de sortie DC 5 8V VUE D ENSEMBLE 1 Porte du CD 2 CD ouvert u v w x y U ...
Page 52: ...des paroles de chansons et le son de votre téléviseur veuillez suivre les étapes suivantes Connectez le câble vidéo RCA jaune à la prise VIDÉO OUT et les câbles audio blanc et rouge aux prises AUDIO OUT situés à l arrière du Singing Machine Connectez l autre extrémité du câble vidéo RCA jaune à la prise VIDÉO IN et les câbles audio blanc et rouge aux prises AUDIO IN situés sur votre téléviseur Rem...
Page 53: ...ions avant de brancher le cordon d alimentation Raccordez simplement votre appareil externe en utilisant un câble audio approprié câble audio 3 5 mm non inclus tel qu illustré Remarque Voir la page F17 pour sélectionner et utiliser la fonction LINE IN LINE IN Vers l unité externe SORTIE AUDIO PRISE DU CASQUE Lumières Disco 1 Appuyer le bouton LIGHT pour allumer l effet de luminosité appuyer de nou...
Page 54: ... CD dans le compartiment car les objets étrangers peuvent endommager l appareil S il n y a aucun disque d inséré la mention Non s affiche à l écran Si connecté à un téléviseur ou à une autre source audio réglez le volume du téléviseur en utilisant sa propre commande de volume 3 Appuyez plusieurs fois sur la touche CDG USB BT pour sélectionner le mode CDG CD la mention s affiche lors de la recherch...
Page 55: ... L option CONTRÔLE AUTOMATIQUE DE LA VOIX peut être activé en tournant le A V C Plus le contrôle est réglé à un haut niveau plus les voix sur l enregistrement multiplex seront mis en sourdine lorsque le chanteur commence à chanter dans le microphone Lorsque le chanteur arrête de chanter les voix enregistrés sur l enregistrement multiplex se nivelleront en mode normal 10 Faire pivoter la commande B...
Page 56: ...tion Répéter l indicateur RÉPÉTER PROGRAMME s éteint 13 PROGRAMME Vous pouvez programmer jusqu à 20 pistes sur n importe quel disque pour la lecture dans n importe quel ordre souhaité En mode arrêt appuyer sur le bouton PROG REP l indicateur de programmes clignotera et apparaîtra P00 Sélectionner la première piste utilisant les boutons Skip Back 9 Skip Forward Appuyer le bouton PROG REP pour confi...
Page 57: ...me 14PAUSE Durant la lecture si vous désirez arrêter le disque momentanément appuyez sur LECTURE PAUSE PLAY PAUSE l indicateur clignote Appuyez à nouveau pour reprendre la lecture normale 15Appuyez sur la touche ARRÊT STOP pour arrêter l enregistrement 16Appuyez sur la touche MARCHE ARRÊT ON OFF pour éteindre l appareil an ao ap ...
Page 58: ...ner le mode USB USB apparaîtra lors de la recherche du lecteur et alors le nombre total de fichiers apparaîtra Remarque Le mode USB n est pas accessible tant qu une carte mémoire n est pas insérée 4Appuyer le bouton LECTURE PAUSE pour lancer la lecture si vous écoutez un fichier MP3 G l image et les paroles apparaîtront sur l écran du téléviseur si connecté 5 Ajustez le volume à un niveau conforta...
Page 59: ... effet écho 9 L option CONTRÔLE AUTOMATIQUE DE LA VOIX peut être activé en tournant le A V C Contrôle automatique de la voix Plus le contrôle est réglé à un haut niveau plus les voix sur l enregistrement multiplex seront mis en sourdine lorsque le chanteur commence à chanter dans le microphone Lorsque le chanteur arrête de chanter les voix enregistrés sur l enregistrement multiplex se nivelleront ...
Page 60: ...continuera lorsque vous relâcherez le bouton Durant le mode arrêt vous pouvez également sélectionner un fichier utilisant le 9 ou les boutons pour faire défiler droite gauche 12RÉPÉTER Pendant la lecture appuyer le bouton REP PROG une fois pendant la lecture l indicateur REP clignotera et la piste en cours sera répétée Appuyer deux fois sur le bouton REP PROG l indicateur REP clignotera toutes les...
Page 61: ...n REP PROG Répéter pour définir jusqu à 20 pistes dans la mémoire Une fois terminé appuyez le bouton PLAY PAUSE pour lancer la lecture Remarque Appuyez sur la touche ARRÊT STOP DEUX FOIS pour arrêter et supprimer le programme 14PAUSE Durant la lecture si vous désirez arrêter le disque momentanément appuyez sur LECTURE PAUSE PLAY PAUSE l indicateur clignote Appuyez à nouveau pour reprendre la lectu...
Page 62: ... résultats de l appareil sur le menu Bluetooth bt s allumera pleine couleur sur l écran Remarque Aussi se référer au manuel d utilisation de votre appareil Bluetooth pour des instructions détaillées 4 L indicateur Bluetooth s allumera et un son d appairage réussi sera entendu Remarque Si votre dispositif Bluetooth vous demande d inscrire un mot de passe au cours du processus de jumelage veuillez i...
Page 63: ...Bluetooth 7 Connectez le s micro s puis glissez l interrupteur MARCHE ARRÊT sur le micro à la position MARCHE 8 Réglez le VOLUME DU MICROPHONE MIC VOLUME au niveau souhaité Le fait de monter ce réglage augmente le volume du des microphone s connecté s 9 Réglez la commande ÉCHO ECHO pour appliquer un effet d écho à votre voix Tourner vers la mention MAX pour augmenter l effet écho 10 Ajustez la bal...
Page 64: ...La fonction LINE IN est automatiquement sélectionnée une fois que le câble audio est connecté Remarques Il est fortement recommandé de régler le volume de l appareil auxiliaire à 1 3 du niveau ou plus bas pour éviter toute distorsion Il n est pas possible de passer des fichiers pistes lorsque vous utiliser un appareil externe 3 Réglez le volume en utilisant la commande de VOLUME PRINCIPAL MASTER V...
Page 65: ...onter ce réglage augmente le volume du micro 6 Réglez la commande ÉCHO ECHO pour appliquer un effet d écho à votre voix Tourner vers la mention MAX pour augmenter l effet écho 7 Ajustez la balance entre les haut parleurs en utilisant les commandes BALANCE 8 Appuyez sur la touche MARCHE ARRÊT ON OFF pour éteindre l appareil y U W V ...
Page 66: ...indicateur REC s allumera la chanson recommencera et l enregistrement débutera Lorsque l enregistrement est terminé appuyer encore le bouton REC pour arrêter ENREGISTRER LA MUSIQUE BLUETOOTH AU PORT USB 4Suivre les instructions du paragraphe utilisation d un périphérique Bluetooth décrite aux pages 15 et 16 pour commencer la lecture de la musique Bluetooth 5 Insérer une clé USB dans le port USB de...
Page 67: ...registrement est terminé appuyer encore le bouton REC pour arrêter 9 Toute musique enregistrée ou chanson enregistrée seront dans le fichier étiqueté REC La musique ou enregistrement de chanson CDG CD seront sauvegardés dans l ordre en commençant avec TRK01 Si la musique CDG est enregistrée le fichier graphique est également enregistré La musique Bluetooth ou l enregistrement d une chanson seront ...
Page 68: ...tir du casier Singing Machine Digital vers disque USB flash 4 Insérez le lecteur USB flash comme démontré à la page F11 et amusez vous Remarques Vos chansons téléchargées peuvent aussi être gravées sur un disque compact CDR CDRW Conseils pratiques Les fichiers mp3 et cdg sont fournis en téléchargement dans un seul fichier zip MP3 G compressé Il n est pas possible d effectuer la lecture du fichier ...
Page 69: ...ent vous permettre de voir les paroles sur l écran de votre téléviseur Rien ne s affiche à l écran du téléviseur lorsque vous utilisez LINE IN ou Bluetooth Les fichiers sur la clé USB ne s ouvrent pas Le fichier est corrompu remplacez le fichier Le fichier n est pas dans un format de lecture compatible Le dispositif USB n est pas compatible à l appareil Aucun son provenant du microphone Assurez vo...
Page 70: ...Compatibilité maximale 32GB SECTION AUX IN 3 5 mm prise d écouteurs stéréo MICROPHONE 74db 600 Ohm impédance avec microphone dynamique de 6 3 mm SECTION PUISSANCE DC 5 8V 1 5A CONSOMMATION D ÉNERGIE 8 7 W DIMENSIONS H x L x P 12 8 x 7 8 x 8 5 inches 32 5 x 19 8 x 21 5 cm Poids 5 0 lbs 2 2 kgs Caractéristiques sujettes à modifications sans préavis Le nom de marque et les logos Bluetooth sont des ma...
Page 71: ...net au www singingmachine com The Singing Machine Company Inc 4060 E Jurupa Street Unit B Ontario CA 91761 1413 USA Copyright 2018 All Rights Reserved Derechos de autor 2018 Todos los derechos reservados Droit d auteur 2018 Tous Droits Réservés PRINTED IN CHINA IMPRESO EN CHINA IMPRIMÉ EN CHINE 625BT 1801 ESF01 US ...