background image

— F11 —

Fonctionnement

Lire un CD (Suite)

14


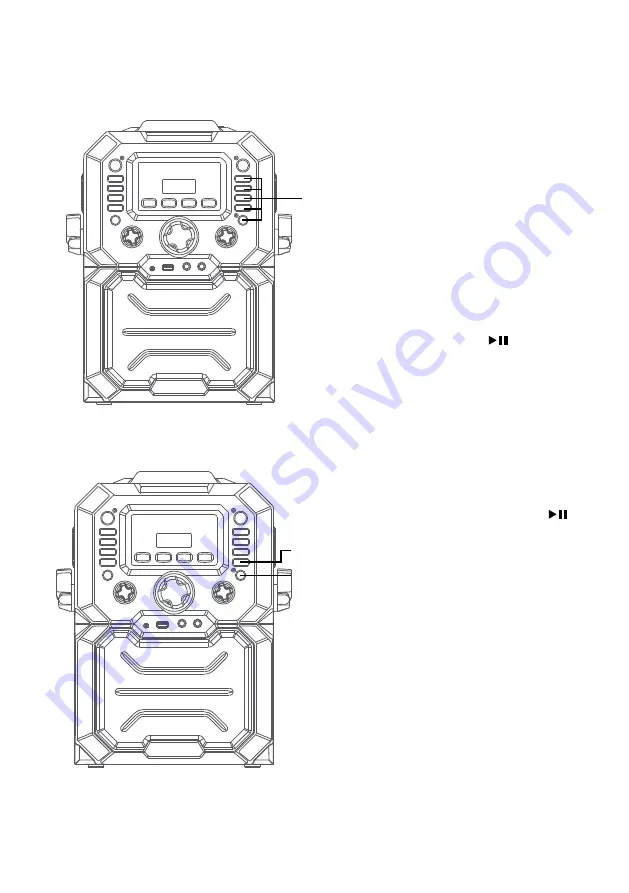
PROGRAM:

 Vous pouvez 

programmer jusqu’à 20 pistes de 

n’importe quel disque pour les lire 

dans l’ordre que vous souhaitez. 

Lorsque l’appareil est en mode Stop, 

Sélectionnez le premier titre en 

utilisant les boutons 

SAUT


9

 et 

:

.  

Appuyez de nouveau sur le bouton 

RÉPÉTER/PROGRAMMER

 pour 

confirmer la saisie. 


Répétez cette opération pour 

programmer jusqu’à 20 titres dans 

la mémoire. Lorsque vous avez 

terminé, appuyez sur le bouton 

LECTURE/PAUSE 

/JUMELER


pour lancer lalecture.

Remarques sur la programmation :

•  Appuyez DEUX FOIS sur le bouton 

ARRÊT


pour arrêter et effacer le programme.

•  Si vous essayez de programmer plus de 

20 titres, “FUL” apparaîtra sur l’écran.

15


PAUSE:


Lors de la lecture, si vous 

souhaitez temporairement mettre 

le disque en pause, appuyez sur 

le bouton 

LECTURE/PAUSE 

/

JUMELER

; le voyant PLAY/PAUSE 

se met à clignoter. Appuyez de 

nouveau pour retourner à la lecture 

normale.

16

  Appuyez sur le bouton 

ARRÊT


 pour 

arrêter la lecture.

an

ao

ap

Summary of Contents for SML271BK/W

Page 1: ...S MODE D EMPLOI www singingmachine com The Singing Machine is a registered trademark of The Singing Machine Co Inc The Singing Machine es marca registrada de The Singing Machine Co Inc Singing Machine...

Page 2: ...ation If this equipment does cause harmful interference to radio or television reception which can be determined by turning the equipment off and on the user is encouraged to try to correct the interf...

Page 3: ...E2 Included What s in the box Wired Microphone Main Unit Audio Video Cables AC Adapter Manual...

Page 4: ...Button 6 SKIP 10 Button 7 LIGHTS Button 8 Built in loop Songs Button 9 MIC VOLUME Control 10 Button 11 MASTER VOLUME Control 12 LINE IN Jack 13 USB Slot 14 Speaker 15 Record indicator 16 RECORD Butto...

Page 5: ...t Indicator 4 PLAY PAUSE Indicator 5 Program Indicator Location of Controls Display 4 5 1 3 2 CDG REPEAT PLAY PAUSE PROGRAM 1 CD compartment 2 Mic Holders 3 Cradle 4 VIDEO OUT Jack 5 AUDIO OUT Right J...

Page 6: ...deo cable Yellow to the VIDEO OUT jack and the audio cables White and Red to the AUDIO OUT jacks located on the back of the Singing Machine 2Connect the opposite end of the RCA video cable Yellow to t...

Page 7: ...21 to select and use the Line In function To External Unit AUDIO OUTPUT HEADPHONE JACK Connecting to Line Out Jack This unit can be connected to another audio system for greater audio output via 3 5mm...

Page 8: ...ed The lights will light up and will synchronize with sound when you speak or sing into the microphone Press the LIGHTSbutton for Light mode 2 which will display the light show but will not respond to...

Page 9: ...n the screen Never place anything other than a CD in the compartment as foreign objects can damage the unit If no disc is inserted no will appear on the screen If connected to a TV or other audio sour...

Page 10: ...ol as desired Increasing this control will increase the volume of both microphones 8 SING ALONG WITH BUILT IN VOICE CHANGERS There are 6 built in voice changers in this unit Turn the VOICE EFFECT knob...

Page 11: ...with this multiplex feature 12SKIP Advance or go back one track by pressing the SKIP9 or SKIP button SEARCH When playing any audio CD press and hold the SKIP9 or SKIP button The CD will search at hig...

Page 12: ...to 20 tracks into memory When done press the PLAY PAUSE PAIR button to start playback ProgramNotes Press the STOP button TWICE to stop and clear the program If more than 20 tracks are attempted to be...

Page 13: ...drive first then press the RECORD button the song will start over and recording will begin The record indicator will light solid Recording will stop when the song stop the record indicator will turn...

Page 14: ...nnected to a TV for USB playback 4 Press the PLAY PAUSE PAIR button to start playback if listening to an MP3 G file the image and lyrics will appear on the TV screen if connected Notes If connected to...

Page 15: ...re are 6 built in voice changers in this unit Turn the VOICE EFFECT knob and singer s voice will change as they sing into the microphone EF0 NONE EF1 ECHO EF2 FEMALE EF3 MALE EF4 CHIPMUNK EF5 ROBOT or...

Page 16: ...SKIP Advance or go back one track by pressing the SKIP9 or SKIP buttons You can also skip ahead 10 files tracks using the SKIP 10 or SKIP 10 button 13REPEAT During playback press the REPEAT PROG butto...

Page 17: ...the entry Repeat to set up to 20 tracks into memory When done press the PLAY PAUSE PAIR button to start playback Notes Press the STOP button TWICE to stop and clear the program If more than 20 tracks...

Page 18: ...d devices are present connect as shown in the next step Note You can also press and hold the PLAY PAUSE PAIR button to disconnect any paired devices in order to pair another device 3 Turn on your devi...

Page 19: ...e between speaker and Bluetooth enabled device does not exceed 30 feet 10 meters 5 To control your Bluetooth device from this unit press the PLAY PAUSE PAIR button to start playback music app must be...

Page 20: ...F0 NONE EF1 ECHO EF2 FEMALE EF3 MALE EF4 CHIPMUNK EF5 ROBOT or EF6 RADIO 10SING ALONG WITH BUILT IN LOOP SONGS There are 3 built in looped songs To select a song press SONGS button repeatedly To end s...

Page 21: ...press the RECORD button Recording will begin and the record indicator will light solid When done recording press the RECORD button again the record indicator will turn off Notes The recorded audio fi...

Page 22: ...chine Notes It is highly recommended to set the volume on the auxiliary unit to 1 3 or lower to avoid distortion Skipping files tracks is not possible in this unit when using an external device 3 Repe...

Page 23: ...t Turn the VOICE EFFECT knob and singer s voice will change as they sing into the microphone EF0 NONE EF1 ECHO EF2 FEMALE EF3 MALE EF4 CHIPMUNK EF5 ROBOT or EF6 RADIO 8 SING ALONG WITH BUILT IN LOOP S...

Page 24: ...ress the RECORD button Recording will begin and the record indicator will light solid When done recording press the RECORD button again the record indicator will turn off Notes The recorded audio file...

Page 25: ...ith the file formats Visit http singingmachine com smc music to get additional resources about the right type of FILE FORMAT for your system Helpful Hints The mp3 and cdg files are delivered for downl...

Page 26: ...on the TV screen when using Line In or Bluetooth No sound from the microphone Make sure the microphone is firmly connected to the MIC 1 or MIC 2 jack Make sure the Mic s ON OFF switch on the Mic is s...

Page 27: ...atibility 32GB GENERAL Power DC9V 1A Positive Center Dimensions Main Unit 9 1 x 13 8 x 14 9 inches 23 2 x 35 0 x 37 8cm Weight Main Unit 6 6Lbs 3 kgs Microphone 74 dB 600 Ohms impedance with 6 3 mm Dy...

Page 28: ...nformidad con las instrucciones puede causar interferencia perjudicial a las comunicaciones radiales No obstante no existe ninguna garant a de que no se produzca interferencia en una instalaci n en pa...

Page 29: ...S2 Se incluyen Aseg rese de que est n incluidos los siguientes elementos Micr fono con cable Unidad principal Adaptador de CA Cables de Audio Video Manual...

Page 30: ...Bot n 11 Control de VOLUMEN PRINCIPAL MASTER VOLUME 12 Conector de ENTRADA DE LA L NEA 13 Puerto USB 14 Altavoz 15 Indicador de grabaci n 16 Bot n GRABAR RECORD 17 Bot n REPETIR PROGRAMAR 18 Bot n pa...

Page 31: ...REPRODUCIR PAUSAR 5 Indicador de PROGRAMA Ubicaci n de los controles Pantalla 4 5 1 3 2 CDG REPEAT PLAY PAUSE PROGRAM 1 Compartimento de CD 2 Porta micr fono 3 Soporte 4 SALIDA DE VIDEO 5 Salida de Au...

Page 32: ...DE VIDEO VIDEO OUT y los cables de audio blanco y rojo a las SALIDAS DE AUDIO AUDIO OUT ubicadas en la parte trasera de la Singing Machine 2 Conecte el otro extremo del cable de video RCA amarillo a l...

Page 33: ...tes de enchufar a la alimentaci n de CA To External Unit AUDIO OUTPUT HEADPHONE JACK Conectando al conector de l nea de salida Line Out Esta unidad se puede conectar a otro sistema de audio para una m...

Page 34: ...m ticamente Las luces se encender n y se sincronizar n con el sonido cuando hable o cante por el micr fono Presione el bot n LUZ LIGHT para seleccionar el modo de luz 2 que mostrar las luces pero no r...

Page 35: ...de canciones en pantalla Nunca coloque nada que no sea un CD en el compartimiento como por ejemplo objetos extra os que puedan da ar la unidad Si no se introdujo ning n disco aparecer NO en la pantall...

Page 36: ...nivel de este control se incrementar el volumen de los dos micr fonos 8 MICR FONOPARACANTAR CONMODIFICADORESDEVOZ INCORPORADOS Hay 6 efectos de cambio de voz incorporados en la unidad Gire la perilla...

Page 37: ...lex 12 Avance o retroceda una pista oprimiendo los botones de SALTO9 o B SQUEDA Cuando reproduzca cualquier CD de audio oprima y mantenga oprimido SALTO9 o El CD buscar a alta velocidad en direcci n h...

Page 38: ...parpadear y aparecer 01 Al finalizar presione el bot n REPRODUCIR PAUSAR EMPAREJAR PLAY PAUSE PAIR para comenzar la reproducci n Notas Oprima DOSVECESDetener STOP para detener y eliminar el programa...

Page 39: ...e iniciar la grabaci n El indicador de grabaci n se iluminar sin parpadear Cuando finalice de grabar oprima nuevamente GRABAR RECORD para detener la grabaci n El indicador de grabaci n se apagar 18 Op...

Page 40: ...vo flash 4 Presione el bot n REPRODUCIR PAUSAR EMPAREJAR PLAY PAUSE PAIR para comenzar la reproducci n Si est escuchando un archivo MP3 G la imagen y la letra aparecer n en la pantalla del televisor s...

Page 41: ...e voz incorporados en la unidad Gire la perilla de EFECTOS DE VOZ VOICE EFFECT y la voz de la persona que canta cambiar cuando cante con el micr fono La pantalla mostrar lo siguiente EF0 NINGUNO EF1 E...

Page 42: ...hivos grabados con esta funci n multiplex 12 Avance o retroceda una pista oprimiendo los botones de SALTO 9 o Tambi n puede saltar 10 archivos pistas hacia adelante con el bot n SALTO10 SKIP10 y hacia...

Page 43: ...eproducci n Notas Oprima DOSVECESDetener STOP para detener y eliminar el programa Si se intentan programar m s de 20 pistas saparecer FUL en la pantalla 15PAUSAR PAUSE Durante la reproducci n si desea...

Page 44: ...antener el bot n REPRODUCIR PAUSAR EMPAREJAR PLAY PAUSE PAIR para desconectar cualquier dispositivo ya sincronizado para sincronizar otro dispositivo 3 Encienda la opci n Bluetooth en su dispositivo d...

Page 45: ...dispositivo con Bluetooth desde esta unidad oprima REPRODUCIR PAUSAR EMPAREJAR PLAY PAUSE PAIR para comenzar la reproducci n la aplicaci n de m sica debe estar abierta Presione RREPRODUCIR PAUSAR EMP...

Page 46: ...NINGUNO EF1 ECO EF2 FEMENINA EF3 MASCULINA EF4 ARDILLA EF5 ROBOT o EF6 RADIO 10 CANTARACOROCONCANCIONES INCORPORADASENCIRCUITO Se incluyen 3 canciones integradas que se repiten Para seleccionar una c...

Page 47: ...o y tambi npara grabar m sica oprima el bot n GRABAR RECORD El indicador de grabaci n se iluminar sin parpadear Cuando termine de grabar presione el bot n GRABAR RECORD nuevamente El indicador de grab...

Page 48: ...EA LINE IN se selecciona autom ticamente una vez que el cable de audio se enchufa Notas Se recomienda que configure el volumen en la unidad auxiliar a 1 3 o menos para evitar distorsiones No es posibl...

Page 49: ...EFFECT y la voz de la persona que canta cambiar cuando cante con el micr fono La pantalla mostrar lo siguiente EF0 NINGUNO EF1 ECO EF2 FEMENINA EF3 MASCULINA EF4 ARDILLA EF5 ROBOT o EF6 RADIO 8 CANTAR...

Page 50: ...a el bot n GRABAR RECORD El indicador de grabaci n se iluminar sin parpadear Cuando termine de grabar presione el bot n GRABAR RECORD nuevamente El indicador de grabaci n se apagar Nota El contenido d...

Page 51: ...hine y conecte el disposi tivo flash USB PREGUNTAS FRECUENTES D nde puedo obtener ayuda adicional con los formatos de archivo Visite http singingmachine com smc music para obtener recursos adicionales...

Page 52: ...a en la pantalla del televisor cuando utilice ENTRADA DE L NEA LINE IN o Bluetooth Nohaysonidodesdeelmicr fono Aseg rese de que est fimemente conectado a la entrada para el MICR FONO 1 o 2 Aseg rese d...

Page 53: ...ad 32 GB GENERAL ENERG A Dc 9V 1A Centro positivo DIMENSIONES HXWXD 232 mm W x 350 mm H x378 mm D PESO 3 0 Kg MICR FONO Impedancia Con Micr fono Din mico 74 Db 600 Ohm Con 6 3 Mm SECCI N DE ENTRADA AU...

Page 54: ...l alin a 15 des r glementations FCC Ces normes sont labor es pour vous prot ger contre toute interf rence nuisible en installation r sidentielle Cet appareil g n re utilise et peut mettre des fr quen...

Page 55: ...F2 Contenu Veuillez vous assurer que les l ments suivants sont bien inclus Cables de Audio Video Microphone filaire Module principal Adaptateur secteur Manuel d utilisation...

Page 56: ...10 bouton 7 Touche LUMI RE 8 Touche de chansons en boucle int gr es 9 Commande VOLUME MICRO 10 Touche 11 Commande VOLUME PRINCIPAL MASTER VOLUME 12 Prise d entr e LINE IN 13 Port USB 14 Haut parleur...

Page 57: ...ants LECTURE PAUSE 5 Indicateur PROGRAMME Position des commandes Affichage 4 5 1 3 2 CDG REPEAT PLAY PAUSE PROGRAM 1 Compartiment de CD 2 Supports de micro 3 Support 4 Jack de sortie vid o 5 Prise AUD...

Page 58: ...o et connectez les c bles audio blanc et rouge aux jacks AUDIO OUT sortie audio situ s l arri re de la Singing Machine 2Connectez l embout oppos du c ble vid o RCA jaune au jack VIDEO IN entr e vid o...

Page 59: ...ur s lectionner et utiliser la fonction Line In To External Unit AUDIO OUTPUT HEADPHONE JACK Branchement la prise de sortie Cet appareil peut tre branch un autre syst me audio pour un meilleur rendeme...

Page 60: ...es s allument et sont synchronis es avec le son lorsque vous parlez ou chantez dans le microphone Appuyez sur la touche MODELUMI RE pour le mode Lumi re 2 qui affiche le spectacle de lumi re mais ne r...

Page 61: ...Nunca coloque nada que no sea un CD en el compartimiento como por ejemplo objetos extra os que puedan da ar la unidad Si no se introdujo ning n disco aparecer no en la pantalla Si se conecta a un tel...

Page 62: ...nte le volume du micro respectif 8 CHANTERENSUIVANT LESPAROLESAVECLES MODIFICATIONSDEVOIX INT GR ES Il y a 6 changeur de voix int gr dans la machine Tournez le cadran EFFETSVOCAUX et la voix du chante...

Page 63: ...vancez ou reculez d une piste en appuyant sur les boutons SAUT 9 et SAUT RECHERCHE Lors de la lecture de tout CD audio appuyez et maintenez la touche SAUT 9ou SAUT Le CD recherche dans les directions...

Page 64: ...20 titres dans la m moire Lorsque vous avez termin appuyez sur le bouton LECTURE PAUSE JUMELER pour lancer lalecture Remarquessurlaprogrammation Appuyez DEUX FOIS sur le bouton ARR T pour arr ter et...

Page 65: ...l enregistrement d butera Indicateur d enregistrement s illuminera ENR REC avec progression de la pi ce en pourcentage s affichera dans le coin sup rieur gauche de l cran Pour arr ter l enregistrement...

Page 66: ...lecture USB 4 Appuyez sur la touche LECTURE PAUSE JUMELER pour d buter la lecture Lorsque vous coutez un fichier MP3 G l image et les paroles s affichent l cran du t l viseur si raccord Remarque Si l...

Page 67: ...dran EFFETSVOCAUX et la voix du chanteur sera modifi e lorsqu ils chanteront dans le micro L afficheur indiquera EF0 AUCUN NONE EF1 CHO EF2 FEMME FEMALE EF3 HOMME MALE EF4 CHIPMUNK EF5 ROBOT ou EF6 RA...

Page 68: ...UIVANT Avancer ou retourner d une piste l autre en appuyant sur les SAUT 9 ou SAUT Vous pouvez galement passer 10 fichiers pistes d un coup partir de la touche SAUT10 ou SAUT10 13R P TER Lors de la le...

Page 69: ...us avez termin appuyez sur le bouton LECTURE PAUSE JUMELERpour lancer la lecture Remarques Appuyez DEUX FOIS sur le bouton ARR T JUMELAGE pour arr ter et effacer le programme Si vous essayez de progra...

Page 70: ...pareil pr c demment coupl n est proximit tablissez la connexion tel que cela est d crit dans l tape suivante Remarque Vous pouvez aussi presser le buton Play Pause Pair en continue pour d connecter un...

Page 71: ...tres Rien ne s affiche sur le t l viseur raccord lors de l utilisation du mode Bluetooth sauf lorsqu une cl USB est ins r e dans le port USB 5 Pour contr ler le dispositif Bluetooth partir de cet appa...

Page 72: ...ALE EF3 HOMME MALE EF4 CHIPMUNK EF5 ROBOT ou EF6 RADIO 10 HANTERENSUIVANTLESPAROLES AVECDESCHANSONSENBOUCLE INT GR ES Il y a trois 3 chansons en boucle int gr es Afin de s lectionner une chanson appuy...

Page 73: ...trement s illuminera ENR REC avec progression de la pi ce en pourcentage s affichera dans le coin sup rieur gauche de l cran Pour arr ter l enregistrement appuyez nouveau sur la touche ENREGISTREMENT...

Page 74: ...Machine Remarques Il est fortement recommand de r gler le volume de l appareil auxiliaire sur 1 3 ou plus bas pour viter les d formations Il n est pas possible d avancer d un ou plusieurs fichiers tit...

Page 75: ...difi e lorsqu ils chanteront dans le micro L afficheur indiquera EF0 AUCUN NONE EF1 CHO EF2 FEMME FEMALE EF3 HOMME MALE EF4 CHIPMUNK EF5 ROBOT ou EF6 RADIO 8 HANTERENSUIVANTLESPAROLES AVECDESCHANSONSE...

Page 76: ...gistrement s illuminera ENR REC avec progression de la pi ce en pourcentage s affichera dans le coin sup rieur gauche de l cran Pour arr ter l enregistrement appuyez nouveau sur la touche ENREGISTREME...

Page 77: ...p singingmachine com smcmusic pour obtenir des ressources suppl mentaires sur le type ad quat de FORMAT DE FICHIER pour votre syst me Conseils pratiques Les fichiers mp3 et cdg sont fournis en t l cha...

Page 78: ...ur l cran de votre t l viseur Rien n apparait sur votre cran de t l viseur si vous utilisez le mode Line In ou Bluetooth Lemicrophonen metpasdeson Assurez vous que le microphone est bien connect au ja...

Page 79: ...e 32 GB G N RALIT S Courant CC 9V centre positif Dimensions Module principal 232 mm W x 350 mm H x 378 mm D Poids Module principal 3 Kg Microphone 74 dB imp dance 600 Ohms avec entr e Aux 6 3 mm pour...

Page 80: ...Ontario CA 91761 1413 USA Copyright 2019 All Rights Reserved Derechos de autor 2019 Todos los derechos reservados Droit d auteur 2019 Tous Droits R serv s PRINTED IN CHINA IMPRESO EN CHINA IMPRIM EN C...

Reviews: