background image

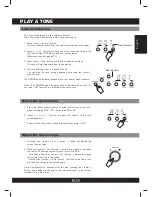
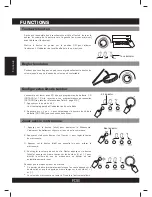
The unit comes with 20 (001-020) preset drum kits and 10 user kits
(021-030). Reference tone list: page E14

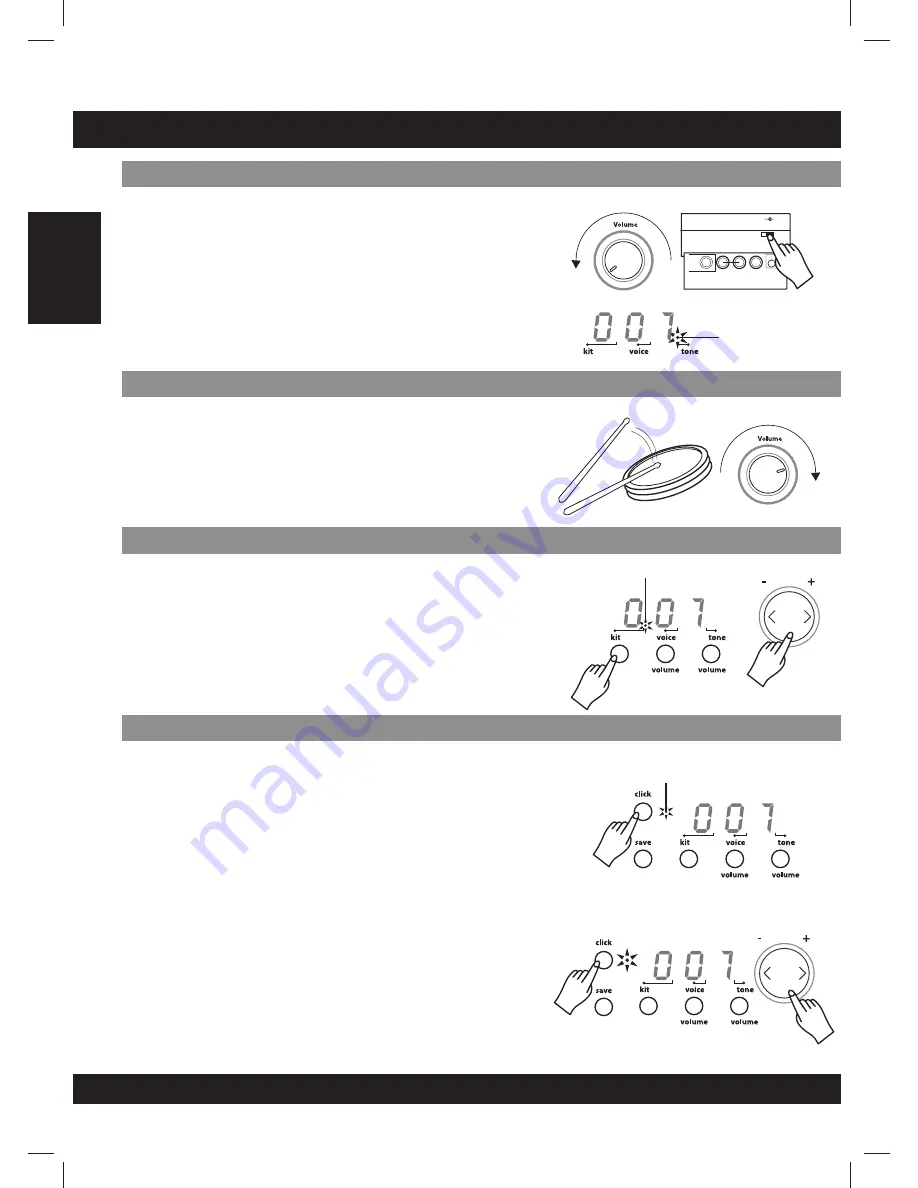
1. Press the [ kit ] button

The current kit number appears and the Kit indicator will display.

2. Press [ + ] or [ - ] buttons to select the drum kit number (001-020)

you want to access.

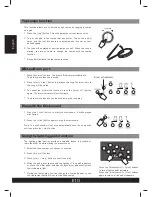
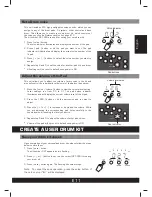
1. Press the [ click ] button to initiate the Metronome. The beat

indicator will flash and the click sound begins to play.

2. Press the [ tempo + ] or [ tempo - ] buttons to set the metronome

beat.

3. Press the [ click ] button again to stop the metronome.

4. To adjust the volume of the click sound, hold down the [click] button

and press the [ + ] or [ - ] buttons to adjust the volume of the click
sound, the metronome automatically plays.

When playing the metronome:

The metronome stops immediately when holding down the [ click ]
button and pressing the [ + ] or [ - ] buttons on the click sound.
Volume of the click sound will be reset to default once the power is
on.

*

*

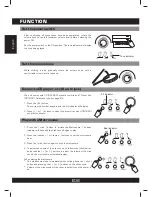
While striking a pad, gradually rotate the volume knob until a
comfortable volume level is reached.

After confirming all connections have been completed, rotate the
volume knob to the left (minimum volume level) before switching the
power ON.

Set the power switch to the ON position. The tone indicator will display
the tone being played.

English

E08

FUNCTION

Play with a Metronome

Connect a CD player, etc (Aux. In jack)

Set the power switch

Set the main volume

-

+

-

+

k i c k

o u t p u t

R

L / m o n o

a u x . i n

ON

OFF

d c 9 v .

Tone indicator

Kit indicator

Beat indicator

Summary of Contents for SMI-1460

Page 1: ...Electronic Drum Set Batterie Electronique Bater a Electr nica Instruction Manual Manuel d Instruction Manual de Instruciones SMI 1460 tempo tap Volume...

Page 2: ...in a car during the daytime Excessive humidity Please use the AC adapter included with this product Insure the AC outlet voltage in the country it is being used matches the input voltage specified on...

Page 3: ...audio equipment 7 Connect a CD player etc Aux in jack 7 Connect Headphones 7 Connect the Power supply jack 7 Switch the power ON 8 Set the main volume 8 Select a drum kit 8 Play with a Metronome 8 Sel...

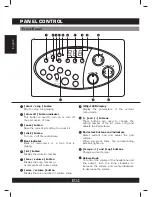
Page 4: ...um kit number 3 Digit LED display Volume Knob Display the parameters of the current menu mode To control the volume of the headphone and line output turn the knob clockwise to increase the volume and...

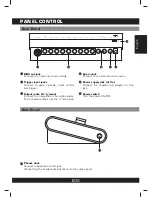
Page 5: ...e power ON OFF MIDI out jack Trigger input jacks Output jacks R L mono Connect to an external sound module Connect to pads cymbals hi hat control kick trigger Connect to an amplifier or an audio syste...

Page 6: ...acoustic drum the hi hat pad functions as an open hi hat when the pedal is released When the pedal is depressed it functions as a closed hi hat 2 By striking areas of the cymbal pad ride crash or hi...

Page 7: ...cks on the rear panel b For monaural playback use the L MONO jack c For stereo playback connect both L MONO and R jacks An optional set of stereo headphones can be connected to the PHONES jack located...

Page 8: ...the click sound the metronome automatically plays When playing the metronome The metronome stops immediately when holding down the click button and pressing the or buttons on the click sound Volume of...

Page 9: ...song or kit number instead of the tempo value This drum module has a total of 50 preset tones Note The preset tone setting is 001 once powered on 1 Press tone volume button The tone indicator lights a...

Page 10: ...playback the song The drum part in the song will be muted 3 To cancel the drum mute function press the drum off button again The drum indicator will not illuminate The drum mute function can be used d...

Page 11: ...volume button to view the volume level setting Level settings run from 00 to 31 The pad button indicator illuminates and will display the current volume level of the lit pad 2 Press the PAD button or...

Page 12: ...20 preset kits 10 user kits 50 preset songs POWER SWITCH START STOP SAVE KIT VOICE VOLUME SONG VOLUME DRUM OFF CLICK HI HAT CRASH RIDE HI HAT CONTROL SNARE TOM 1 TOM 2 TOM 3 KICK VOLUME TEMPO TAP LED...

Page 13: ...A 101 Tom A 5 102 Tom A 4 103 Tom A 3 104 Tom A 2 105 Tom A 1 106 Tom T 1M 107 Tom T 3L 108 Tom T 3F 109 Tom El 4 Electronic Snare Drum Acoustic Tom Electronic Tom 110 Tom El 3 111 Tom El 2 112 Tom E...

Page 14: ...4 4 4 4 4 4 4 4 4 4 6 8 4 4 4 4 4 4 4 4 4 4 3 4 6 8 9 8 4 4 4 4 4 4 No Name 011 Jazz 012 Brush 2 013 Dance Stick 014 Orchestra 015 Drum Bass 016 House 017 Rhythm Blues 018 Ungle 019 China LuoGu 020 Or...

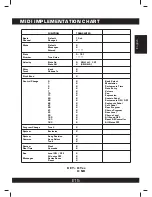
Page 15: ...d Default Messages Altered True Voice Note On Note Off Key s Channel s 0 1 5 6 7 10 11 64 65 66 67 80 81 91 93 120 121 123 True Exclusive Song Position Song Select Tune Clock Comands Local ON OFF All...

Page 16: ...loigner l instrument de l quipement affect par les interf rences NETTOYER INTERF RENCE LECTRIQUE LIEU D EMPLACEMENT Ne pas exposer le mat riel ces diff rentes conditions pour viter toute d formation d...

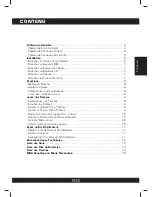
Page 17: ...il MIDI 7 Brancher un quipement Audio 7 Brancher un Baladeur CD 7 Brancher un Casque 7 Brancher la Prise de Courant 7 Mettre en Marche 8 R gler le Volume 8 S lectionner un Kit de Batterie 8 Jouer Avec...

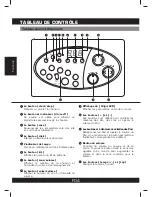
Page 18: ...u l intensit du volume Affichage du 3digit LED Bouton du volume Afficher les param tres du mode en cours Contr le du volume du casque et de la sortie Tournez le bouton dans le sens des aiguilles d une...

Page 19: ...r le casque ou couteur Branchez l couteur cette prise jack Aux dans le cric Cric d alimentation d nergie C C dans 9V Le bouton Power Branchez une source de son externe Branchez l adaptateur AC fourni...

Page 20: ...ntr l par la p dale hi hat Comme une batterie acoustique le pad hi hat fonctionne comme hi hat ouvert quand on rel che la p dale Quand on appuie sur la p dale il fonctionne comme un hi hat ferm 2 En f...

Page 21: ...e jack L MONO c Pour une lecture st r o branchez les deux jacks L MONO et R L installation d couteurs ou de casque st r o peut tre faite avec la prise PHONES situ e sur le cot du module de batterie Aj...

Page 22: ...tons et pour ajuster le volume du son du m tronome ce dernier se met automatiquement jouer Pendant que le m tronome est en marche Ce dernier s arr te imm diatement lorsque l on reste appuy sur le bout...

Page 23: ...au du tempo Le module de batterie contient 50 Timbres Note la chanson pr install e est la 001 apr s avoir allumer le mat riel 1 Appuyer sur le bouton tone volume L indicateur de la Timbre s allume et...

Page 24: ...ur le bouton click une nouvelle fois pour arr ter le m tronome Note Le son de clic ne s arr te pas automatiquement la fin de la chanson tant que vous n appuyez pas sur le bouton click Appuyer sur les...

Page 25: ...r voir le niveau de volume r gl Les niveaux de r glage varient de 00 31 L indicateur du bouton du Pad s allume et l affichage montre le niveau du volume actuel du Pad allum 2 Appuyer sur le bouton Pad...

Page 26: ...s pr install s 10 kits d utilisateur 50 chansons pr install es POWER SWITCH START STOP SAVE KIT VOICE VOLUME SONG VOLUME DRUM OFF CLICK HI HAT CRASH RIDE HI HAT CONTROL SNARE TOM 1 TOM 2 TOM 3 KICK VO...

Page 27: ...101 Tom A 5 102 Tom A 4 103 Tom A 3 104 Tom A 2 105 Tom A 1 106 Tom T 1M 107 Tom T 3L 108 Tom T 3F 109 Tom El 4 Electronic Snare Drum Acoustic Tom Electronic Tom 110 Tom El 3 111 Tom El 2 112 Tom El 1...

Page 28: ...4 4 4 4 6 8 4 4 4 4 4 4 4 4 4 4 3 4 6 8 9 8 4 4 4 4 4 4 No Name 011 Jazz 012 Brush 2 013 Dance Stick 014 Orchestra 015 Drum Bass 016 House 017 Rhythm Blues 018 Ungle 019 China LuoGu 020 Oriental 1 No...

Page 29: ...Messages Alt r Vrai son Note On Note Off Cl Canal 0 1 5 6 7 10 11 64 65 66 67 80 81 91 93 120 121 123 True Exclusive Position d une chanson S lection d une chanson Tune Horloge Commande Local ON OFF...

Page 30: ...n aparato de radio o televisor Si eso ocurriese aleje el modulo de dichos aparatos LIMPIEZA INTERFERENCIA EL CTRICA ALMACENAJE No deje la unidad en condiciones y lugares como los descritos a continuac...

Page 31: ...io 7 Conectar un reproductor de CD s etc AUX in 7 Conectar un aud fono 7 Conectar la fuente de poder 7 Encender el modulo 8 Ajustar el volumen 8 Seleccionar un Drum Kit 8 Tocar con metr nomo 8 Elegir...

Page 32: ...3 digitos Perilla de volumen Muestra el n mero del sonido o el valor del Volumen Muestra los par metros del men elegido Esa perilla controla el volumen de los gire la perilla en el sentido horario par...

Page 33: ...ifonos Conecte los auriculares a este conector Al conectar los aud fonos no se interrumpir n las salidas de audio Conector de entrada auxiliar aux in Conexi n de la fuente de poder dc 9v Interruptor C...

Page 34: ...as en el panel posterior con los pads o pedales correspondientes Nota 1 El sonido del pad hi hat es controlado por el pedal hi hat Semejante a una bater a ac stica el pad hi hat funciona como un hi ha...

Page 35: ...con el sonido del bombo permiti ndole acompa ar sus canciones favoritas Conecte sus aud fonos estereof nicos en la entrada PHONES ubicada sobre el panel lateral del m dulo Ajuste el volumen a un nivel...

Page 36: ...y mantenga oprimido el bot n CLICK y gire al mismo tiempo la perilla o para ajustar el volumen El metr nomo se escuchar autom ticamente Cuando el Metr nomo est operando El metr nomo se detendr inmedi...

Page 37: ...canciones pregrabadas Nota La configuraci n programada de tono es 001 cuando es encendido 1 Presione el bot n timbre volume El indicador luminoso de timbre se iluminar y el n mero de la timbre se mos...

Page 38: ...r momento 1 Presione el bot n CLIC y el metr nomo sonar en tiempo 2 Presione una vez m s el bot n CLICK y el metr nomo se detendr Nota El sonido de clic no parar autom ticamente una vez que la canci n...

Page 39: ...el nivel de volumen Las configuraciones de nivel van desde 00 hasta 31 El LED indicador se iluminar y la pantalla mostrar el valor del volumen del PAD 2 Oprima el bot n del PAD o golpee el PAD al cual...

Page 40: ...bater a 10 baterias para el usuario 50 canciones preseteadas POWER SWITCH START STOP SAVE KIT VOICE VOLUME SONG VOLUME DRUM OFF CLICK HI HAT CRASH RIDE HI HAT CONTROL SNARE TOM 1 TOM 2 TOM 3 KICK VOLU...

Page 41: ...TomH A 101 Tom A 5 102 Tom A 4 103 Tom A 3 104 Tom A 2 105 Tom A 1 106 Tom T 1M 107 Tom T 3L 108 Tom T 3F 109 Tom El 4 Tambor electr nico Tom ac stico Tom electr nico 110 Tom El 3 111 Tom El 2 112 Tom...

Page 42: ...4 4 4 4 4 6 8 4 4 4 4 4 4 4 4 4 4 3 4 6 8 9 8 4 4 4 4 4 4 No Nombre 011 Jazz 012 Brush 2 013 Dance Stick 014 Orchestra 015 Drum Bass 016 House 017 Rhythm Blues 018 Ungle 019 China LuoGu 020 Oriental...

Page 43: ...Voz real Notas activadas Notas desactivadas LLaves Canales 0 1 5 6 7 10 11 64 65 66 67 80 81 91 93 120 121 123 Verdaadero Exclusivo Posici n de la canci n Selector de canci n Tono Reloj Comandos Loca...

Page 44: ...singingmachine com VISITE NUESTRO SITIO DE INTERNET www singingmachine com Printed in China Imprim en Chine Impreso en China 6601 Lyons Road Bldg A7 Coconut Creek FL 33073 9902 USA TEL 954 596 1000 F...

Reviews: