


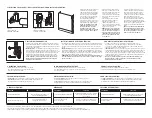

• Put the pin end into the round hole
of the bracket. Pushing the pin
end towards its bracket, insert the
hooks on the control side straight
into the two slots in the bracket.
• Once the two hooks are through
the slots, gently pull down on
the control side until the two
hooks have locked securely to the
bracket. The bottom of the control
side should point straight down.
• NOTE: The shade will come with
additional material to conceal
the roller tube and secure the
material. Stops on the chain
will prevent the shade from being
raised or lowered past its limits.
2. INSTALLING YOUR SHADE / INSTALLER VOTRE TOILE / CÓMO INSTALAR LA CORTINA:
6. TROUBLESHOOTING:
DÉPANNAGE:
SOLUCIÓN DE PROBLEMAS:
PROBLEM
SOLUTION
Chain is difficult to move.
Remove tension device and move
closer to headrail (upwards).
Shade is not lowering evenly.
Check if mounting brackets
are aligned. Refer to Step 1.
PROBLÈME
SOLUTION
La chaîne est difficile à actionner.
Retirez le dispositif de tension et replacez
plus proche de la traverse supérieure
(vers le haut).
La toile ne s'abaisse pas
de façon régulière.
Vérifiez si les supports de fixation sont
bien alignés. Reportez-vous à l’étape 1.
PROBLEMA
SOLUCIÓN
Cuesta mover la cadena.
Retirar el dispositivo tensor y moverlo
cerca del cabezal (hacia arriba).
La cortina no baja de
manera uniforme.
Verifique que los soportes de montaje
estén alineados. Consulte el Paso 1.
INSTALLATION DU DISPOSITIF DE TENSION:
• Positionner sur le cadre de fenêtre ou le mur afin que le dispositif de tension
et la chaîne perlée n'interfère pas avec le fonctionnement du store. La chaîne
perlée doit être tendue, sans être étirée. Ne pas croiser ou nouer la chaîne
perlée.
• INSTALLATION:
Maintenez le ressort arrière sur le dispositif de tension qui est
pré-installé en haut de la boucle continue. En maintenant le ressort enfoncé,
faites glisser le dispositif vers le bas de la boucle jusqu'à la position souhaitée.
Placez le dispositif de tension contre le mur et fixez avec deux vis. La boucle
ne doit pas passer librement dans le dispositif de tension.
• REMARQUE: Les vis incluses peuvent être vissées directement dans le bois.
Pour une fixation sur du métal ou des cloisons sèches, utilisez les ancrages
prévus à cet effet.
CÓMO INSTALAR EL DISPOSITIVO TENSOR:
• Coloque sobre el marco de la ventana o la pared de modo que el
dispositivo tensor y la cadena metálica no interfieran con la apertura
y cierre de la cortina. La cadena metálica debe estar estirada, sin estar
tirante. No retuerza ni cruce la cadena.
• INSTALACIÓN:
Presione y sostenga el resorte del dispositivo tensor que ya
viene instalado en la parte superior del bucle continuo. Mientras sostiene el
resorte, deslice el dispositivo hacia abajo hasta la parte inferior del bucle,
donde le gustaría colocar el dispositivo. Coloque el dispositivo tensor contra
la pared y ajuste con dos tornillos. El bucle ahora debe pasar libremente a
través del dispositivo tensor.
• NOTA: Los tornillos incluidos se pueden atornillar directamente en la
madera. Cuando coloque en placa de yeso y metal, utilice anclajes
diseñados para estos sustratos.
3. INSTALLING TENSION DEVICE:
• Position on the window frame or the wall so that the tension
device and beaded chain do not interfere with shade operation.
The beaded chain must be taut, without stretching. Do not twist
or cross the beaded chain.
• INSTALLATION:
Press and hold the back spring on the tension
device that is pre-installed at the top of the continuous loop.
With the spring held, slide the device down to the bottom of the
loop to where you would like the device positioned. Place the
tension device against the wall and secure with two screws.
The loop should now pass freely through the tension device.
• NOTE: Included screws can be screwed directly into wood.
When attaching to drywall and metal, use anchors that are
designed for such substrates.
PIN END
CÔTÉ CLAVETTE
EXTREMO DEL PERNO
CONTROL SIDE
CÔTÉ DE CONTRÔLE
COSTADO DE CONTROL
5. CLEANING YOUR SHADE:
• Roller Shades:
Use a soft brush or clean with a low suction vacuum.
• Solar Shades:
Dampen a clean cloth with warm water and a mild
detergent solution to clean the spot until it’s gone.
NETTOYAGE DE VOTRE TOILE:
• Stores déroulants:
Utilisez une brosse douce ou nettoyer avec un
aspirateur à faible aspiration.
• Toiles solaires:
Humidifiez un chiffon propre avec de l'eau chaude et un
détergent doux pour nettoyer la tache jusqu'à ce qu’elle disparaisse.
CÓMO LIMPIAR LA CORTINA:
• Cortinas enrollables:
Use un cepillo suave o una aspiradora con poca succión.
• Cortinas solares:
Humedezca un paño limpio con agua tibia y una solución de
detergente suave para limpiar la mancha hasta que desaparezca.
4. OPERATING YOUR SHADE:
• Simply pull the chain to raise or lower the shade.
• The chain will maintain a consistent length, making
it easier to operate your shade.
FONCTIONNEMENT DE VOTRE TOILE:
• Tirez simplement la chaîne pour abaisser ou relever la toile.
• La chaîne gardera la même longueur et votre toile sera ainsi
plus facile à utiliser.
CÓMO UTILIZAR LA CORTINA:
• Simplemente tire de la cadena para subirla o bajarla.
• La cadena mantendrá un largo consistente, lo que facilitará su uso.
• Placez l'extrémité de la clavette
dans le trou rond du support. En
poussant l'extrémité de la broche
vers son support, insérez les
crochets du côté de la commande
directement dans les deux fentes
du support.
• Une fois que les deux crochets
traversent les fentes, abaissez
doucement le côté de la
commande jusqu'à ce que les
deux crochets soient bien fixés au
support. Le bas du côté de contrôle
doit pointer vers le bas.
• REMARQUE: Le store sera fourni
avec un élément supplémentaire
pour cacher le tube à rouleau et
fixer le matériel. Des arrêts sur la
chaîne empêcheront la toile de se
relever ou de s'abaisser au-delà
de ses limites.
• Coloque el extremo del perno en el
orificio redondo del soporte. Mientras
empuja el extremo del perno hacia el
soporte, inserte los ganchos sobre el
costado de control en línea recta dentro
de las dos ranuras del soporte.
• Una vez que los dos ganchos están a
través de las ranuras, baje suavemente
el costado de control hasta que los dos
ganchos queden firmemente bloqueados
en el soporte. La parte inferior del
costado de control debe apuntar hacia
abajo.
• NOTA: La cortina vendrá equipada con
material adicional para ocultar el tubo
de enrollar y fijar el material. Los topes
de la cadena evitarán que la cortina
suba o baje fuera de sus límites.
For questions or assistance, please call us at 1-800-GO-BEYOND® (1-800-462-3966) or email [email protected]
Pour toute question ou assistance, veuillez nous appeler au 1-800-GO-BEYOND® (1-800-462-3966) ou par courriel à [email protected]
Si tiene alguna pregunta o necesita ayuda, llámenos al 1-800-GO-BEYOND® (1-800-462-3966) o envíe un correo electrónico a [email protected]


