background image

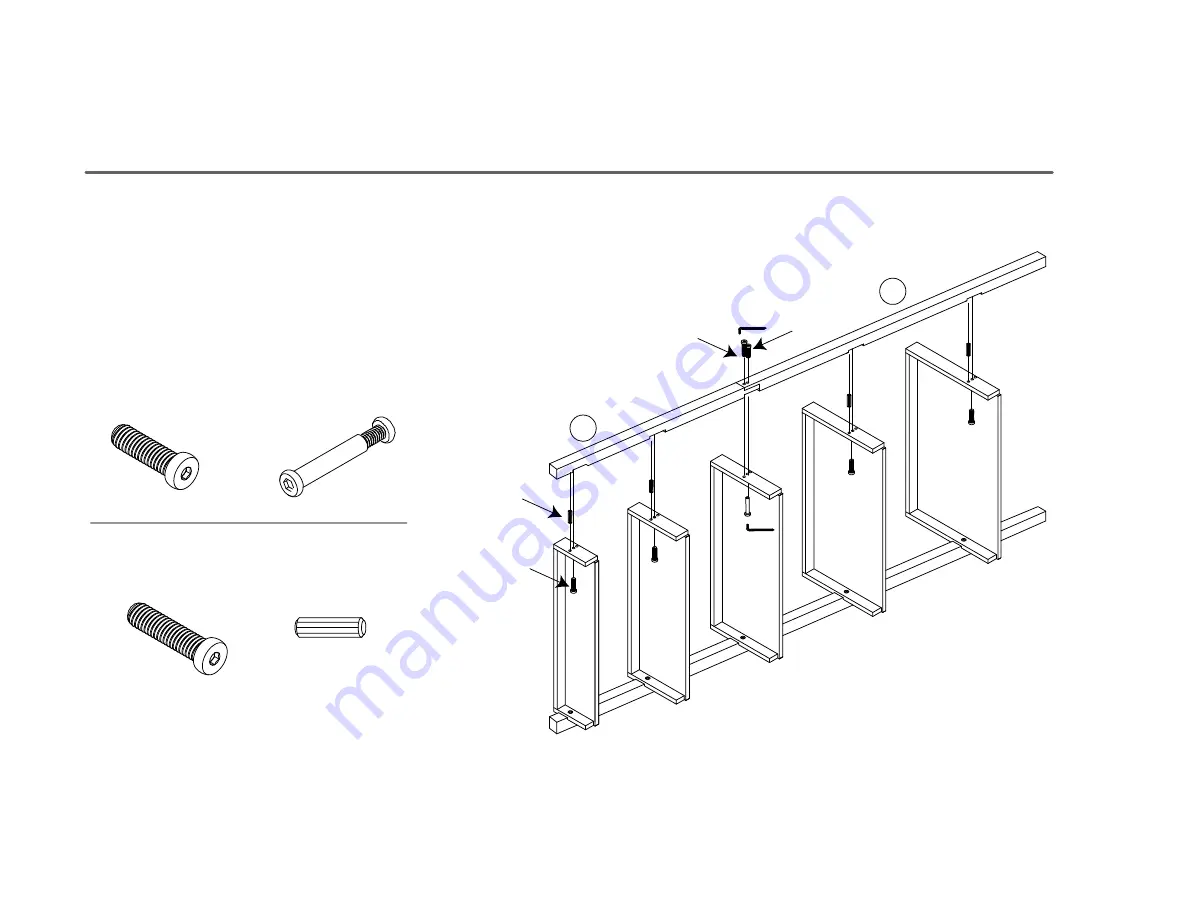
step 3.

1.  Fasten right leg assembly [AB] to Third Shelf [G] using a long bolt and binding screw.

2.  Use the short bolts and short dowels to fasten the right leg assembly to the remaining shelves.

A

(H2)

(H4) 

(H5)

(H3)

B

(H5) x 4

short dowel

(H2) x 4

short bolt 

(H4) x 1

long bolt

(H3) x 1

binding screw

PAGE 6 OF 10

Summary of Contents for Linea Leaning Bookcase

Page 1: ...tents included in the box Please take the time to identify the hardware as well as the individual components of this product As you unpack and prepare for assembly place the contents on a carpeted or...

Page 2: ...Hardware Tools You may choose to use a mallet hammer to tap dowels in A screwdriver and drill will be required to complete assembly of the anti tip strap H6 x 2 allen wrench H1 x 4 1 extra long dowel...

Page 3: ...ty A B C D E F G H I 1 1 1 1 1 1 1 1 1 Right side upper leg Right side lower leg Left side upper leg Left side lower leg Top Shelf Second Shelf Third Shelf Fourth Shelf Bottom Shelf H G F E A B C D I...

Page 4: ...step 1 1 Use two long dowels to assemble each leg 2 Make sure the dowels are fully inserted C D A B H1 x 4 long dowel PAGE 4 OF 10...

Page 5: ...y CD using a long bolt and a binding screw 2 Each remaining shelf is attached using a short bolt and a short dowel E F G H I D C H2 H5 H4 H3 H6 x 2 allen wrench H5 x 4 short dowel H2 x 4 short bolt H4...

Page 6: ...Shelf G using a long bolt and binding screw 2 Use the short bolts and short dowels to fasten the right leg assembly to the remaining shelves A H2 H4 H5 H3 B H5 x 4 short dowel H2 x 4 short bolt H4 x...

Page 7: ...step 4 1 Locate pilot holes on the backs of the legs 2 Use panhead screws to attach support brackets H9 x 2 support bracket H10 x 8 panhead screw PAGE 7 OF 10...

Page 8: ...plate 1 Locate pilot holes on the backs of the legs 2 Use the small flathead screws to attach the mending plates If you have purchased multiple leaning bookcases or desks use the mending plates to co...

Page 9: ...e Position the unit against the wall in the desired location Locate the pilot hole and attach the wall strap to the back of the shelf with the pan head screw Gently pull the wall strap along the produ...

Page 10: ...xceed the recommended weight limits on the designated panels Exceeding these limits could cause sagging possibly resulting in failure of the panel or bodily injury 50 pounds each 75 pounds each PAGE 1...

Reviews: