Tharo Systems H-427+ User Manual Download Page 52

6

    Maintenance and Adjustment

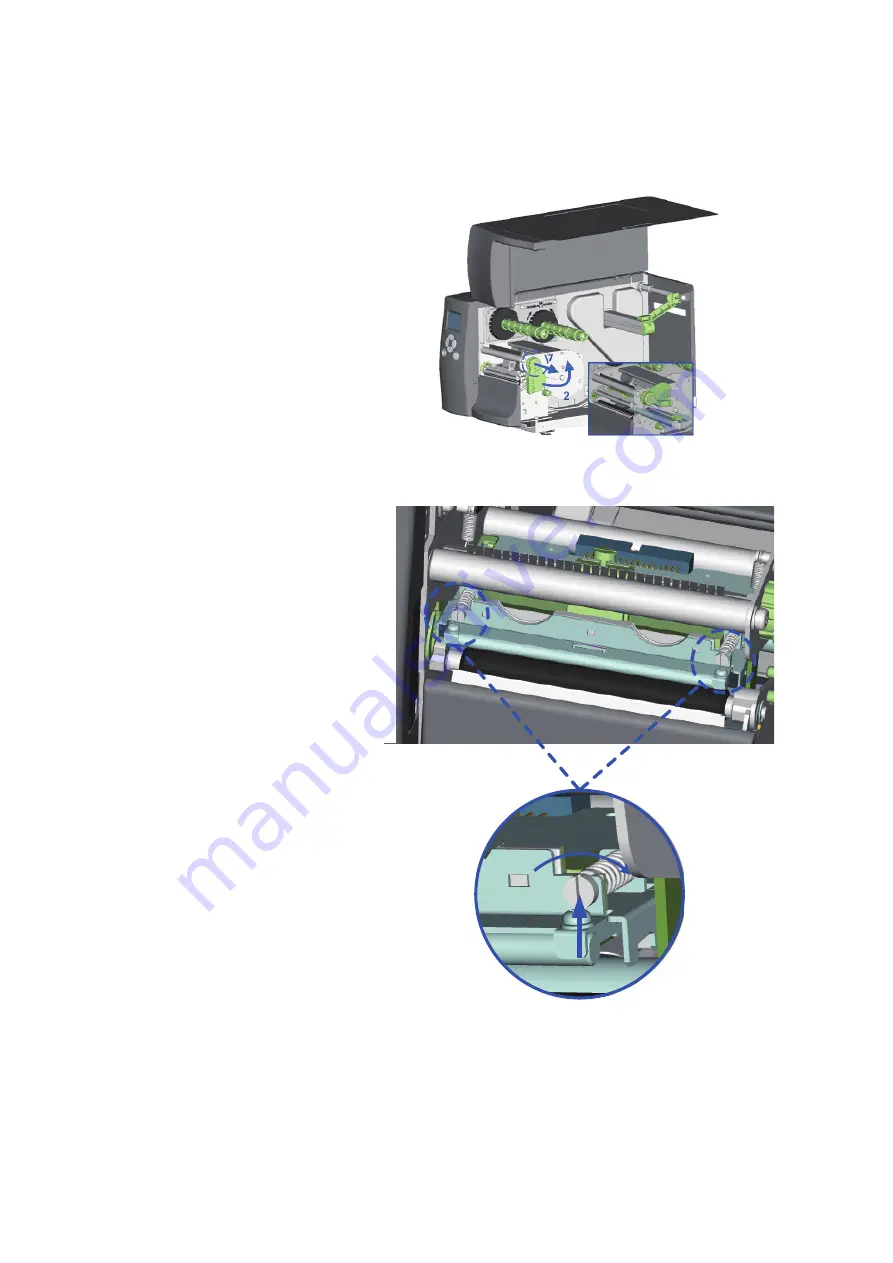
6.2    Adjusting the print line


A

48

1.  Open the Printer’s top cover.

2.  Pull the Printhead Lever out 
      and rotate it upward to the
      right (counterclockwise) to
      open the Printhead.

3.  Move the Print Line all the way back
     by turning the screws on each side of
     the Printhead (marked A) 
     counterclockwise. 

4.  Then turn the screws clockwise a 
     quarter turn at a time to move the 
     Print Line forward.  Adjust both screws
     by the same amount to ensure that 
     the Print Line and the Platen Roller 
     are parallel.

5.  Print a test label with a black bar 
     across the entire width of the label 
     to check print quality and repeat 
     step 4 as necessary to achieve 
     proper print quality.

When printing on stiff or thick paper, the Print Line needs to be moved forward (paper feed direction) 
in order to achieve better print quality.

Summary of Contents for H-427+

Page 1: ...Date 01 26 2015 H 427 and H 435 Users Manual...

Page 2: ...Installing the NetSetting Software NetSetting Interface 30 31 5 Accessories 38 5 1 5 2 5 3 Internal Rewinder Installing the Rewinder Guide Label Dispenser Strip and Peel Setup 38 40 6 Maintenance and...

Page 3: ...ent has been tested and passed with the requirements relating to electromagnetic compatibility based on the standards EN 55022 2010 Class A EN61000 3 2 2006 A1 2009 A2 2009 EN 61000 3 3 2008 and EN 55...

Page 4: ...before connecting the power cord to an electrical outlet Do not expose the Printer to moisture or operate it in wet or damp areas The Printer will operate with the cover open if necessary This is not...

Page 5: ...tents Please check that all of the following items are included with your printer H 427 H 435 Printer USB Cable Empty Ribbon Core Power Cord Quick Guide H 427 H 435 Series CD Including EASYLABEL Start...

Page 6: ...1 Operation Panel 2 Lower Cover Plate 3 Media Window 4 Top Cover 1 Fan Fold Label Slot 2 Calibration Button 3 Parallel Port optional 4 Applicator Interface optional 5 USB Host 6 Ethernet Port 7 USB P...

Page 7: ...e Sensor 1 Ribbon Rewind Hub 2 Ribbon Supply Hub 3 Printer Mechanism 4 Platen 5 Tear off Plate 6 Printhead Lever 7 Sensor Adjustment Knob 8 Label Guide 9 Label Tension Guide 10 Label Supply Hub 11 Lab...

Page 8: ...3DSHU DQG Goes not require a ribbon Verify which printing method you are using and modify the settings in the printer driver printer menu and or software 1 Open the Printer s top cover 2 Pull the Pri...

Page 9: ...Printer s inner wall 6 Rotate the Label Roll Guide back down and push it against the label roll Avoid pushing the Guide too far or you will damage the edge of the label stock 7 Feed the label stock th...

Page 10: ...e label stock against the Printer s center wall and then position the Label Guide against the outside edge of the label stock 10 Rotate the Printhead Lever back to its original position 11 Close the T...

Page 11: ...d Hub 4 The figure to the right shows two different installation methods One is for ink in ribbon and one for ink out ribbon 5 Feed the ribbon from the Ribbon Supply Hub under the Printhead Be sure th...

Page 12: ...your Computer 8 1 Ensure that the printer is turned off 2 Connect the power cord to the printer Plug the power cord into an electrical outlet 3 Connect the USB cable to the printer and your computer...

Page 13: ...n the license agreement radio button and click Next to continue the installation 1 Insert the product CD into CD DVD drive of your computer Open the install folder on the CD Right click on the setup e...

Page 14: ...ses the default is fine You may also specify if you want an EASYLABEL icon on your desktop Click on Next to continue 5 The next step allows you to specify the installation type Full is recommended for...

Page 15: ...ainted with your new labeling software EASYTutor can be found in the EZtutor folder on the product CD You may also view EASYTutor online at www tharo com interactive php We suggest getting started wit...

Page 16: ...Then plug the Printer s USB cable into your computer The printer should now be ready for use in Windows 8 or 10 If you plugged in the printer without doing the above steps first the printer is instal...

Page 17: ...rd to complete the installation www tharo com The printer can be installed on Windows releases other than Windows 8 or Windows 10 without any special steps Insert the product CD into CD DVD drive of y...

Page 18: ...abel Calibration and Self Test PAUSE PRINTING using the FEED Button Pressing the FEED button while the printer is printing will PAUSE the printer When the FEED button is pressed again the printer resu...

Page 19: ...N MENU page will be displayed on the LCD Power on Enter Main Menu 15 Getting Started Press the POWER button to turn on the printer You will see the START UP SCREEN while the printer is booting up Once...

Page 20: ...s the FEED button you will then enter the SETTING PAGES for that selection or Select Enter On the SETTING PAGES press the4 or 3 buttons to move the cursor Highlight a function and press FEED button yo...

Page 21: ...ick will appear next to the value On SETTING VALUE PAGES press the 5 or 6 button to change the setting values or Select Apply The blue arrow indicates the current value The red checkmark indicates tha...

Page 22: ...to Ready Status The navigation icon on top left corner of the screen displays the icon for the last level screen NAVIGATION ICON On SETTING VALUE PAGES press the 3button to go back to the SETTING PAGE...

Page 23: ...AIN MENU PAGE use the 4 or 3button to highlight the EXIT icon and then press the FEED button or Select EXIT Press the FEED Button 19 The Printer returns to Ready status 3 Printer Settings and Control...

Page 24: ...screen will display error messages on the screen when they occur See section 3 5 for the list of errors causes and solutions If the printer setting is UNLOCKED the printer will process any commands t...

Page 25: ...etting options for the label such as label rotation Printing position label offset etc Devices Setting options for optional modules and communication ports Printer Control Includes self diagnosis func...

Page 26: ...Tear off Position 0 40 Top of Form OFF Code Page 850 852 437 860 863 865 857 861 862 855 866 737 851 869 Win 1252 Win 1250 Win 1251 Win 1253 Win 1254 Win 1255 Win 1257 Rotation 0 90 180 270 Horizonta...

Page 27: ...its RTC Settings Clock Display Apply Cancel RTC Setting YYYY MM DD HH MM SS Calibration Apply Cancel Self test Apply Cancel TPH Test Apply Cancel Restore Defaults Apply Cancel Clear Memory Label Forma...

Page 28: ...MEMORY 000 ASIAN FONT S IN MEMORY 000 DATABASE S IN MEMORY 000 TTF S IN MEMORY 4073 KB FREE MEMORY S4 H8 R000 R200 W102 Q100 3 E18 Option D0 O0 AD Ref 1 96 2 84 2 49 0 88_23 Code Page 850 24 Self Test...

Page 29: ...Label Calibration button is used to perform a Label Calibration This is useful to correct any Media Errors that may occur when changing the labels to another type such as changing gap labels to black...

Page 30: ...ion Print Head Error 2 x 4 beeps The print head mechanism is not locked in place Open the print mechanism and close it again Print Head Error None High temperature at the print head Once the print hea...

Page 31: ...e labels there is no paper Please reset the sensor The memory is full The printer prints the message File System full Delete unnecessary data or install additional memory Unable to find file The print...

Page 32: ...printer Connect the printer to a PC with the USB Stick plugged in and use EASYLABEL Silver or higher software to download Graphics Fonts Label Formats and Database files to the printer Updating Firmwa...

Page 33: ...et the Code Page 4 RTC Settings This selection allows you to set the Real Time Clock RTC 5 Edit Database This selection allows you to browse and edit records in any database stored in the printer memo...

Page 34: ...ick Next to continue the installation 6 Once the installation has completed you will see the NetSetting icon on your desktop 1 Insert the Printer CD in your computer s CD DVD drive Browse the contents...

Page 35: ...C There are six tabs on the top of interface which are used to access different network configuration settings You will need to enter a password to enter the configuration pages Click on the magnifyin...

Page 36: ...twork administrator for the required related network settings Click the Set button to apply the settings and the Refresh button to re query the printer and refresh the values IP Setting On the IP Sett...

Page 37: ...refresh the values Alert Mail Setting The Printer can send the alert messages to a designated mail account when errors occur The alert messages are sent by SMTP Simple Mail Transfer Protocol or SNMP...

Page 38: ...e Setting Here you can specify which errors should trigger sending an email The alert messages can be sent by SMTP SNMP or both Click the Set button to apply the settings and the Refresh button to re...

Page 39: ...ows you to change the configuration of the connected printer Many of the printer settings can be modified on this setting page ZX1200i Click the Set button to apply the settings and the Refresh button...

Page 40: ...control the printer Enter printer commands into the Input Command window and press the Send Command button the commands will be sent to the printer For the commands that return a response message the...

Page 41: ...back to factory default Firmware Upgrade The current printer firmware version is shown on the Firmware Upgrade tab You may also upgrade the printer firmware from this screen Simply click the browse b...

Page 42: ...al Rewinder 1 2 3 4 38 Components 1 Rewind Module 2 U Shaped Clip 3 Screws 4 4 Rewind Guide Suggested Label Liner thickness 0 06mm 10 weight 65g m2 6 1 Open the Top Cover of the Printer 2 Remove the R...

Page 43: ...al Clip from the rewind shaft 1 4 Install the Internal Rewind module using the 4 supplied screws 2 5 After installing the Internal Rewind Module plug the cable connector into the rewind control socket...

Page 44: ...e onto the Printhead Mechanism and secure with the screws provided 4 The Label Rewind Guide is now installed Install the label stock 5 Feed the label stock through the Printhead Mechanism and around t...

Page 45: ...ever out and rotate it upward to the right counterclockwise to open the Printhead 2 4 Remove the U Shaped Metal Clip 3 from the rewind shaft 5 Install the label stock as shown For more detailed instru...

Page 46: ...the U Shaped Metal Clip 2 to secure the liner 8 Rotate the Printhead Lever back to its original position 9 Replace the Lower Cover Plate and tighten the Lower Cover Plate Screw 10 Press the Sensor to...

Page 47: ...lade life of 500 000 cuts when using paper weighing 160 g m and 250 000 cuts when using paper weighing 200 g m 43 Components 1 Cutter Cover 2 Cutter Module 3 Cable Clips 4 Screws 1 Face the front of t...

Page 48: ...l 6 Insert the cable into the locks Peel the backing off the locks and then secure them to the bottom plate 7 Hang the Cutter Cover on the Cutter and then tighten the Lower Cover screw 8 Load the medi...

Page 49: ...tion Cable 4 Screws 1 Place the Printer on a flat surface and open the Top Cover 2 Remove the two screws marked in the illustration on the right Close the Top Cover Then remove the left hand side of t...

Page 50: ...apter in its place and secure it with two screws 5 Attach the 30 pin Connection Cable to the motherboard 6 Replace the left hand side of the printer housing and secure it with two screws 7 The install...

Page 51: ...p cover 2 Pull the Printhead Lever out and rotate it upward to the right counterclockwise to open the Printhead 3 Gently pull the Printhead assembly towards you 4 To replace the Printhead line up the...

Page 52: ...rclockwise 4 Then turn the screws clockwise a quarter turn at a time to move the Print Line forward Adjust both screws by the same amount to ensure that the Print Line and the Platen Roller are parall...

Page 53: ...tension by 1 Pushing the end of the shaft in 2 Then turn the ribbon shaft clockwise to increase the tension If narrower ribbons are being used especially ribbon widths of less than 2 the Printer might...

Page 54: ...e ribbon 4 Release the print head by turning the print head release lever counterclockwise 5 Clean the print head surface see Blue arrow with a special cleaning pen or a cotton swab soaked in Isopropy...

Page 55: ...rotate it upward to the right counterclockwise to open the Printhead 2 Move the Thermal Printhead Spring Box on the right side Normally the wider the paper the farther the Thermal Printhead Spring Box...

Page 56: ...in figure a please turn the ribbon shield screw A clockwise and if ribbon wrinkle occurs as shown in figure b please turn the ribbon shield screw B clockwise For best results only adjust the screw by...

Page 57: ...s a hole circled on each side of the Cutter Insert a 3mm hex key into one of these holes and use the key to turn the cutter blade clockwise to allow access to the entire length of the blade 6 Allow th...

Page 58: ...no printed image on part of the label or the image is blurred Check the thermal print head for dust or other dirt Use the internal T command to perform a Test Print and check if the print head can pri...

Page 59: ...ce Specifications are subject to change without notice All company and or product names are trademarks and or registered trademarks of their respective owners TPL EASYLABEL Start H 427 H 435 APPENDIX...

Page 60: ...N C Printer Parallel Port Optional Handshaking DSTB is sent to the printer BUSY to the host computer Interface cable Parallel cable compatible with IBM computers Pinout See below Pin No Function Tran...

Page 61: ...pe A Pin NO 1 2 3 4 Function VBUS D D GND Connector Type Type B WKHUQHW 3RUW 5 PIN NO FUNCTION 1 T 2 T 3 R 4 N C 5 N C 6 R 7 N C 8 N C SSOLFDWRU 3RUW 2SWLRQDO PIN NO 1 2 3 4 5 6 7 FUNCTION Print Signa...

Reviews: