background image

13

 0258

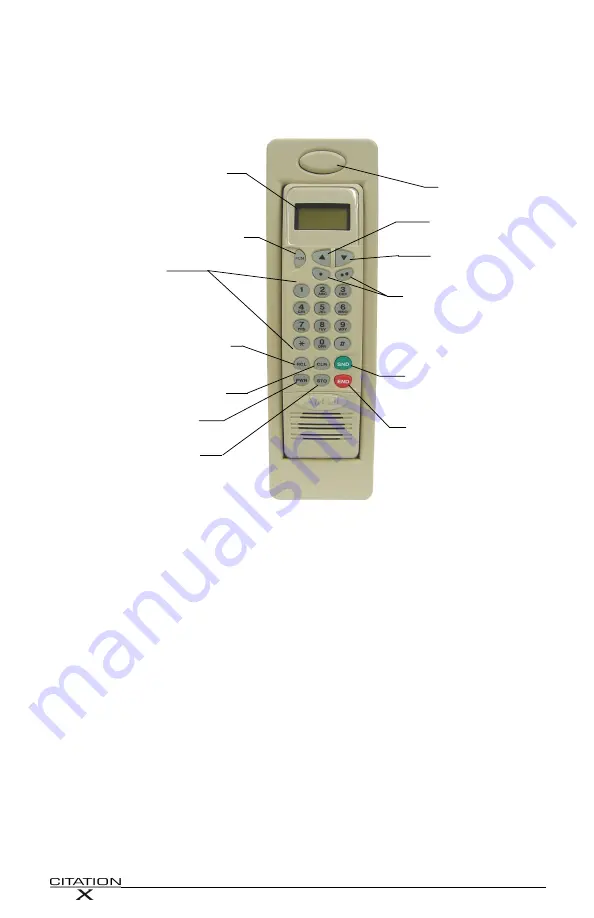
AirCell Telephone

The AirCell Telephone provides voice, fax and data transmission capabilities during

flight.  Use the system’s handset to perform all normal operations of the AirCell

Telephone.  A backlit LCD screen shows telephone numbers, signal strength and AirCell

Telephone status.  Use the keypad to enter phone numbers, menu selections, call

timer and other functions. For detailed information and instructions for using the

different services, refer to the AirCell User Manual.

Press to Increase Earpiece

Volume

Backlit LCD

Screen

Press to Release Phone

from Holder

Press to Decrease Earpiece

Volume

Press, then Use 

S

 and 

T

 to Increase

or Decrease Ringer Volume

Displays Telephone Numbers and

AirCell Telephone Status.

See Note Below.

Press to Display Active Telephone
Number or Recall Stored Number.

See AirCell User Manual for Details.

Press to Clear Last Digit Entered

on Keypad

Keypad.

Use to Enter Telephone Number

to be Called and Other

Functions.  See AirCell User

Manual for Details.

Press to Turn AirCell

Telephone On/Off

Press to Store Telephone

Number or Name.  See AirCell

User Manual for Details.

Press to Send (Connect) to Number

Entered on Keypad or Connect to

Incoming Call.

Press to End Call (Disconnect)

“One Touch Dialing” Keys.  See AirCell

User Manual for Details.

Note:

§

In lower left hand corner of screen indicates AirCell Telephone

“On.”

InUse

On lower part of screen indicates AirCell Telephone “In Use.”

To place an air-to-ground call:

1.

Take handset from holder.

2.

Press “PWR” to turn AirCell Telephone on.

3.

Use keypad to enter 00 + country code (8816 to dial another Iridium

telephone) + area code and telephone number to be called.  The number will

appear on the LCD screen.

4.

Press “SND.”   The telephone number will continue to display for approximately

one second before it is sent.  For Credit-Card Billing:  Press “0” + Area code +

Number.

5.

If you misdial, press “CLR” to clear the digits and enter the number again.

6.

When call is finished, press “END” to disconnect.

To receive an incoming call:

1.

Take handset from holder.

2.

Press “SND” to connect to incoming call.

3.

When call is finished, press “END” to disconnect.

To use the handset as an internal intercom:

1.

Take handset from holder.

2.

Press “PWR” to turn AirCell Telephone on.

3.

Press “FCN” key, then “7.”  The other phones in the aircraft will ring.

4.

When call is finished, press “END” to disconnect.

Summary of Contents for Cessna Citation 0258

Page 1: ...Cabin Equipment Operation Manual Unit 0258...

Page 2: ...is manual is intended as an operational overview only It is not intended to replace operation or maintenance instructions for any component or feature Copyright 2006 Cessna Aircraft Company All Rights...

Page 3: ...r Seat Switch Panel 19 Vanity Switch Panel 19 Furniture Location Operation Furniture Location Diagram 21 Electric Outlet Locations 21 Seat Adjustment 22 Cabin Lights 22 Table Operation 23 Galley 24 Ho...

Page 4: ...4 0258 Blank Page...

Page 5: ...deo Monitor Cabin Entertainment Phone Equipment Infrared Sensor Passenger Seat Switch Panel Passenger Seat Switch Panel Passenger Seat Switch Panel Passenger Seat Switch Panel Data Panel Video Monitor...

Page 6: ...ntrol switch panel in the galley header access the Cabin A V Menu then press the button below CABIN MONITOR to turn the forward monitor on 2 Press the button below VIDEO to choose the desired video so...

Page 7: ...e DVD tray door 3 Place a DVD in the disc tray and press Open Close to close the door 4 Press PLAY to start playing the DVD Note To pause the DVD press PAUSE To stop the DVD press STOP 5 Turn on the d...

Page 8: ...en DVD screen 1 of 2 and 2 of 2 or press the Special Function Button under Device to access Device Screen Press Hold to Brighten Screen and Highlight Buttons Highlight disappears after about 5 seconds...

Page 9: ...een screens DVD2 or Date Time 2 2 DVDX Mode Device TITLE MENU SETUP OK Device Use this Special Function Button to access Device Screen Mode Use this Special Function Button change function of remote N...

Page 10: ...witches Section for the switch menu details Note To view a DVD or Airshow on the monitor the applicable player must first be turned on and PLAY pressed on the unit itself see appropriate section for o...

Page 11: ...e below or use the VIP switch Airshow 4000 screen see Cabin Switch Panels to scroll through and select features Banner Menu Access Ticker Menu Access Flight Information Sliding Panels When Enabled Mai...

Page 12: ...Cabin Speaker On Off Executive Control VIP Switch Panel Cabin A V Menu Headphone Control Personal headphones are included as loose equipment for personal entertainment listening To use the headphones...

Page 13: ...er or Name See AirCell User Manual for Details Press to Send Connect to Number Entered on Keypad or Connect to Incoming Call Press to End Call Disconnect One Touch Dialing Keys See AirCell User Manual...

Page 14: ...needs attention the center text of the VIP switch panel is replaced by a symbol 2 Take AirCell handset from holder 3 Press SND to connect to incoming call 4 When call is finished press END to disconn...

Page 15: ...Switch Panel Passenger Seat Switch Panel Master Control Switch Panel Passenger Seat Switch Panel Data Panel Galley Vanity Toilet Vanity Switch Panel Passenger Seat Switch Panel Passenger Seat Switch...

Page 16: ...abin Speaker Volume Executive Control VIP Switch Panel Cabin Audio Video Menu Press for Seat Lights Shades Menu See Following Page Press to Turn Divider Lights On Off On displays when in use Press to...

Page 17: ...creen Executive Control VIP Switch Panel Seat Audio Video Menu Press to Page Through Video Sources Selection displays on screen Press to Return to Main Menu Center Text Replaced by When Call Input Rec...

Page 18: ...ss to Raise All Window Shades Master Control Switch Panel Press to Turn Indirect Lighting On Off On displays when in use Press to Turn Left Galley Hot Liquid Heater On Off On displays when in use Pres...

Page 19: ...dio Video Menu Passenger Seat Switch Panel Lights Shades Menu Press to Close Seat Window Shade Press to Open Seat Window Shade Press to Open Table Window Shade Press to Close Table Window Shade Press...

Page 20: ...20 0258 Blank Page...

Page 21: ...ilet Galley Table Table Table Table Passenger Seat Passenger Seat Passenger Seat Passenger Seat Hot Liquid Containers Hot Water Tank Vanity Forward Closet Passenger Seat Passenger Seat 110V Outlet 110...

Page 22: ...r swiveled to face any direction Push in on the seat recline button to adjust seat back recline Armrests may be pulled down or stowed in a full up position The headrest adjusts up and down to any desi...

Page 23: ...re rotating down to prevent damage to the table mechanism 3 Rotate table down 90 degrees 4 Unfold table leaf 5 Close table lid Note Return table to its stowed position during takeoffs and landings See...

Page 24: ...trol Switch Panel Galley Menu Located in Galley Header Hot Liquid Container Operation The Galley menu on the master control switch panel controls the hot liquid containers Access the galley menu then...

Page 25: ...ly removed for filling The master control switch panel in the galley header controls each hot liquid container separately see previous page for switch operation To remove and fill hot liquid container...

Page 26: ...es located on the front of the unit Refer to the vendor manual for more detailed information To use the microwave oven 1 Press door release to open microwave oven door 2 Place food in microwavable con...

Page 27: ...witch panel or master control switch panel vanity menu may be used to control the temperature of the heater for the vanity water tank Press the button below HOT WATER for the desired temperature setti...

Page 28: ...ove and fill hot water tank 1 Open bottom center door of the vanity 2 A quick disconnect is incorporated in the water line for easy disconnection of water line from tank Press on release button to dis...

Page 29: ...29 0258 Toilet Press to Flush Toilet Under Lid On Seat Shroud Note The toilet is externally serviceable Refer to the aircraft maintenance manual for instructions on service procedures...

Page 30: ...30 0258 Blank Page...

Page 31: ...31 0258 Emergency Equipment Fire Ax Aft Closet Toilet Galley Vanity Forward Closet Protective Breathing Equipment First Aid Kit Included as loose equipment Consult aircraft crew for location...

Page 32: ...32 0258 Emergency Exits...

Page 33: ...e shoulder harness may be detached during flight Fasten seat belt stow tables place seat in full upright position with headrest raised armrests lowered and seat fully against sidewall during takeoff a...

Page 34: ...ble hand held fire extinguishers are installed in the airplane One extinguisher is located in the cockpit under the front of the copilot s seat The other extinguisher is located in the cabin in the fo...

Page 35: ...ut do not inflate until outside of airplane First Aid Kit A first aid kit is included as loose equipment and is provided for minor emergencies Note The First Aid Kit may be stored in many locations in...

Page 36: ...from storage pouch Turn valve counter clockwise to open Place mask over nose and mouth Pull adjusting straps for secure fit Water Barrier Warning Do not open cabin door until Water Barrier is in place...

Page 37: ...the international distress frequencies of 121 5 243 and 406 MHz These frequencies are monitored by government monitoring stations military CAA FAA and Coast Guard aircraft The unit s internal battery...

Reviews: