background image


SWRU294 


Page 32/40 


9  SmartRF TrxEB rev. 1.3.0 

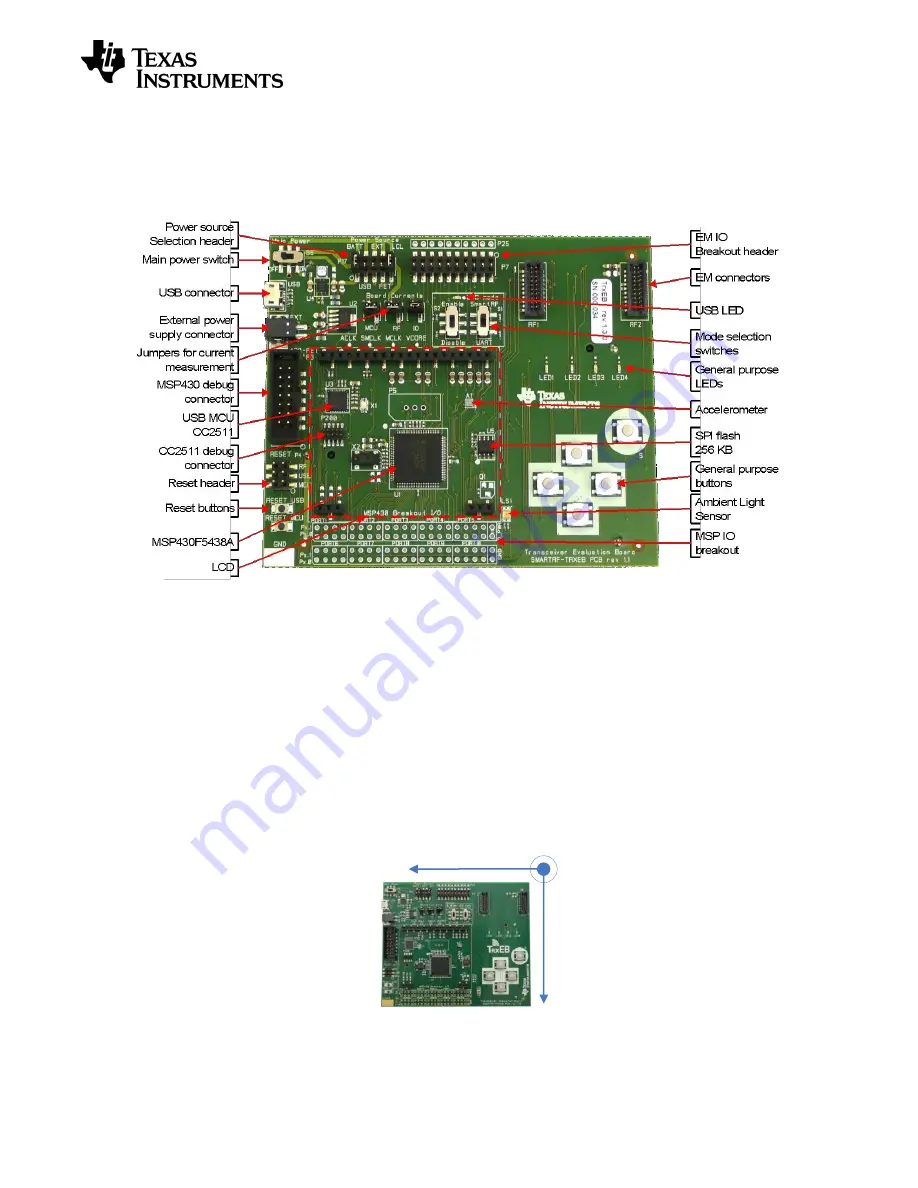
9.1  Board Overview 


Figure 23 

– SmartRF TrxEB revision 1.3.0 overview 


9.2  Software Considerations 

9.2.1  Virtual COM port over USB 

The onboard MSP430 MCU can communicate with a PC over a virtual serial port when the USB 
MCU  is  in  UART  Mode  (described  in  section  6.1.2).  When  developing  MSP430  code  to 
communicate  via  the  USB  MCU,  keep  in  mind  that  the  standard  USB  MCU  firmware  only 
supports a two-line UART interface (see section 6.1.2 for further details). 

9.2.2  Accelerometer 

The onboard MSP430 MCU has access to accelerometer A1. On SmartRF TrxEB revision 1.3.0, 
the accelerometer axes are as shown in Figure 24. 


Figure 24 

– Accelerometer axes on SmartRF TrxEB rev. 1.3.0 


Summary of Contents for SWRU294

Page 1: ...SWRU294 SmartRF Transceiver Evaluation Board User s Guide ...

Page 2: ......

Page 3: ... 17 6 3 3 External Power Supply 18 6 3 4 MSP FET Power 19 6 4 LCD 19 6 5 ACCELEROMETER 19 6 6 AMBIENT LIGHT SENSOR 19 6 7 SERIAL FLASH 19 6 8 BUTTONS 20 6 9 LEDS 20 6 9 1 General Purpose LEDs 20 6 9 2 USB LED 20 6 10 EM CONNECTORS 21 6 11 BREAKOUT HEADERS AND JUMPERS 22 6 11 1 EM I O breakout headers 23 6 11 2 MSP430 I O breakout 23 6 12 CURRENT MEASUREMENT JUMPERS 26 7 CONNECTING AN EXTERNAL MCU ...

Page 4: ...B REV 1 5 0 34 10 1 BOARD OVERVIEW 34 10 2 CHANGES FROM REV 1 3 0 34 10 2 1 RC filter on USB MCU reset line 34 10 2 2 Accelerometer 34 10 2 3 Silk print 35 10 3 USB MCU PIN OUT 35 10 4 MSP430 MCU PIN OUT 35 11 UPDATING THE FIRMWARE 36 11 1 FORCED BOOT RECOVERY MODE 37 12 FREQUENTLY ASKED QUESTIONS 38 13 REFERENCES 39 14 DOCUMENT HISTORY 40 ...

Page 5: ...tRF TrxEB 30 Figure 21 Signal strapping for SmartRF Studio combo EM support on SmartRF TrxEB 31 Figure 22 Block diagram for SmartRF Studio combo EM support on SmartRF TrxEB 31 Figure 23 SmartRF TrxEB revision 1 3 0 overview 32 Figure 24 Accelerometer axes on SmartRF TrxEB rev 1 3 0 32 Figure 25 SmartRF TrxEB revision 1 5 0 overview 34 Figure 26 Accelerometer axes on SmartRF TrxEB rev 1 5 0 34 Figu...

Page 6: ...on development and demo use Light Sensor Ambient Light Sensor for application development and demo use Breakout pins Easy access to GPIO pins for quick and easy debugging Table 1 Available features on the SmartRF TrxEB 2 About this manual This manual contains reference information about the SmartRF TrxEB Chapter 4 will give a quick introduction on how to get started with the SmartRF TrxEB It descr...

Page 7: ...t Output KB Kibi Byte 1024 byte LCD Liquid Crystal Display LED Light Emitting Diode LPRF Low Power RF MCU Micro Controller MISO Master In Slave Out SPI signal MOSI Master Out Slave In SPI signal NA Not Applicable Not Available NC Not Connected PER Packet Error Rate RF Radio Frequency RX Receive RTS Request to Send SoC System on Chip SPI Serial Peripheral Interface TI Texas Instruments TrxEB Transc...

Page 8: ...municate with the SmartRF TrxEB over USB you will need to install the USB drivers for the EB The latest SmartRF Studio installer 1 includes USB drivers both for Windows x86 and Windows x64 platforms After you have downloaded SmartRF Studio from the web extract the zip file run the installer and follow the instructions Select the complete installation to include the SmartRF Studio program the Smart...

Page 9: ...l virtual COM port USB driver using the Windows Hardware Wizard The driver for the Virtual COM Port VCP is typically located in the directory C Program Files Texas Instruments SmartRF Tools Drivers vcp where C Program Files Texas Instruments SmartRF Tools is the root installation directory for SmartRF Tools such as SmartRF Studio The path may be different if you have chosen a different installatio...

Page 10: ...PC take direct control of the RF device on the EM over the USB interface Currently SmartRF TrxEB supports CC1120EM CC1121EM CC2520EM CC1101EM CC1100EM CC1100EEM CC110LEM CC113LEM CC115LEM SmartRF TrxEB is included in e g the CC1120 development kit Some of the above EMs comes in variants combined with a RF front end such as CC1190 or CC2590 CC2591 Such variants are called combo EMs and are also sup...

Page 11: ...IAR Embedded Workbench for 8051 Develop code to the onboard MSP430 MCU and use the SmartRF TrxEB as a standalone board without PC tools 5 1 Absolute maximum ratings The minimum and maximum operating supply voltages and absolute maximum ratings for the active components onboard the SmartRF TrxEB are summarized in Table 2 Table 3 lists the recommended operating temperature and storage temperature ra...

Page 12: ...oller USBController CC2511 UART Alternative SPI USCIB1 UART USCIA0 SPI USCIB0 UART 1 6 0 only GPIO SPI USCIA2 SPI USCIB2 LEDs Figure 3 SmartRF TrxEB architecture 6 1 USB MCU The USB MCU is the CC2511F32 from Texas Instruments Please see the CC2511 product page 3 on the TI web for detailed information about this controller The recommended operating condition for the CC2511 is a supply voltage betwe...

Page 13: ...cessful the application is started and the board can be operated normally If no application is detected e g blank flash or firmware upgrade failed the USB LED D6 will start blinking rapidly indicating failure See section 6 9 2 for more details on USB LED states The USB MCU bootloader will allow programming upgrading of the USB MCU firmware over the USB interface No additional hardware or programme...

Page 14: ...tRF Studio to configure and control the RF IC connected to the EB s EM connectors The onboard MSP430 microcontroller is in this operating mode held in reset by the USB MCU 6 1 2 UART Mode UART Mode is obtained by setting hardware switches S1 and S2 on the EB to UART and Enable respectively see Table 4 In UART mode the EB is recognized over USB as a virtual serial port CDC ACM The USB MCU works as ...

Page 15: ...ting hardware switch S2 on the EB to Disable position see Table 4 The position of S1 is disregarded by the USB MCU when S2 is in the Disable position In Disabled Mode the USB MCU is in power down mode and no USB communication is possible between a PC and the EB It is however still possible to power the EB via the USB cable see section 6 3 2 NOTE Figure 5 shows the four hardware connected UART line...

Page 16: ...s USB bus external power supply and MSP FET The power source can be selected using the power source selection jumpers on header P17 Figure 6 The main power supply switch S5 turns off all power sources Figure 6 Main power selection header P17 and power switch P5 WARNING Do not use multiple power sources to power the SmartRF TrxEB at the same time Doing so may lead to excessive currents causing onbo...

Page 17: ...er TrxEB using batteries The maximum current consumption is limited by the regulator to 800 mA 6 3 2 USB Power When the SmartRF TrxEB is connected to a PC via a USB cable it can draw power from the USB bus The onboard voltage regulator supplies approximately 3 3 V to the board The power source selection jumpers should short circuit pin 3 4 USB and 9 10 LCL of header P17 Figure 8 Figure 8 P17 jumpe...

Page 18: ...ply a voltage in the range from 3 0 V to 3 3 V to pin 1 see Figure 10 Pin 1 and pin 2 of P201 are marked Vext and GND respectively on SmartRF TrxEB revision 1 5 0 Figure 10 Powering TrxEB via the external power supply connector P201 WARNING When using an external power source all onboard voltage regulators are bypassed There is a risk of damaging the onboard components if the applied voltage on th...

Page 19: ...terrupt line to the MCU The onboard accelerometer is suitable for application development prototyping and demo use See sections 9 2 2 and 10 2 2 for details on accelerometer axis orientation for EB revision 1 3 0 and 1 5 0 respectively The recommended operating condition for the accelerometer is a supply voltage between 1 7 V and 3 6 V The min max operating temperature is 40 85 C 6 6 Ambient Light...

Page 20: ...D D6 USB LED is controlled by the USB controller and is used to indicate the status of the EB The USB LED has several states listed in Table 6 USB LED state Description OFF Power is turned off the USB controller is in Disabled Mode or the software on the USB controller is corrupt ON SmartRF Mode The standard firmware is running and a RF IC has been detected UART Mode The standard firmware is runni...

Page 21: ...PI Clock P7 5 P1 4 RF1 4 P1_1 GPIO signal to EM board P7 2 P1 1 RF1 5 P8_2 GPIO signal to EM board P7 13 P8 2 RF1 6 P1_5 GPIO signal to EM board P7 6 P1 5 RF1 7 RF_UART_TXD RF_SPI1_MISO 2 line UART to EM board Alt SPI P7 9 P3 4 P5 4 RF1 8 P25A_1 GPIO signal P25A 1 RF1 9 RF_UART_RXD RF_SPI1_MOSI 2 line UART to EM board Alt SPI P7 7 P3 5 P3 7 RF1 10 P1_7 GPIO signal to EM board P7 8 P1 7 RF1 11 P8_3...

Page 22: ...al used to reset EM board P7 10 P8 0 RF2 16 NC Not connected RF2 17 P8_1 GPIO signal to EM board P7 11 P8 1 RF2 18 P1_2 RF_SPI1_SCLK GPIO signal to EM board Alt SPI P7 3 P1 2 RF2 19 P1_0 GPIO signal to EM board P7 1 P1 0 RF2 20 NC Not connected Table 8 EM connector RF2 pin out 6 11 Breakout Headers and Jumpers Header P7 and P25A E give access to main EM connector pins while P11 P14 P16 and P18 P24...

Page 23: ...nnector RF1 and RF2 respectively Figure 14 I O connector P25A E PCB layout 6 11 2 MSP430 I O breakout MSP430 ports 1 10 are on SmartRF TrxEB available through the MSP430 I O breakout shown in Figure 15 Table 9 lists I O breakout for ports 1 5 while Table 10 covers ports 6 10 Both tables indicate if the given MSP430 pin is connected to an EM connector pin For additional info on the MSP430 pin out o...

Page 24: ...RF_SPI0_SCLK EM SPI Clock RF1 16 P3 4 RF_UART_TXD RF_SPI1_MISO 2 line UART to EM board RF1 7 P3 5 RF_UART_RXD RF_SPI1_MOSI 2 line UART to EM board RF1 9 P3 6 LCD_BL LCD backlight module enable line 2 P3 7 RF_UART_RXD RF_SPI1_MOSI Alternative EM SPI MOSI RF1 9 P4 0 LED_1 General purpose LED 1 line P4 1 LED_2 General purpose LED 2 line P4 2 LED_3 General purpose LED 3 line P4 3 LED_4 General purpose...

Page 25: ... to EM board RF1 5 P8 3 P8_3 GPIO signal to EM board RF1 11 P8 4 P8_4 GPIO signal to EM board RF1 15 P8 5 P8_5 GPIO signal to EM board RF1 17 P8 6 FLASH_CS_N SPI Chip Select for serial flash active low P8 7 ACC_CS_N SPI Chip Select for accelerometer active low P9 0 IO_SPI1_SCLK SPI Clock interface shared by LCD serial flash P9 1 IO_SPI0_MOSI SPI MOSI interface used by accelerometer P9 2 IO_SPI0_MI...

Page 26: ...hich power segment Figure 16 Current measurement jumpers If the EM is powered by a different source than the rest of the board the same voltage should be used on the EM as on the EB The digital signals between the EB and the EM are not isolated from each other and different voltage levels can cause excessive current consumption or erroneous interaction between the EB and the EM Figure 17 Current m...

Page 27: ...MCU MCU_PWR NA USB MCU IO_PWR NA General Purpose LEDs IO_PWR NA USB LED IO_PWR NA Accelerometer MCU_PWR MSP430 P6 0 NA Ambient Light Sensor MCU_PWR MSP430 P6 1 NA SPI Flash MCU_PWR MSP430 P7 6 IO_PWR swap R17 R18 LCD MCU_PWR MSP430 P7 7 IO_PWR swap R29 R30 Table 11 Component Power segment overview ...

Page 28: ...is to program the onboard MSP430 with you own custom software which configures the MSP430 pins to minimize current consumption and makes the MSP430 enter a low power mode 5 a Disable USB MCU b Hold MSP430 in reset Figure 18 Switch and jumper settings to disable both SmartRF TrxEB MCUs 7 2 Select power source When connecting an external MCU board to the SmartRF TrxEB there are typically two options...

Page 29: ... shows where the signals listed Table 12 and Table 13 can be found on the P7 EM I O breakout header on SmartRF TrxEB TrxEB Signal Name TrxEB breakout pin Description RF_RESET_N P7 10 Signal used to reset EM board RF_SPI0_SCLK P7 12 EM SPI interface clock signal RF_SPI0_CS_N P7 14 EM SPI interface chip select signal active low RF_SPI0_MOSI P7 16 EM SPI interface MOSI signal RF_SPI0_MISO P7 18 EM SP...

Page 30: ...ed with EM SPI MISO P1_3 P7 4 Transceiver GPIO2 P1_2 RF_SPI1_SCLK P7 3 Transceiver GPIO3 Table 13 Strapping overview to transceiver GPIO to an external MCU P7 20 GND P7 18 GPIO1 MISO P7 16 SPI MOSI P7 14 CSn P7 12 SCLK GPIO3 GPIO2 P7 4 GPIO0 P7 8 RESET P7 10 Figure 20 P7 with strapping to connect external MCU to SmartRF TrxEB NOTE Transceiver EM boards from Texas Instruments share much of the same...

Page 31: ...s remember to power off the SmartRF TrxEB before strapping signals After strapping these three signals combo EMs can be used together with SmartRF Studio and SmartRF TrxEB EM board signal Strapping MSP430 I O breakout HGM High Gain Mode P3 5 P5 6 PA_EN Power Amplifier Enable P3 4 P2 7 LNA_EN Low Noise Amplifier Enable P1 4 P5 7 Table 14 Signal strapping for SmartRF Studio combo EM support on Smart...

Page 32: ...he USB MCU is in UART Mode described in section 6 1 2 When developing MSP430 code to communicate via the USB MCU keep in mind that the standard USB MCU firmware only supports a two line UART interface see section 6 1 2 for further details 9 2 2 Accelerometer The onboard MSP430 MCU has access to accelerometer A1 On SmartRF TrxEB revision 1 3 0 the accelerometer axes are as shown in Figure 24 Figure...

Page 33: ...Switch S2 input P1 7 P1_7 CC Debug Data RF1 10 P2 0 RF_UART_RXD RF_SPI1_MOSI GPIO signal to EM board RF1 9 P2 1 USB_DBG_DD CC2511 CC Debug Interface Data P2 2 USB_DBG_DC CC2511 CC Debug Interface Clock P2 3 USB_MODE Switch S1 input P2 4 USB_LED USB LED and Forced Recovery signal Table 15 USB MCU pin out on SmartRF TrxEB rev 1 3 0 9 4 MSP430 MCU pin out For details on the pin out for MSP430 port 1 ...

Page 34: ...removed It is replaced by a RC filter R22 and C50 to remove ripple during reset line state transitions See the schematics for EB revision 1 5 0 for more details 10 2 2 Accelerometer The onboard accelerometer A1 has been rotated 180 degrees compared to EB revision 1 3 0 The accelerometer axes are given in Figure 26 Silk print has been added on the EB backside indicating the accelerometer axes Figur...

Page 35: ...ision 1 3 0 swapped and placed next to the wrong test point This has been corrected as seen in Figure 27 Figure 27 Correct silk print for MCLK and SMCLK test points Silk print has been added to the backside for EB revision 1 5 0 The silk print indicates the orientation of the accelerometer axes see section 10 2 1 and power source jumper configurations see section 6 3 10 3 USB MCU pin out Same as r...

Page 36: ...d below 1 Turn off the evaluation board EB 2 Disconnect any connected evaluation module EM 3 Plug in the USB cable and turn the power switch on 4 The SmartRF TrxEB device should appear in the SmartRF Studio main window as seen in Figure 28a 5 Double click the TrxEB device SmartRF Studio will prompt if you wish to update the EB firmware Figure 28b 6 Confirm that you wish to update the EB firmware a...

Page 37: ...3 While doing as explained in the second step turn the EB power on When the board is powered up the bootloader will not attempt to start the firmware and it will remain in control of the board LED D6 USB LED will be blinking with a 1 second interval indicating that the bootloader is running You can use the USB LED state as an indicator to whether you have a working bootloader or not When the bootl...

Page 38: ...xxx Development Tools USB driver Cebal Q4 Nothing happens when I power up the evaluation board Why A4 Make sure the power selection jumpers on header P17 are set according to your power source see section 6 3 Check that the Mode Selection switches section 6 1 are not set to disable the USB MCU Also make sure the board current jumpers P10 P13 and P15 are all short circuited Q5 When powering up the ...

Page 39: ...i com docs toolsw folders print flash programmer html 5 MSP430x5xx MSP430x6xx Family User s Guide http www ti com lit slau208 6 MSP430F5438A Product Page http focus ti com docs prod folders print msp430f5438a html 7 Electronic Assembly DOGM128 6 Datasheet http www lcd module com eng pdf grafik dogm128e pdf 8 VTI CMA3000 D01 http www vti fi en products accelerometers consumer_electronics cma3000_se...

Page 40: ...SWRU294 Page 40 40 14 Document History Revision Date Description Changes SWRU294 2011 06 30 Initial release ...

Page 41: ...SWRU294 Appendix A Schematics SmartRF TrxEB 1 3 0 ...

Page 42: ......

Page 43: ......

Page 44: ......

Page 45: ......

Page 46: ......

Page 47: ......

Page 48: ......

Page 49: ...SWRU294 Appendix B Schematics SmartRF TrxEB 1 5 0 ...

Page 50: ......

Page 51: ......

Page 52: ......

Page 53: ......

Page 54: ......

Page 55: ......

Page 56: ......

Page 57: ...horized for use in safety critical applications such as life support where a failure of the TI product would reasonably be expected to cause severe personal injury or death unless officers of the parties have executed an agreement specifically governing such use Buyers represent that they have all necessary expertise in the safety and regulatory ramifications of their applications and acknowledge ...

Reviews: