background image

15

SNAU210A – March 2017 – Revised March 2020

Submit Documentation Feedback

Copyright © 2017–2020, Texas Instruments Incorporated

SYSREF Feature

Appendix G

SNAU210A – March 2017 – Revised March 2020

SYSREF Feature

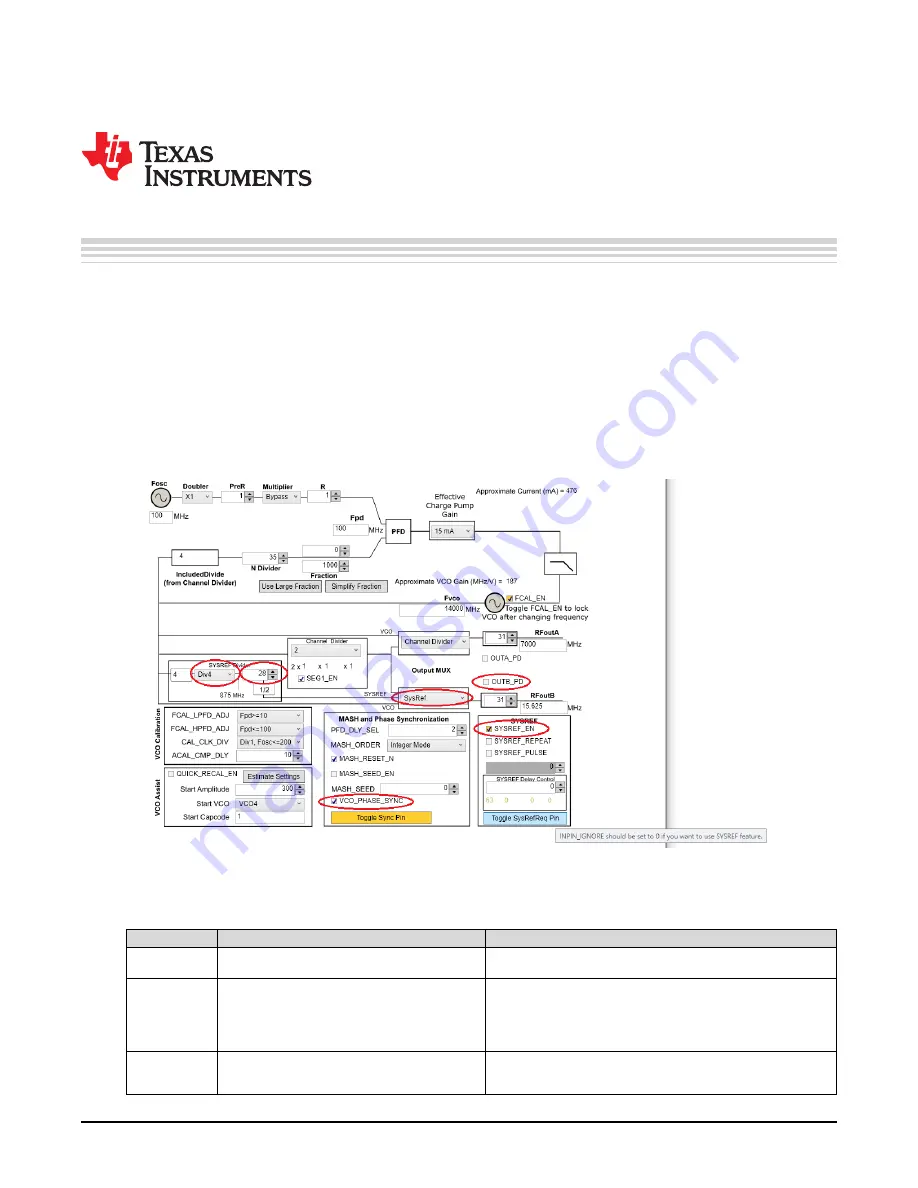
1. Configure TICS Pro

PLL

tab for SYSREF.

Check the

SYSREF_EN

box and

VCO_PHASE_SYNC

box.

Change

OUTB_MUX

to

SysRef

and uncheck the

OUT_PD

box.

Confirm the

Interpolator frequency

is between 800 MHz and 1500 MHz. If not, change the

SYSREF_DIV_PRE

drop-down to

Div2

or

Div4

.

To modify SYSREF frequency, change the value in the

SYSREF_DIV

box.

Go to

User Controls

in the side bar, make sure the

INPIN_IGNORE

box is unchecked.

2. Click the

Toggle SysRefReq Pin

box to initiate SYSREF.

Figure 20. SYSREF Example

Table 9. SYSREF Modes

MODE NAME

DESCRIPTION

TICS PRO - SYS REF SETTINGS

Master -

Continuos

LMX2594 generates SysRef pulses as long as
SysRefReq pin is held high.

Default mode. See quick start instructions

Master - Pulse

LMX2594 generates a finite number of pulses as long
as the SysRefReq pin is held high.

Note: SysRefReq

must be held high for the duration of the pulses.

• Uncheck

SysRefReq

under

Pins

in

User Controls

tab

• Check

SYSREF_PULSE

• Set

SYSREF_PULSE_CNT

to desired number of pulses

• Check

SysRefReq

under

Pins

in

User Controls

tab

Repeater

RFOUTB will repeat external input to SysRefReq pin.
Output will be reclocked to LMX2594 internal
frequency

• Uncheck

SysRefReq

• Check

SysRef_Repeat

Summary of Contents for LMX2594EVM

Page 1: ...as in the LMX2594 can generate or repeat the SYSREF signal and is designed for clock high speed data converters The integrated jitter from the EVM measurements is less than 50 fs at 9 GHz carrier frequency By providing a SYNC signal the user can synchronize the output phase across multiple LMX2594 devices The LMX2594 can also generate a frequency ramp as demonstrated in this evaluation module With...

Page 2: ...x A Schematic 7 Appendix B Bill of Materials 8 Appendix C Board Layers Stack Up 9 Appendix D Changing Reference Oscillator and Setup 11 Appendix E Connecting Reference Pro 12 Appendix F Ramping Feature 14 Appendix G SYSREF Feature 15 Appendix H Enabling Onboard DC DC Buck Converter TPS62150 16 Trademarks PLLATINUM is a trademark of Texas Instruments All other trademarks are the property of their r...

Page 3: ...nd Low Noise PLL With Integrated VCO 1 Evaluation Board Setup Figure 2 LMX2594EVM Setup 1 Power a Set power supply to 3 3 V with 600 mA current limit and connect to VCC SMA 2 Input Signal a Connect a clean 100 MHz clock source to the OSCinP SMA 3 Programming Interface Reference Pro will provide SPI interface to program LMX2594 a Connect USB cable from laptop or PC to USB port in Reference Pro This...

Page 4: ...MUXout 4 SDI 5 Not Used 6 GND 7 RampCLK 8 SCK 9 SysRefReq 10 SYNC 2 1 Installing the Software 1 Download TICS Pro from the TI Website at www ti com tool TICSPRO SW 2 Install the software by following the wizard 3 Search for the LMX2594 In the menu bar search Select Device PLL VCO LMX2594 Figure 4 Search for LMX2594 on TICS Pro 4 You are now ready to use this software Verify that you can communicat...

Page 5: ...3 Bringing LMX2594 to a Lock State 1 Load the default mode by clicking on Default configuration Default Mode xxxx xx xx 2 From the menu bar select USB communications Write All Registers to write all the registers to LMX2594 Figure 7 TICS Pro GUI LMX2594 Default Configuration 4 Loop Filter Configuration The parameters for the loop filters are Table 2 Loop Filter Configuration PARAMETER VALUE VCO Ga...

Page 6: ...n 15 mA Phase Detector Frequency MHz 200 MHz VCO Frequency Designed for 15 GHz but works over the whole frequency range Figure 8 Loop Filter Configuration For detailed design and simulation of TI s PLLATINUM integrated circuits see the PLLatinum Sim Tool For application notes blogs or videos on TI PLL products see http www ti com pll 5 Key Results to Expect Figure 9 Phase Noise Plot at 14 GHz Outp...

Page 7: ...U210A March 2017 Revised March 2020 Submit Documentation Feedback Copyright 2017 2020 Texas Instruments Incorporated Schematic Appendix A SNAU210A March 2017 Revised March 2020 Schematic Figure 10 Schematic ...

Page 8: ...0805 TDK C2012X5R1C226K125AC 1 Css CAP CERM 3300 pF 50 V 5 C0G NP0 0603 MuRata GRM1885C1H332JA01D 1 D1 LED Green SMD Lite On LTST C190GKT 1 L1 L2 Inductor Multilayer Air Core 18 nH 0 3 A 0 36 Ω SMD MuRata LQG15HS18NJ02D 2 L1_TPS Inductor Shielded Composite 2 2 µH 3 7 A 0 02 Ω SMD Coilcraft XFL4020 222MEB 1 MUXout_SW Switch SPST Slide Off On 2 Pos 0 1 A 20 V SMD CTS Electrocomponents 219 2MST 1 OSC...

Page 9: ... 9 SNAU210A March 2017 Revised March 2020 Submit Documentation Feedback Copyright 2017 2020 Texas Instruments Incorporated Board Layers Stack Up Appendix C SNAU210A March 2017 Revised March 2020 Board Layers Stack Up The top layer is 1 oz copper Figure 11 Board Layer Stack Up Figure 12 Top Layer ...

Page 10: ...ti com 10 SNAU210A March 2017 Revised March 2020 Submit Documentation Feedback Copyright 2017 2020 Texas Instruments Incorporated Board Layers Stack Up Figure 13 GND Layer Figure 14 Power Layer Figure 15 Bottom Layer ...

Page 11: ...hallenge at 100 Hz offset 1 A noise source 10 dB down from the PLL noise will contribute to raise the noise by 0 4 dB Table 4 Reference Oscillator Requirements 100 MHz REFERENCE MINIMUM REQUIREMENTS FOR A 0 4 dB IMPACT ON PLL INBAND PN 1 Offset Hz 100 1k 10k 100k Noise level dBc Hz 139 149 159 164 There are different options to provide a reference oscillator to LMX2594 Use on board oscillator enab...

Page 12: ... control output frequency control and output enable control These control pins can be configured through the jumpers shown in Table 6 and Table 7 Jumpers FS1 FS0 OS and OE can be used to configure the corresponding control pin to either high or low state by strapping the center pin to VDD position tie pins 2 3 or GND position tie pins 1 2 respectively Connections from the VDD position to the devic...

Page 13: ... 50 Ω to VCC 2 V termination is required on receiver 2 100 Ω differential termination R31 is provided on Reference Pro PCB Removing the differential termination on the EVM is possible if the differential termination is available on the receiver Table 8 Output Termination Schemes OUTPUT FORMAT COUPLING COMPONENT VALUE LVPECL AC default EVM configuration R25 R28 0 Ω R26 R29 150 Ω C24 C25 0 01 µF R27...

Page 14: ...edback Copyright 2017 2020 Texas Instruments Incorporated Ramping Feature Appendix F SNAU210A March 2017 Revised March 2020 Ramping Feature VCO is ramping from 12 to 12 125 GHz This can be set up on the ramp GUI tab Figure 18 Ramping Example Figure 19 Ramping Example ...

Page 15: ...PIN_IGNORE box is unchecked 2 Click the Toggle SysRefReq Pin box to initiate SYSREF Figure 20 SYSREF Example Table 9 SYSREF Modes MODE NAME DESCRIPTION TICS PRO SYS REF SETTINGS Master Continuos LMX2594 generates SysRef pulses as long as SysRefReq pin is held high Default mode See quick start instructions Master Pulse LMX2594 generates a finite number of pulses as long as the SysRefReq pin is held...

Page 16: ...NAU210A March 2017 Revised March 2020 Enabling Onboard DC DC Buck Converter TPS62150 Figure 21 Resistor Configuration to Enable DC DC 1 MUST SWITCH R35 to Rtps1 2 MUST SWITCH R34 to Rtps2 3 Populate Rtps 4 DC DC circuitry was optimized for efficiency for 5 to 8 V but a voltage of 3 3 V to 17 V can be applied to VCC SMA after resistor network is configured correctly from steps above ...

Page 17: ...ory Revision History NOTE Page numbers for previous revisions may differ from page numbers in the current version Changes from Original March 2017 to A Revision Page Added abstract 1 Added external reference clock in Figure 2 3 Changed to use external reference clock 3 Added PCB layout diagrams 9 Added diagrams for different reference clock input configuration 11 ...

Page 18: ...other than TI b the nonconformity resulted from User s design specifications or instructions for such EVMs or improper system design or c User has not paid on time Testing and other quality control techniques are used to the extent TI deems necessary TI does not test all parameters of each EVM User s claims against TI under this Section 2 are void if User fails to notify TI of any apparent defects...

Page 19: ... These limits are designed to provide reasonable protection against harmful interference in a residential installation This equipment generates uses and can radiate radio frequency energy and if not installed and used in accordance with the instructions may cause harmful interference to radio communications However there is no guarantee that interference will not occur in a particular installation...

Page 20: ...y for convenience and should be verified by User 1 Use EVMs in a shielded room or any other test facility as defined in the notification 173 issued by Ministry of Internal Affairs and Communications on March 28 2006 based on Sub section 1 1 of Article 6 of the Ministry s Rule for Enforcement of Radio Law of Japan 2 Use EVMs only after User obtains the license of Test Radio Station as provided in R...

Page 21: ... any interfaces electronic and or mechanical between the EVM and any human body are designed with suitable isolation and means to safely limit accessible leakage currents to minimize the risk of electrical shock hazard User assumes all responsibility and liability for any improper or unsafe handling or use of the EVM by User or its employees affiliates contractors or designees 4 4 User assumes all...

Page 22: ...OR DAMAGES ARE CLAIMED THE EXISTENCE OF MORE THAN ONE CLAIM SHALL NOT ENLARGE OR EXTEND THIS LIMIT 9 Return Policy Except as otherwise provided TI does not offer any refunds returns or exchanges Furthermore no return of EVM s will be accepted if the package has been opened and no return of the EVM s will be accepted if they are damaged or otherwise not in a resalable condition If User feels it has...

Page 23: ...se resources are subject to change without notice TI grants you permission to use these resources only for development of an application that uses the TI products described in the resource Other reproduction and display of these resources is prohibited No license is granted to any other TI intellectual property right or to any third party intellectual property right TI disclaims responsibility for...

Page 24: ...Mouser Electronics Authorized Distributor Click to View Pricing Inventory Delivery Lifecycle Information Texas Instruments LMX2594EVM ...

Reviews: