background image


swru138 

 22/33 

7.3.3 USB 

power 

When SmartRF05EB is connected to a PC via a USB cable, it can draw power from the USB 
bus. The onboard voltage regulator supplies approx 3.05 V to the board. The power source 
selection jumper should short circuit pin 2 and 3 of header P11. 
 

7.3.4  Laboratory power supply 

When connecting a lab power supply, ground should be connected to any of the GND pads 
on the board. Remove the power source selection jumper and apply a voltage in the range 
from 2.7V to 3.6V to pin 2 on header P11. The main power switch will not have any effect in 
this case.  
 

WARNING!

 Note that this will bypass all voltage regulators on the board so there might be a 

risk of damaging the components on the board if the voltage on pin 2 on header P11 is lower 
than -0.3V or higher than 3.9V (maximum ratings for CC2511).  
 

7.4 

UART RS232 interface 

The UART interface can be used by custom applications for communication with other 
devices. The interface uses a voltage translation device so that the port is compatible with 
RS232 signalling. The RS232 voltage converter can be disabled by shorting pin 1 and 2 on 
P10 with a jumper. 
 
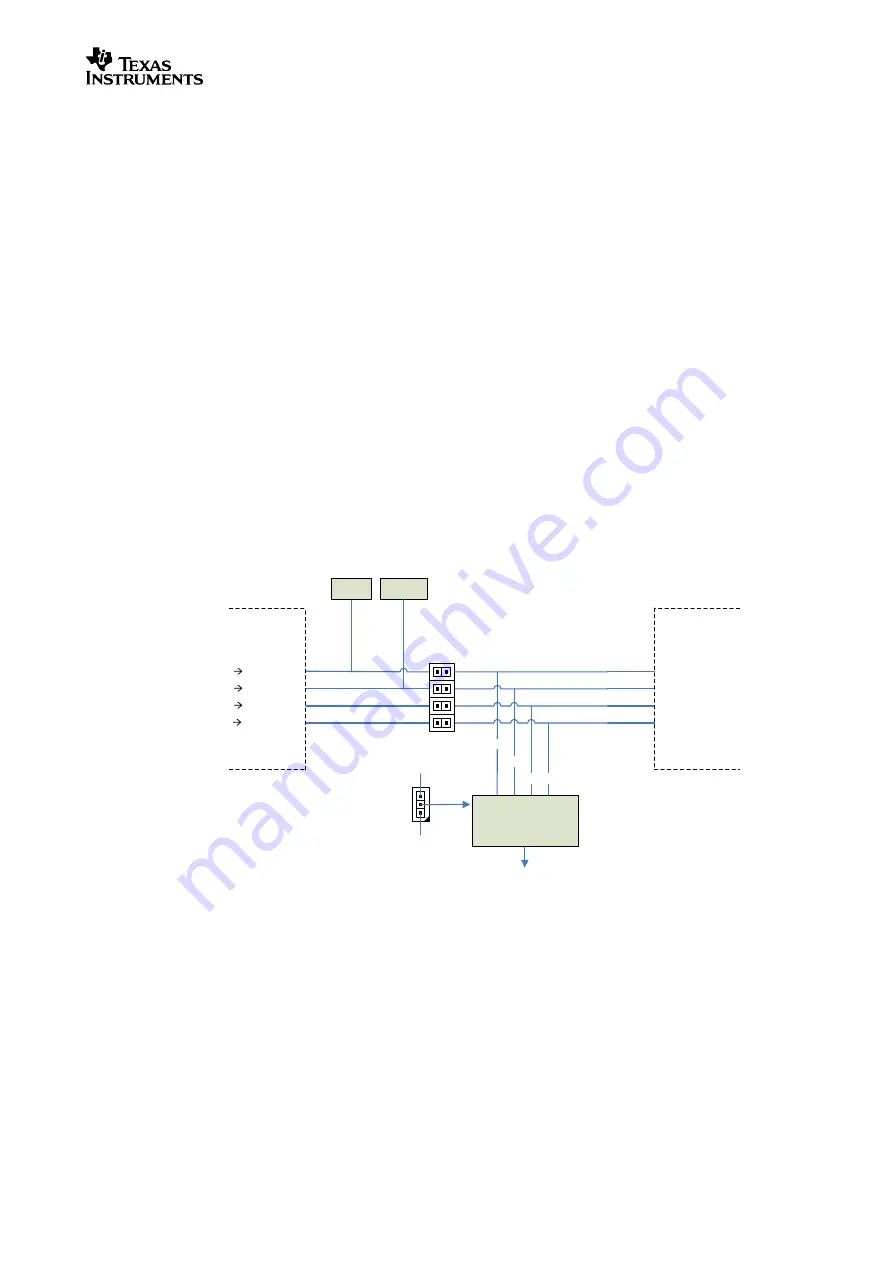
The figure below gives a detailed overview of the UART signals and how they are connected 
to the different devices on the EB. 
 

RTS

USB_UART_RTS   CC2511 CTS

CTS

RX

TX

USB_UART_CTS   CC2511 RTS

USB_UART_RX   CC2511 TX

USB_UART_TX   CC2511 RX

RTS

CTS

RX TX

LED

RS232

Level Converter

EN

EM Interface

CC2511

Button

P1

Vcc

GND

P10

P16

1-2

3-4

5-6

7-8


Figure 18 - UART RS232 signals and jumpers 

 
As the figure shows, signals are crossed on the EB between the EM and CC2511 and 
between the EM and the RS232 level converter/DE9 connector. The implication is that if the 
board connected to the EM interface communicates with a PC using UART, use a straight 
serial cable. To communicate with CC2511 from a PC, a null-modem cable (crossed) has to 
be used. UART communication between CC2511 and the controller on the EM works without 
crossing any signals (RX connected to TX and vice versa). 
 
Also note that the USB button and USB LED share the RTS and CTS signals going to the 
CC2511. To avoid any conflicts when the RTS/CTS UART flow control signal are used, 
disconnect jumpers 1-2 and 3-4 on P1. They are disconnected by default. 

Summary of Contents for CC2520

Page 1: ...CC2520 Development Kit User s Guide swru138...

Page 2: ...andard firmware 19 7 1 2 USB MCU pin out 20 7 2 MODE SELECTION SWITCH 21 7 3 POWER SOURCES 21 7 3 1 Battery power 21 7 3 2 DC Jack 21 7 3 3 USB power 22 7 3 4 Laboratory power supply 22 7 4 UART RS232...

Page 3: ...www ti com lpw 2 About this manual This manual contains reference information about the hardware components of the CC2520 Development Kit Chapter 4 will briefly describe the contents of the developmen...

Page 4: ...d Circuit JTAG Joint Test Action Group kB Kilo Byte 1024 byte LCD Liquid Crystal Display LCL Local LED Light Emitting Diode LPW Low Power Wireless MCU Micro Controller PER Packet Error Rate RF Radio F...

Page 5: ...430F2618 Use SmartRF Studio to perform RF measurements The radio can be easily configured to measure sensitivity output power and other RF parameters Prototype development All I O from the CC2520 are...

Page 6: ...lugged into the SmartRF05EB and it is compatible with most TI LPW RF IC EMs CC2520EM This is the CC2520 Evaluation Module EM with the RF IC and necessary external components and matching filters for g...

Page 7: ...from the Texas Instruments website www ti com smartrfstudio where you will also find a complete user manual 5 2 Installing SmartRF Studio and Windows drivers Before your PC can communicate with the S...

Page 8: ...5EB for the first time Windows XP If you did a complete install of SmartRF Studio the driver to use is already copied to your hard drive Select No not this time and continue with Next Figure 3 Select...

Page 9: ...C Program Files Texas Instruments Extras Drivers for the needed inf and sys driver files Figure 4 The driver installation is completed Windows XP The driver is now installed and the computer should be...

Page 10: ...F Studio the evaluation board should now appear in the SmartRF05 DK tab Double click on the device and a new window opens giving access to all of the registers on the chip as well as making it possibl...

Page 11: ...8 Figure 7 CC2520EM and SmartRF05EB The first option Figure 7 should be used when the RF Module is controlled by SmartRF Studio via the USB controller on SmartRF05EB It is also possible to implement...

Page 12: ...e board can be powered through the MSP FET430UIF by setting the appropriate switch on the board See chapter 8 for details The development kit comes with two CCMSP EM430F2618 allowing two complete node...

Page 13: ...connected to SmartRF05EB After installation of SmartRF Studio and plugging the EB to the PC via USB the driver can be installed as described in chapter 5 2 When starting SmartRF Studio the following w...

Page 14: ...er and the other to be the transmitter o On the receiver select the Packet RX tab o Set up basic test parameters and press the Start packet RX button o On the transmitter select the Packet TX tab o St...

Page 15: ...in power switch from OFF to ON 4 Follow the instructions on the LCD by using the joystick to select modes and set up one node as transmitter and one as receiver 5 When the test starts it displays a PE...

Page 16: ...tudio documentation for more information about how to use the tool 6 1 Output power testing SmartRF05EB USB CC2520EM 50 Ohm coax cable Spectrum Analyser Figure 13 Output power measurement set up Inste...

Page 17: ...iven distance from the transmitter Then run the PER test to measure packet errors and possibly the signal strength Repeat at different distances to get an idea of the range that can be obtained By add...

Page 18: ...gure 14 SmartRF05EB Figure 15 shows the main components of the board and outlines the main communication buses Figure 15 SmartRF05EB architecture The main component on the board is the USB controller...

Page 19: ...rogrammer or hardware needed The boot loader communicates with SmartRF Studio or SmartRF Flash Programmer When the USB controller starts running it will check for a valid version of firmware in flash...

Page 20: ...P1 0 USB_IFC_CTRL Enables the USB interface when it is set high Set either by the boot loader or the firmware P1 1 USB_DBG_DC Debug clock used when CC2511 communicates with another LPW Soc via the deb...

Page 21: ...The power source can be selected using the power source selection jumper on header P11 Figure 17 Main power switch and power selection jumper The main power supply switch P8 turns off all power source...

Page 22: ...with RS232 signalling The RS232 voltage converter can be disabled by shorting pin 1 and 2 on P10 with a jumper The figure below gives a detailed overview of the UART signals and how they are connecte...

Page 23: ...PI bus and the additional control signals LCD CS LCD Mode and LCD Reset to control the LCD 7 7 Buttons There are five buttons on the evaluation board Button 1 and Button 2 are only connected to the EM...

Page 24: ..._LCD_MODE 11 12 EM_DBG_DC EM_LCD_FLASH_RESET 13 14 EM_CS EM_JOY_LEVEL 15 16 EM_SCLK EM_POT_R 17 18 EM_MOSI EM_MISO 19 20 GND Table 3 I O connector P18 pin out Signal name Pin Pin Signal name NC 1 2 NC...

Page 25: ...e flow control No 5 6 UART_RX Received data connected to TX on CC2511 Yes 7 8 UART_TX Transmitted data connected to RX on CC2511 Yes 9 10 SNIFF_DATA Sniff interface bit stream of data from radio No 11...

Page 26: ...26 LED2 Control signal for LED D2 Set high to turn LED on Yes 27 28 LED3 Control signal for LED D3 Set high to turn LED on Yes 29 30 LED4 Control signal for LED D4 Set high to turn LED on Yes 31 32 J...

Page 27: ...is used for programming and debugging software running on the MSP430F2618 Please refer to the CC2520DK Software User s Guide for further details on how the debugger can be used Figure 21 JTAG and powe...

Page 28: ...can be accessed from the CC2511 Custom software can be implemented to use the features It is also possible to connect an external cable to access the BSL Please refer to application reports www ti com...

Page 29: ...Mode 2 SPI_M2 An alternative mode is to use only one SPI bus for all devices This is achieved by using SPI mode 2 Figure 25 SPI Mode 2 In this case USCIB0 is used for accessing both the SPI devices on...

Page 30: ...the bus operating as a passive slave This chip select signal is routed to the EM chip select signal enabling its SPI interface The CC2511 can now operate as SPI master and communicate with the EM as...

Page 31: ...the following window Select the path as indicated in the figure above Windows should now be able to find and install the required driver If the above fails select Don t search I will choose the driver...

Page 32: ...ew firmware on the board Q6 How can I measure the current consumption of the radio on the EM A6 The easiest way to measure current consumption of the chip in various modes is to connect the EM directl...

Page 33: ...2520dk 3 CC2520 Software Examples User s Guide www ti com lit swru137 4 CC2520 website www ti com cc2520 5 SmartRF Studio www ti com smartrfstudio 6 TIMAC www ti com timac 7 DN002 Practical Sensitivit...

Page 34: ...swru138 Appendix A SmartRF05EB Schematics...

Page 35: ......

Page 36: ......

Page 37: ......

Page 38: ......

Page 39: ......

Page 40: ......

Page 41: ...swru138 Appendix B CCMSP EM430F2618 Schematics...

Page 42: ......

Page 43: ......

Page 44: ......

Page 45: ...ce and is an unfair and deceptive business practice TI is not responsible or liable for any such statements TI products are not authorized for use in safety critical applications such as life support...

Reviews: