background image

VBUS

GND

VBUS: 3.9V to 6.5V

J1

1

2

3

4

5

6

7

8

J7

VBUS

D+_PSEL

JP3

D-_/PG

JP6

30.1k

R14

10K

TS

10.0k

R15

5.23k

R12

JP5

REGN

JP7

REGN

RTOP TS

4

1

2

3

J6

SCL_OTG

SDA_GND

CD_/CE

10k ohm

R5

383

R3

1.00k

R4

TP8

TP7

TP9

TP10

TP13

TP12

VBUS_IC

PMID

SDA_GND

TP15

TP14

SNS_SYS

BAT

TP11

REGN

MID_/PG

/INT_VSET

SCL_OTG

TP16

TP17

TS

TP18

TP19

D-_/PG

TP20

TP21

D+_PSEL

TP22

CD_/CE

TP23

TP24

TP25

TP26

STAT

TP27

CBSET_ICHGSET

ILIM

10.0k

R10

10.0k

R11

PULL-UP

10.0k

R13

1.02k

R17

PULL-UP

Green

D4

STAT

JP10

1.02k

R18

Green

D5

/PG_LED

SYSTEM

GND

BAT

ISYS+IBAT:  up to 2A

J5

BAT

SNS_SYS

TP3

TP4

TP5

TP6

J2

1

2

JP1

PULL-UP

BAT

SYS

LDO_IN

10

R8

20V

D1

40V

D2

0.047uF

C9

REGN

4.7uF

C14

0

R7

110pF

C13

20V

D3

0.01uF

C10

10uF

C11

22uF

C4

0.01uF

C2

22uF

C3

0.01uF

C8

10uF

C7

2

3

JP4

10.0k

R16

REGN

D+_PSEL

PSEL

GND

REGN

PMID

GND

J3

0.01uF

C1

0.01

R1

TP1

TP2

D-

10

8

7

VSET

NC

GND

CE

2

9

D+

VBUS

PMID

PMID

19
20

SW

SW

15

16

13

14

BTST

REGN

25

BQ25886RGER

U1

STAT

TS

ILIM

CD_/CE

SDA_GND

SCL_OTG

D+_PSEL

D-_/PG

/INT_VSET

SW

SW

10.0k

R9

GND

1uH

L1

22uF

C5

22uF

C12

10uF

C6

IBUS: up to 3A

VSYS:  up to 8.6V

VBAT: up to 8.4V

VBUS

VBUS_IC

PMID

1uH

L2

JP9

CD_/CE

GND

10k ohm

R19

NT1

Net-Tie

1uF

C15

20V

D6

20V

D7

JP14

JP15

0.01

R2

0.01

R6

2.2uF

C17

1uF

C16

TLV70433DBVT

GND

3

IN

NC

5

U2

SNS_SYS

CD_/CE

82

R20

82

R21

82

R22

82

R23

82

R24

18.0k

R29

39.2k

R26

75.0k

R27

JP16

JP17

JP18

JP19

/INT_VSET

150k

R28

TOP-/BOT+

MID_/PG

MID_/PG

10k ohm

R31

51k

R32

270

R30

MID_/PG

CBSET_ICHGSET

CBSET_ICHGSET

D-_/PG

SCL_OTG

JP8

OTG

GND

JP13

JP2

TP29

TP28

TS

TS

J4

JP12

1

2

3

JP11

MID_/PG

8.2V

8.8V

8.7V

8.4V

82

R25

0.1uF

C18

TP30

SW

0

R33

300

R34

0.01uF

C19

Board Layout, Schematic, and Bill of Materials

www.ti.com

12

SLUUC11 – February 2019

Submit Documentation Feedback

Copyright © 2019, Texas Instruments Incorporated

BQ25886 QFN Standalone boost-mode battery charger evaluation module

Advance Information

4.2

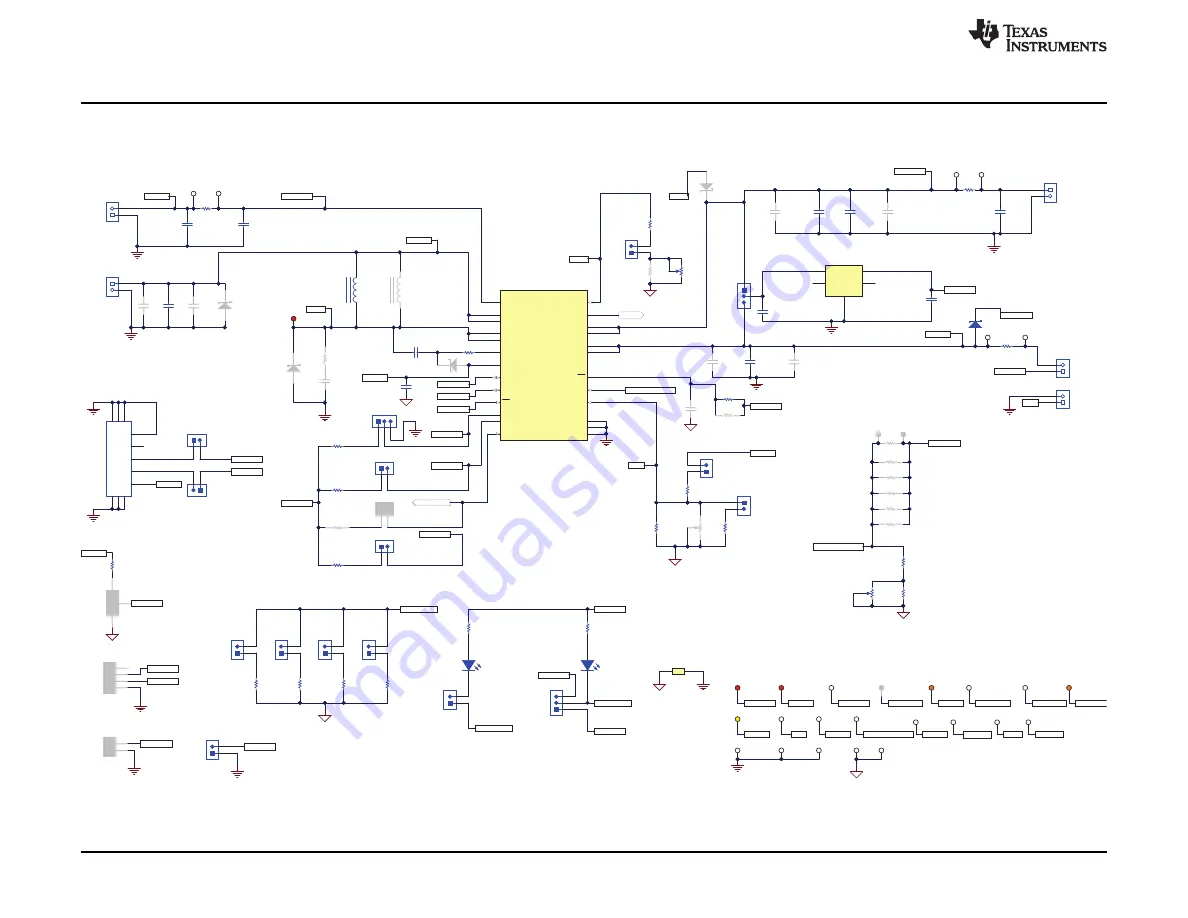
Schematic

Figure 9

shows the schematic for the BQ2588x QFN EVM.

Figure 9. BQ25886EVM Schematic

Summary of Contents for BQ25886

Page 1: ... the term evaluation module are synonymous with the BQ25886 QFN evaluation module unless otherwise noted Contents 1 Introduction 2 1 1 EVM Features 2 1 2 I O Descriptions 2 2 Test Summary 4 2 1 Equipment 4 2 2 Charge Mode 5 2 3 OTG Mode 8 2 4 Helpful Tips 10 3 PCB Layout Guidelines 10 4 Board Layout Schematic and Bill of Materials 11 4 1 Board Layout 11 4 2 Schematic 12 4 3 Bill of Materials 13 Li...

Page 2: ...FET switch mode boost charger in the QFN package Use of an onboard USB input adapter for connecting to a USB source and either communication through D D to set the default input current limit Onboard test points sense resistors and jumpers facilitate measurement of high efficiency and high accuracy voltage and current regulation See the device data sheet Table 1 for detailed features and operation...

Page 3: ... through diode and resistor to pullup source Installed JP11 Pulls up PG through diode and resistor to pullup source Shunt pins 2 and 1 JP12 Pull up GND pin to GND Shunt pins 2 and 3 JP13 NC pin Open JP14 DNI NA JP15 Pull up CE pin through 10 kΩ resistor Open JP16 Connects VSET to GND through 18 kΩ resistor sets VREG to 8 2V Open JP17 Connects VSET to GND through 39 2 kΩ resistor sets VREG to 8 8V ...

Page 4: ...necessary for this procedure 2 Battery simulator BS 1 Four quadrant supply set to constant voltage 9 2 V Example Kepco Bipolar Power Supply BOP 20 5M DC 0 to 20 V 0 to 5 A or higher and Keithley 2420 Sourcemeter 3 Load 1 Electronic or resistive load capable of sinking up to 3 A at 9 2 V 4 Meters Six Fluke 75 multimeters equivalent or better Alternatively four equivalent voltage meters and two equi...

Page 5: ...BUS SYS and BAT as close to the IC pins as possible Voltmeters 4 through 6 measure the voltage across 0 01 Ω which gives the current 3 Before attaching to the EVM set battery simulator 1 BS 1 no higher than 7 6 V and at a 2 5 A current limit and set power supply 1 PS 1 for 5 5 V and a 3 5 A current limit 4 Turn off BS 1 and PS 1 then attach BS 1 to the BAT J4 and PGND J5 terminal of the EVM and at...

Page 6: ...S_S TP26 AGND measures 5 5 V 50 mV and adjust BS 1 until VM3 TP15 BAT TP26 AGND measures 7 6 V 50 mV Measure on VM6 V TP5 RBAT TP6 RBAT 10 mV 0 7 mV which corresponds to ICHG 1 0 A 5 through a 0 010 Ω 1 resistor Voltage of 0 1 mV is added to account for DMM accuracy Measure on VM4 V TP1 RAC TP2 RAC 14 8 mV 0 7 mV which corresponds to IVBUS 1 48 A 5 accounting for efficiency variation across ICs an...

Page 7: ...entation Feedback Copyright 2019 Texas Instruments Incorporated BQ25886 QFN Standalone boost mode battery charger evaluation module Advance Information 2 2 3 Charge Mode Evaluation Results Figure 2 shows the Charge Mode Startup graph Figure 2 Charge Mode Startup ...

Page 8: ...hrough 3 VM1 VM2 and VM3 connect to Kelvin test points for measuring VBUS SYS and BAT as close to the IC pins as possible Voltmeters 4 through 5 measure the voltage across 0 01 Ω which gives the current 3 Set BS 1 to 7 6 V and at a 6 A current limit then turn off BS 1 and attach to the J4 BAT GND terminal of the EVM 4 With electronic load disabled attach to the J1 VBUS GND terminal of the EVM 5 Pl...

Page 9: ...ocumentation Feedback Copyright 2019 Texas Instruments Incorporated BQ25886 QFN Standalone boost mode battery charger evaluation module Advance Information 2 3 3 OTG Mode Evaluation Results Figure 4 shows the OTG Mode Startup graph Figure 4 OTG Mode Startup ...

Page 10: ...series between the power sources and power pins 3 PCB Layout Guidelines Minimize the switching node rise and fall times for minimum switching loss Proper layout of the components that minimize the high frequency current path loop is important to prevent electrical and magnetic field radiation and high frequency resonant problems To ensure proper layout follow the priority list for this printed cir...

Page 11: ...ts Incorporated BQ25886 QFN Standalone boost mode battery charger evaluation module Advance Information 4 Board Layout Schematic and Bill of Materials 4 1 Board Layout Figure 5 through Figure 8 show the PCB board layouts Figure 5 BQ2588xEVM Top Overlay Figure 6 BQ2588xEVM Layer 2 Figure 7 BQ2588xEVM Layer 3 Figure 8 BQ2588xEVM Bottom Overlay ...

Page 12: ... PMID 19 20 SW SW 15 16 13 14 BTST REGN 25 BQ25886RGER U1 STAT TS ILIM CD_ CE SDA_GND SCL_OTG D _PSEL D _ PG INT_VSET SW SW 10 0k R9 GND 1uH L1 22uF C5 22uF C12 10uF C6 IBUS up to 3A VSYS up to 8 6V VBAT up to 8 4V VBUS VBUS_IC PMID 1uH L2 JP9 CD_ CE GND 10k ohm R19 NT1 Net Tie 1uF C15 20V D6 20V D7 JP14 JP15 0 01 R2 0 01 R6 2 2uF C17 1uF C16 TLV70433DBVT GND 3 IN NC 5 U2 SNS_SYS CD_ CE 82 R20 82 ...

Page 13: ...S016 Any C1 1 0 01uF CAP CERM 0 01 uF 25 V 10 X7R 0402 0402 GCM155R71E103 KA37D MuRata C3 C4 2 22uF CAP CERM 22 uF 25 V 20 X5R 0805 0805 GRM21BR61E226 ME44L MuRata C7 C11 2 10uF CAP CERM 10 uF 25 V 20 X5R 0603 0603 GRM188R61E106 MA73D MuRata C9 1 0 047uF CAP CERM 0 047 uF 25 V 10 X7R 0402 0402 GRM155R71E473 KA88D MuRata C14 1 4 7uF CAP CERM 4 7 uF 10 V 20 X5R 0402 0402 GRM155R61A475 MEAAD MuRata C...

Page 14: ...3SAAN Sullins Connector Solutions JP2 JP3 JP5 JP6 JP7 JP8 JP10 JP13 JP15 JP16 JP17 JP18 JP19 13 Header 100mil 2x1 Tin TH Header 2 PIN 100mil Tin PEC02SAAN Sullins Connector Solutions L2 1 1uH Inductor Shielded Drum Core Powdered Iron 1 uH 11 A 0 009 ohm SMD IHLP 2525CZ IHLP2525CZER1R 0M01 Vishay Dale LBL1 1 Thermal Transfer Printable Labels 0 650 W x 0 200 H 10 000 per roll PCB Label 0 650 x 0 200...

Page 15: ...k RES 150 k 1 0 1 W AEC Q200 Grade 0 0402 0402 ERJ 2RKF1503X Panasonic R29 1 18 0k RES 18 0 k 1 0 063 W AEC Q200 Grade 0 0402 0402 CRCW040218K0F KED Vishay Dale R30 1 270 RES 270 5 0 1 W 0603 0603 CRCW0603270RJ NEA Vishay Dale R32 1 51k RES 51 k 5 0 1 W 0603 0603 CRCW060351K0J NEA Vishay Dale R33 1 0 RES 0 5 0 063 W 0402 0402 RC0402JR 070RL Yageo America SH JP1 SH JP2 SH JP3 SH JP4 SH JP5 SH JP6 S...

Page 16: ... Texas Instruments BQ25886RGET Texas Instruments U2 1 Single Output LDO 150 mA Fixed 3 3 V Output 2 5 to 24 V Input with Ultra Low IQ 5 pin SOT 23 DBV 40 to 125 degC Green RoHS and no Sb Br DBV0005A TLV70433DBVT Texas Instruments C2 C8 C10 0 0 01uF CAP CERM 0 01 uF 25 V 10 X7R 0402 0402 GRM155R71E103 KA01D MuRata C5 0 22uF CAP CERM 22 uF 25 V 10 X5R 1206 1206 GRM31CR61E226 KE15L MuRata C6 0 10uF C...

Page 17: ...er 3 PIN 100mil Tin PEC03SAAN Sullins Connector Solutions JP9 JP14 0 Header 100mil 2x1 Tin TH Header 2 PIN 100mil Tin PEC02SAAN Sullins Connector Solutions L1 0 1uH Inductor Shielded Metal Composite 1 uH 3 3 A 0 04 ohm SMD 2 5x1 2x2mm DFE252012F 1R0M P2 MuRata Toko R4 0 1 00k RES 1 00 k 1 0 063 W 0402 0402 CRCW04021K00F KED Vishay Dale R8 0 10 RES 10 5 0 063 W 0402 0402 CRCW040210R0J NED Vishay Da...

Page 18: ...18 SLUUC11 February 2019 Submit Documentation Feedback BQ25886 QFN Standalone boost mode battery charger evaluation module ...

Page 19: ...lication and 3 ensuring your application meets applicable standards and any other safety security or other requirements These resources are subject to change without notice TI grants you permission to use these resources only for development of an application that uses the TI products described in the resource Other reproduction and display of these resources is prohibited No license is granted to...

Page 20: ...other than TI b the nonconformity resulted from User s design specifications or instructions for such EVMs or improper system design or c User has not paid on time Testing and other quality control techniques are used to the extent TI deems necessary TI does not test all parameters of each EVM User s claims against TI under this Section 2 are void if User fails to notify TI of any apparent defects...

Page 21: ... These limits are designed to provide reasonable protection against harmful interference in a residential installation This equipment generates uses and can radiate radio frequency energy and if not installed and used in accordance with the instructions may cause harmful interference to radio communications However there is no guarantee that interference will not occur in a particular installation...

Page 22: ...y for convenience and should be verified by User 1 Use EVMs in a shielded room or any other test facility as defined in the notification 173 issued by Ministry of Internal Affairs and Communications on March 28 2006 based on Sub section 1 1 of Article 6 of the Ministry s Rule for Enforcement of Radio Law of Japan 2 Use EVMs only after User obtains the license of Test Radio Station as provided in R...

Page 23: ... any interfaces electronic and or mechanical between the EVM and any human body are designed with suitable isolation and means to safely limit accessible leakage currents to minimize the risk of electrical shock hazard User assumes all responsibility and liability for any improper or unsafe handling or use of the EVM by User or its employees affiliates contractors or designees 4 4 User assumes all...

Page 24: ...OR DAMAGES ARE CLAIMED THE EXISTENCE OF MORE THAN ONE CLAIM SHALL NOT ENLARGE OR EXTEND THIS LIMIT 9 Return Policy Except as otherwise provided TI does not offer any refunds returns or exchanges Furthermore no return of EVM s will be accepted if the package has been opened and no return of the EVM s will be accepted if they are damaged or otherwise not in a resalable condition If User feels it has...

Page 25: ...se resources are subject to change without notice TI grants you permission to use these resources only for development of an application that uses the TI products described in the resource Other reproduction and display of these resources is prohibited No license is granted to any other TI intellectual property right or to any third party intellectual property right TI disclaims responsibility for...

Reviews: