background image

Hardware Connections

1.  Connect one end of the Powerpole extension cable to the other battery 

connection port on PRIZM. Connect the other end of the Powerpole 

extension cable to the battery connection port on the Tele-Op module.

2.  Connect one end of the daisy-chain data cable to the I2C expansion 

port on PRIZM. Connect the other end of the daisy-chain data cable to 

the I2C port on the Tele-Op module. 

3.  Choose a location on the TaskBot to attach the Tele-Op module. 

Make sure that the location is close enough to PRIZM that the power 

connection cable and the daisy-chain data cable will reach between the 

Tele-Op module and PRIZM. Attach the Tele-Op module using leftover 

socket head cap screws and kep nuts from your TETRIX MAX set.

4.  This activity uses the motor encoders built into the TETRIX MAX 

TorqueNADO® Motors. Connect one end of a motor encoder cable to a 

TorqueNADO motor. Connect the other end of the cable to the encoder 

port on PRIZM that corresponds to the motor port for that motor 

(Motor 1 to Encoder Port 1, Motor 2 to Encoder Port 2).

5.  Make sure that the Ultrasonic Sensor on the TaskBot is connected to 

Port D2 on PRIZM.

6.  Make sure that the Line Finder Sensor is connected to Port D3 on 

PRIZM.

7.  Make sure that the servo that raises and lowers the flag on the TaskBot 

is connected to Servo Port 1 on PRIZM.

Tele-Op Module Activity 2 – TaskBot Control
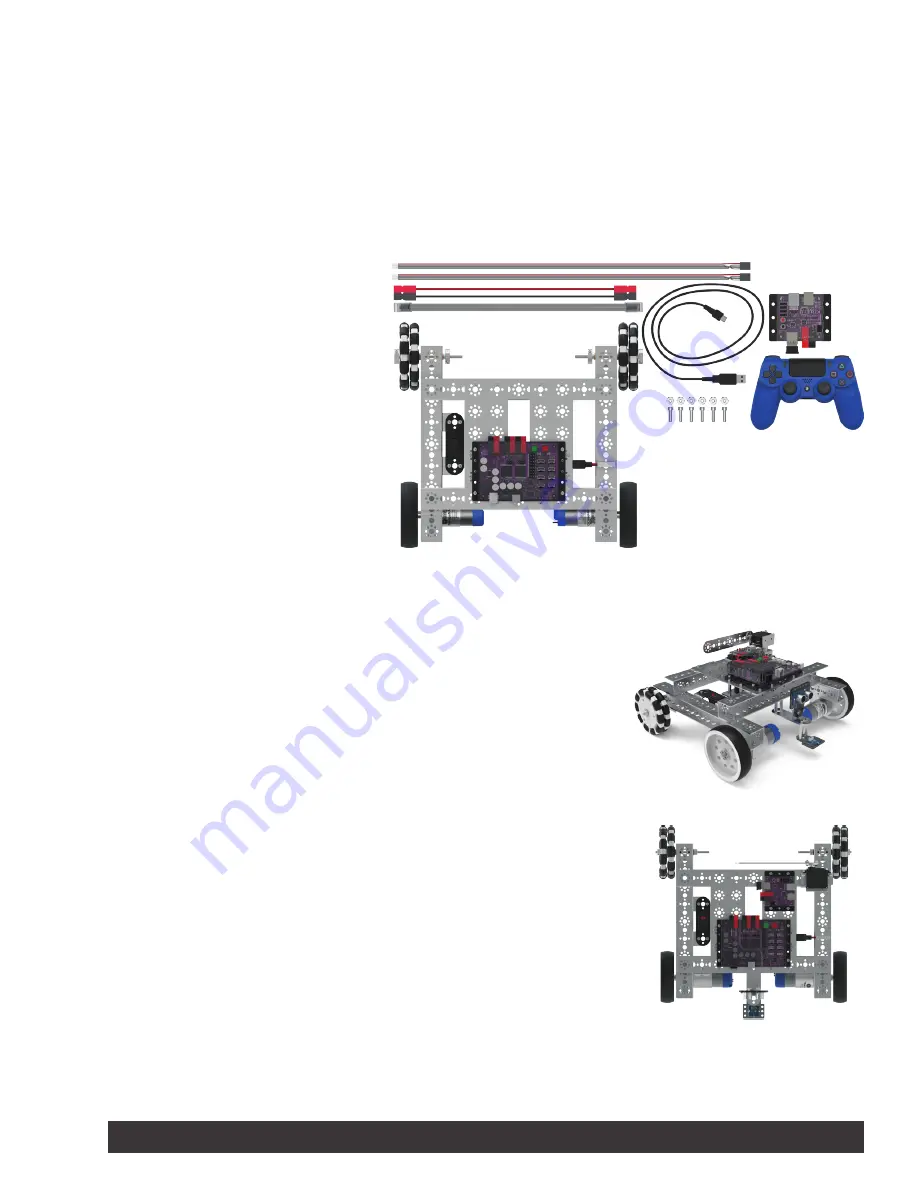
Parts Needed

•  Built TETRIX® MAX TaskBot from 

PRIZM 

Programming Guide

•  Tele-Op module
•  PS4 DUALSHOCK 4 gaming controller
•  Powerpole extension cable
•  Daisy-chain data cable
•  2 motor encoder cables
•  USB cable
•  Socket head cap screws
•  Kep nuts

Overview

In this activity, you will understand how the Tele-Op module enables you to control 

a robot using the buttons, triggers, joysticks, and sensors associated with the PS4 

DUALSHOCK 4 gaming controller. You will first need to build the TaskBot using 

instructions from the 

PRIZM

® 

Programming Guide

. The TaskBot should include 

the PRIZM controller, the Line Finder and Ultrasonic Sensors, and the servo/flag 

attachment that is used for the final activity in the 

PRIZM Programming Guide

.

TETRIX Tele-Op Control Module Activity 2      

1

Summary of Contents for Tele-Op

Page 1: ...ds to the motor port for that motor Motor 1 to Encoder Port 1 Motor 2 to Encoder Port 2 5 Make sure that the Ultrasonic Sensor on the TaskBot is connected to Port D2 on PRIZM 6 Make sure that the Line...

Page 2: ...lash white in a rapid pattern The controller is now in discovery mode 6 Press the black button on the Tele Op module The green LED on the Tele Op module should remain on and stop flashing Also the lig...

Page 3: ...ports and encoder ports that each TorqueNADO is plugged into turn your TaskBot back on and restart the program You should find that the farther you push the joysticks up the faster the TaskBot will mo...

Page 4: ...ine up with the line so that it faces the same direction that the line goes Hold down the L2 and R2 buttons at the same time to enter line following mode You should see the TaskBot start following the...

Page 5: ...rmal 35 modes There are also four integer variables one for storing the x value from the touch pad one for storing the distance measured by the Ultrasonic Sensor to operate the PS4 controller s rumble...

Page 6: ...mmand also returns a unique byte value based on which buttons from Group 2 are pressed Group 2 includes the Up Down Left Right L3 R3 Share and Options buttons The first while loop will continuously ca...

Page 7: ...egrees The next three lines of the main loop provide this functionality The first if statement turns the TaskBot left and the second if statement turns the TaskBot right The command ps4 Button BUTTON...

Page 8: ...commands is executed the else part Since the user does not want crawl mode or turbo mode then the only other option is normal mode The powerMultiplier is set to the medSpeed variable 0 35 or 35 and t...

Page 9: ...e PS4 controller s LED is set to blue to indicate the TaskBot is in line following mode The two if statements read the Line Finder Sensor and cause the TaskBot to turn one way if the sensor detects da...

Page 10: ...the TaskBot moves the opposite direction of the controller tilt but because of the backward motion the TaskBot ends up facing the direction of the tilt Controller Tilt Pitch Roll Motor 1 P R Motor 2 P...

Page 11: ...des an if statement to determine if the value of the touch pad has changed If the user is using the touch pad to adjust the motor speed then the touchPadControl function is called to adjust the crawl...

Page 12: ...back on the line the user should be able to press a button on the PS4 controller to have the TaskBot start autonomously following the line again The table here shows the direction pad buttons the uni...

Reviews: