EN
6
Operation and Storage Manual of Panel Heater
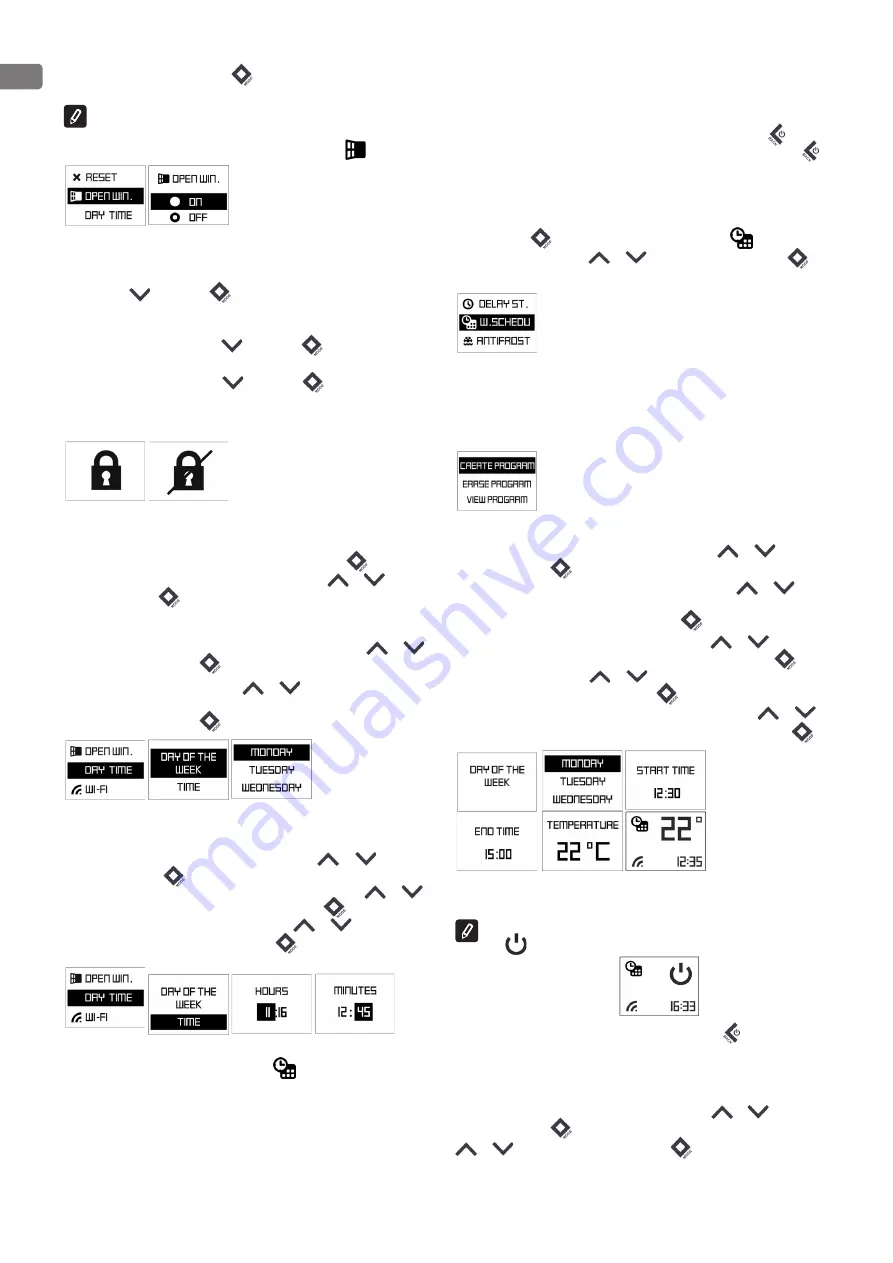
to reach ‘’ON”. Confirm with “Mode”
button. In this case function “Open
window” is switched ON.
Note:
When the “Open window” function is enabled, the “Anti-frost” function
does not work!
Visualization on Display in “Open window” settings
:
Keyboard lock (Protection from children)
When user turns on this function, all keys of the control panel remain locked.
Hold buttons
and “Mode”
together for 3 seconds. The display should
show a message when this mode is activated. When user wants to turn off this
function has to hold the same button combination for 3 seconds.
Activation/deactivation: Holding
and “Mode”
buttons for 3 seconds
the keyboard gets locked.
To unlock the control panel, hold
and “Mode”
buttons for 3 seconds.
Visualization on Main Display when activating and deactivating the
function “Protection from children”:
Day and time – settings
First step or use after factory reset function
Set the current time and day by pushing the “Mode” button
for 3 sec and
select “DAY TIME” mode by pushing any of the buttons:
or
. Confirm
with “Mode” button
:
Set a schedule for the first day of the week
Select “DAY OF THE WEEK” mode by pushing any of the buttons:
or
.
Confirm with “Mode” button
.
Select by pushing any of the buttons:
or
reach current day of the
week (Monday, Tuesday, Wednesday, Thursday, Friday, Saturday, Sunday) .
Confirm with “Mode” button
.
Set time
Select “TIME” mode by pushing any of the buttons:
or
. Confirm
with “Mode” button
.
The hour icon is flashing and by pushing any of the buttons:
or
reach actual hour time. Confirm with “Mode” button
. The minute icon
is flashing and by pushing any of the buttons:
or
reach actual
minute time. Confirm with “Mode” button
. (range 00.00-24.00)
Weekly program (timer) 24hours/7days
Min 300 sets of time periods
Electronic thermoregulator with weekly program (timer) 24/7 - electronic room
temperature control plus weekly timer means the product is equipped with
an electronic device, either integrated or external, which allows the product
automatically to vary its heat output over a certain time period. In relation
with a certain required level of indoor heating comfort. It allows the setting
of timing and temperature levels for a full week. During the 7-day period the
settings must allow a variation on a day-to-day basis;
Deactivation
If the customer wants to deactivate it, he/she has to push ON/OFF
button(The heater goes into “heating” mode.) or press for 1.5 sec ON/OFF
button for OFF the heater.
Activation
If the customer wants to set “Weekly shedule (timer)” mode- by pushing the
“Mode” button
for 3 sec and select “Weekly shedule”
mode by
pushing any of the buttons:
or
. Confirm with “Mode” button
.
There have three options:
- CREATE PROGRAM
- ERASE PROGRAM
- VIEW PROGRAM
Create program
Select “Create program” by pushing any of the buttons:
or
. Confirm
with “Mode” button
.
1. Set “DAY OF THE WEEK” by pushing any of the buttons:
or
reach
current day of the week (Monday, Tuesday, Wednesday, Thursday, Friday,
Saturday, Sunday). Confirm with “Mode” button
.
2. Set “TIME PERIOD” by pushing any of the buttons:
or
reach the
desired Start time (range 00.00-24.00). Confirm with “Mode” button
. By
pushing any of the buttons:
or
reach the desired End time (range
00.00-24.00). Confirm with “Mode” button
.
3. Set “DESIRE TEMPERATURE” by pushing any of the buttons:
or
reach the desired temperature (10-30 ˚C). Confirm with “Mode” button
.
The temperature of 22 ˚C started at 12.30 to 15.00 on Sunday. The convector
will heat till reach the settings of the next given point.
If the TIME PERIOD is empty (no time set) – visualization should be
OFF
.
- One step back – with single pushing of ON/OFF button
.
- No limit of time periods – step is 0.5 hour (30 minutes).
- Adaptive start function is switched on by default.
Erase program
Select “Erase program” by pushing any of the buttons:
or
. Confirm
with “Mode” button
. Select the program by pushing any of the buttons
or
and confirm with “Mode” button
.
Checking the schedule program
View program
Summary of Contents for CN051 100 EI CLOUD W
Page 63: ......


