


14300
-
AF Auto Focus HDMI
4
/
13
Centidegree)
Storage
Temperature(in
Centidegree)
-20~ 60
Operating Humidity
30~80%RH
Storage Humidity
10~60%RH
Power Supply
DC 12V/1A Adapter
2
Quick Instructions for 14300-AF camera
Before starting the camera please connect the standard
14300
-
AF
C-mount camera to camera adapter and
connect it to the microscope’s 3
rd
tube which will relay microscope object’s middle image to the camera sensor.
2.1 Wi-Fi Mode
1.
Plug
12V/ 1A
power cable into
Power Interface
③
to supply power for the camera. The
LED Indicator
⑥
will
turn into red
2.
Press
ON/ OFF Button
⑤
to start the camera and the
LED Indicator
⑥
will turn blue
3.
Plug the
Wi
-
Fi
antenna which comes with the camera into
Wi
-
Fi ANTENNA/ USB PORT
②
to generate
Wi
-
Fi
signal
4.
After the indicator on the
Wi
-
Fi
antenna starting blinking, connect computer (may be Pad or Phone) to
Wi
-
Fi
signal whose name starts with
14300
-
AF
. The
Password
is 12345678
5.
Open
AF+ Intelligent Imaging Suite
software, start
14300
-
AF
by clicking the camera model name listed in
Camera
List
. For more details please refer to the
AF+ Intelligent Imaging Suite
help manual
2.2 HDMI MODE
1.
Plug the HDMI cable into the
HDMI Port
①
to connect the
14300
-
AF
camera to HDMI display
2.
Plug a USB mouse into
USB Port
②
to get control of the camera by using built-in software
AF+ Intelligent
Imaging Software
3.
Plug 12V/ 1A power adapter into
Power Interface
③
to supply power for the camera. The
LED Indicator
⑥
will turn into red
4.
Insert SD card into
SD Card Slot
④
for saving captured images and recorded videos
5.
Press
ON/ OFF Button
⑤
to start the camera.
LED Indicator
⑥
will turn blue
6.
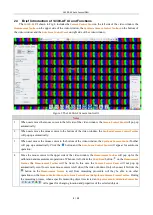
Move mouse cursor to the left side of the video window, The
Camera Control Panel
will appear. It includes
Manual/ Automatic Exposure
,
White Balance
,
Sharpness
,
Denoise
and other functions, please refer to 2.3 for
details
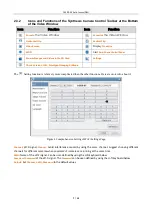
7.
Move the mouse cursor to the upper side of the video window, a
Measurement Toolbar
with calibration and
other measurement tools will appear, please refer to 2.3 for details. The measurement data can be output with
*.CSV
format.
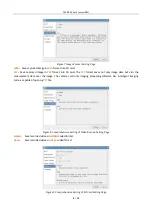
8.
Move the mouse cursor to the bottom of the video window and a
Synthesis Camera Control Toolbar
will appear.
Operations like
Zoom In
,
Zoom Out
,
Flip
,
Freeze
,
Cross Line
,
WDR
and etc. can be realized. Please refer to 2.3 for
details
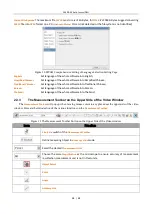
9.
Move the mouse cursor to bottom of the video window, the
Synthesis Camera Control Toolbar
will pop up
automatically. Click the
button and
Auto Focus Control Panel
will show up for conducting autofocus
operation