


Page 1
part list
Eye-shield
Washer
Washer
Nut
Nut
Washer
Washer
Eye Shield Bracket
Square Neck Screw
Screw
LEFT EYE SHIELD MOUNTING ROD
Fixing piece
Washer
Nut
Screw
Left Outer Guard
Nut
Wheel flange
Grinder Wheel
Screw
Washer
Left inner guard
Left spark guard
Washer
Washer
Bolt
Washer
Bolt
Washer
Left tool rest
Screw
Washer
Washer
End bell
Bearing
Rotor
Stator
Motor house
1
2
3
4
5
6
7
8
9
10
11
12
13
14
15
16
17
18
19
20
21
22
23
24
25
26
27
28
29
30
31
32
33
34
35
36
37
38
2
4
4
4
2
2
2
2
2
4
1
2
2
2
6
1
1
4
1
6
6
1
1
2
2
2
4
4
4
1
8
8
8
2
2
1
1
1
1
1
2
1
1
1
1
1
1
1
1
1
1
1
1
1
1
2
1
2
2
1
1
1
1
1
1
1
1
1
1
1
1
4
4
4
1
1
39
40
41
42
43
44
45
46
47
48
49
50
51
52
53
54
55
56
57
58
59
60
61
62
63
64
65
66
67
68
69
70
71
72
73
74
75
76
No Part list
QTY.
Right eye shield mounting rod
Right spark guard
Label
Right inner guard
Grinder Wheel
Nut
Right Outer Guard
Right tool rest
Plug & cable
Lamp
Washer
Nut
Ground terminal
Washer
Washer
Screw
Capacitor clip
Bolt
Cable Clip
Screw
Washer
Cable Block
Cable Protector
Base
Washer
Washer
Washer
Screw
Capacitor
Transformer
Washer
Screw
Base plate
Rubber foot
Washer
Screw
Switch
Logo
No Part list
QTY.
Contents
Parts List
Page 1
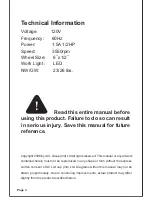
Technical Spec
Page 3
Safety Instructions
Page 4
Using your product
Page 9
Maintenance
Page
9
Warranty
Page
10
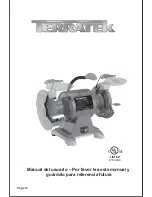
Summary of Contents for TBG6
Page 3: ...Exploded Assembly Diagram Page 2...
Page 16: ...Dibujo despiezado del conjunto Page 15...
Page 27: ...Page 26...
Page 28: ......