TerraMaster F2-422 Fundamentals And Preliminaries Download Page 11

Step 7: Administrator Settings

Please  set  the  administrator  password  and  complete  the  administrator  security  mailbox  (this  is  used  for 
administrator authentication) (Note: It is extremely important that you take care when completing this step. 
If the administrator loses their password, completing the administrator security mailbox will allow them to 
reset their password). Afterwards, click 

“Send Code”

, and the security mailbox will receive an email with a 

verification code. Please log in to the security mailbox in order to obtain your code, and then complete the 
administrator settings.
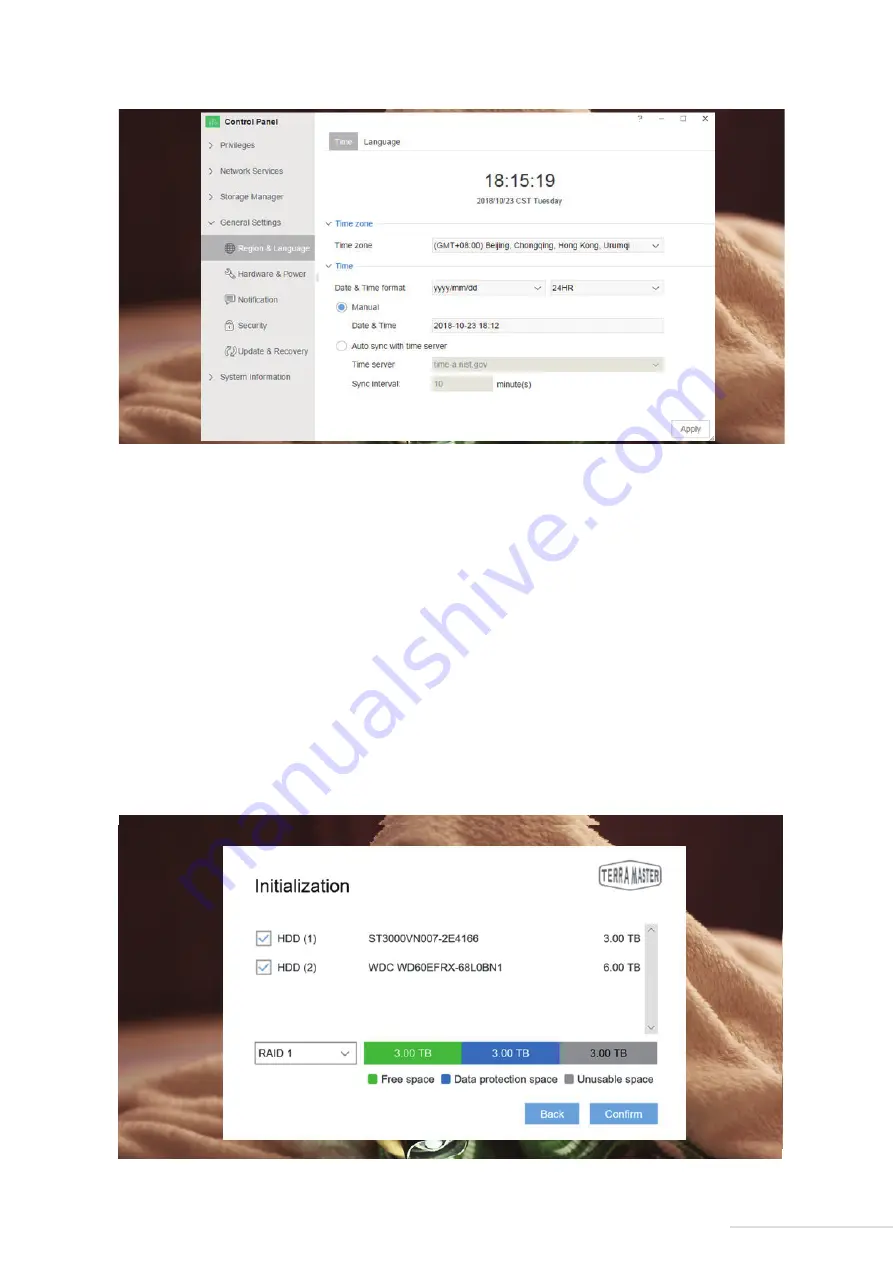
Step 8: Create RAID

Please select the RAID type, and then select the hard drive you intend to use to create RAID and click 

Confirm

There are two file systems to choose from: EXT 4 and Btrfs. The system default file format is Btrfs. If you need 
to  modify  the  file  format,  go  to  the  control  panel  of  TOS.  When  the  RAID  has  been  created,  hard  drive 
formatting will occur. Therefore, please back your data up in advance (Note: Please take a moment to wait for 
hard drive formatting to finish. When you see “Congratulations! Initialisation is complete!”, this indicates 
that your TNAS is ready for use).

10

Model:F2-422

Summary of Contents for F2-422

Page 1: ...TerraMaster NAS Model F2 422 Fundamentals and Preliminaries Copyright 2019 TerraMaster All Rights Reserved...

Page 2: ...Contents 2 Hardware Installation 3 Software Installation 4 Initialisation 1 2 5 7 1 Overview 2 5 Getting Started 11 Model F2 422...

Page 3: ...lease contact the reseller immediately Once you receive your new TerraMaster TNAS product please install and set up your TNAS according to the Quick Installation Guide Please note that given our commi...

Page 4: ...USB 3 0 host 2 Network interface 1000M 100M bps network interface Network interface 10GbE Network interface Use to connect USB storage device or USB wireless adaptor SN SN Item Item Hard drive tray Ne...

Page 5: ...rd drives of the following type rstly 2 5 3 5 inch SATA hard drive or secondly 2 5 SATA SSDs TNAS is a durable storage device which means that in order to operate for long periods of time high quality...

Page 6: ...functions properly please install some necessary software TNAS PC is a desktop application designed for TNAS devices It helps you to quickly search log in or set up your TNAS The application is avail...

Page 7: ...the menu and click File Browser Note At this point you need to have a username and password Map Drive By mapping your drive you can simplify le management by creating a shortcut to frequently used fol...

Page 8: ...r TNAS administrator Scan the QR code to download the TNAS mobile app Newly purchased TNAS devices must be initialised prior to use In the process of initialisation TOS will be installed onto your TNA...

Page 9: ...AS is not initialised you will be redirected to the initialisation page Please Click Start to initiate the initialisation process 8 Model F2 422 Step 3 Hard Drive Detection If the installed hard drive...

Page 10: ...tep 4 Hard Drive Check Up Your TNAS will assess the health status of the hard drive If the health status is good please click Next If the test results indicate a risk we recommend that you replace the...

Page 11: ...the security mailbox in order to obtain your code and then complete the administrator settings Step 8 Create RAID Please select the RAID type and then select the hard drive you intend to use to create...

Page 12: ...ou will be able to access the le browsing page There you can copy delete and edit your les This feature is used on Windows OS and Mac OS in the same way For added e ciency you can also map your drive...

Page 13: ...n obtain your TNAS IP address from the TNAS PC desktop application You can log in to TOS in two ways END 12 Model F2 422 TOS has many advanced features and it is also equipped with its own app store T...

Reviews: