TerraMaster F2-210 Fundamentals And Preliminaries Download Page 6

Step 3: 

Press the power button to power on TNAS. 

Step 4: 

If the hardware indicator is always red, this indicates that the hard drive is functioning abnormally. The 
hard  drive  may  be  damaged,  or  the  hard  drive  may  not  be  compatible  with  the  TNAS  device.  If  this 
happens, please re-install or replace the hard drive and try again. 

Step 5: 

If the hard drive indicators and network indicators display a normal connection, your TNAS hardware is 
ready. 

To ensure that TNAS functions properly, please install some necessary software.

TNAS PC is a desktop application designed for TNAS devices. It helps you to quickly search, log in, or set up 

your TNAS. The application is available in both Mac OS and Windows OS versions.

1. Visit www.terra-master.com and click 

“Download”

2. Select your TNAS model
3. Locate TNAS PC using the download checklist
4. Choose a version that works for you and click 

“Download”

5. Install the TNAS PC application you just downloaded onto your computer

Please follow the instructions below to download the TNAS PC application:

3.1  TNAS PC

3.  Software Installation
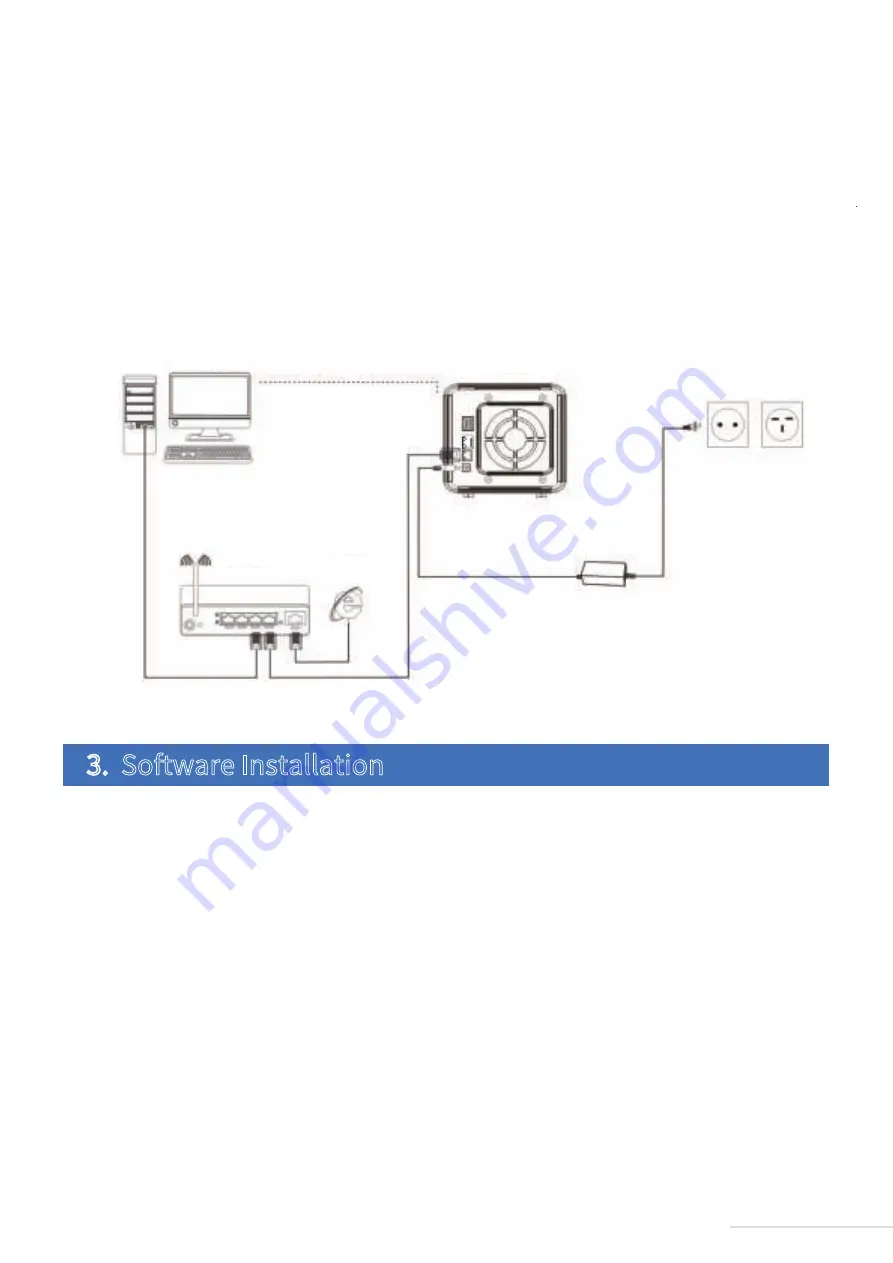
Computer

Router

Network

Power

F2-210

5

Model:F2-210

Summary of Contents for F2-210

Page 1: ...TerraMaster NAS Model F2 210 Fundamentals and Preliminaries Copyright 2019 TerraMaster All Rights Reserved Data Storage Master...

Page 2: ...Contents 2 Hardware Installation 3 Software Installation 4 Initialisation 1 2 5 7 1 Overview 2 5 Getting Started 11 Model F2 210...

Page 3: ...lease contact the reseller immediately Once you receive your new TerraMaster TNAS product please install and set up your TNAS according to the Quick Installation Guide Please note that given our commi...

Page 4: ...k interface DC 12V power input NOTE Do not use a third party power adaptor Use to connect USB storage device 1000M 100M bps network interface SN SN Item Item Hard drive tray Network indicator Power sw...

Page 5: ...lled with hard drives of the following type rstly 2 5 3 5 inch SATA hard drive or secondly 2 5 SATA SSDs TNAS is a durable storage device which means that in order to operate for long periods of time...

Page 6: ...functions properly please install some necessary software TNAS PC is a desktop application designed for TNAS devices It helps you to quickly search log in or set up your TNAS The application is avail...

Page 7: ...the menu and click File Browser Note At this point you need to have a username and password Map Drive By mapping your drive you can simplify le management by creating a shortcut to frequently used fol...

Page 8: ...r TNAS administrator Scan the QR code to download the TNAS mobile app Newly purchased TNAS devices must be initialised prior to use In the process of initialisation TOS will be installed onto your TNA...

Page 9: ...AS is not initialised you will be redirected to the initialisation page Please Click Start to initiate the initialisation process 8 Model F2 210 Step 3 Hard Drive Detection If the installed hard drive...

Page 10: ...tep 4 Hard Drive Check Up Your TNAS will assess the health status of the hard drive If the health status is good please click Next If the test results indicate a risk we recommend that you replace the...

Page 11: ...the security mailbox in order to obtain your code and then complete the administrator settings Step 8 Create RAID Please select the RAID type and then select the hard drive you intend to use to create...

Page 12: ...ou will be able to access the le browsing page There you can copy delete and edit your les This feature is used on Windows OS and Mac OS in the same way For added e ciency you can also map your drive...

Page 13: ...n obtain your TNAS IP address from the TNAS PC desktop application You can log in to TOS in two ways END 12 Model F2 210 TOS has many advanced features and it is also equipped with its own app store T...

Reviews: