TerraMaster D8 Thunderbolt 3 User Manual Download Page 6

Once you have installed your hard drive, use the provided Thunderbolt 3 cable to link your device to your computer’s 
Thunderbolt 3 interface. Then, use the power adapter provided to link the device to a power source. Finally, press the 
power button of the device (see the front panel) to power it on.

5.  Hardware Connection

If you use a Mac computer, please proceed straight to next step.
If  you  are  a  Windows  user,  you  may  need  to  install  a  driver  for  the  Thunderbolt  3  interface.  Therefore,  first  check 
whether the most recent Thunderbolt 3 interface driver is already present on your computer. If it is not, then visit your 
computer manufacturer’s official website to download and install the Thunderbolt 3 driver. Once it has been installed, 
you can find the Thunderbolt™ software in Control panel > Program and features.

6.  Install Driver for Thunderbolt 3 Interface

A  driver  for  RAID  usually  needs  to  be  installed  before  you  can  use  the  device.  Otherwise,  your  computer  cannot 
recognise  the  device.  Therefore,  please  visit  TerraMaster’s  official  website  (www.terra-master.com),  click  on  the 
“Download”, and download and install the RAID driver. Depending on the operating system you use, please select 
either the Mac or Windows version.
Follow the steps below to download and install the RAID driver:
1.Visit the “Download” on TerraMaster’s official website. Choose the relevant product model, and then click “RAID 
driver” in the list;
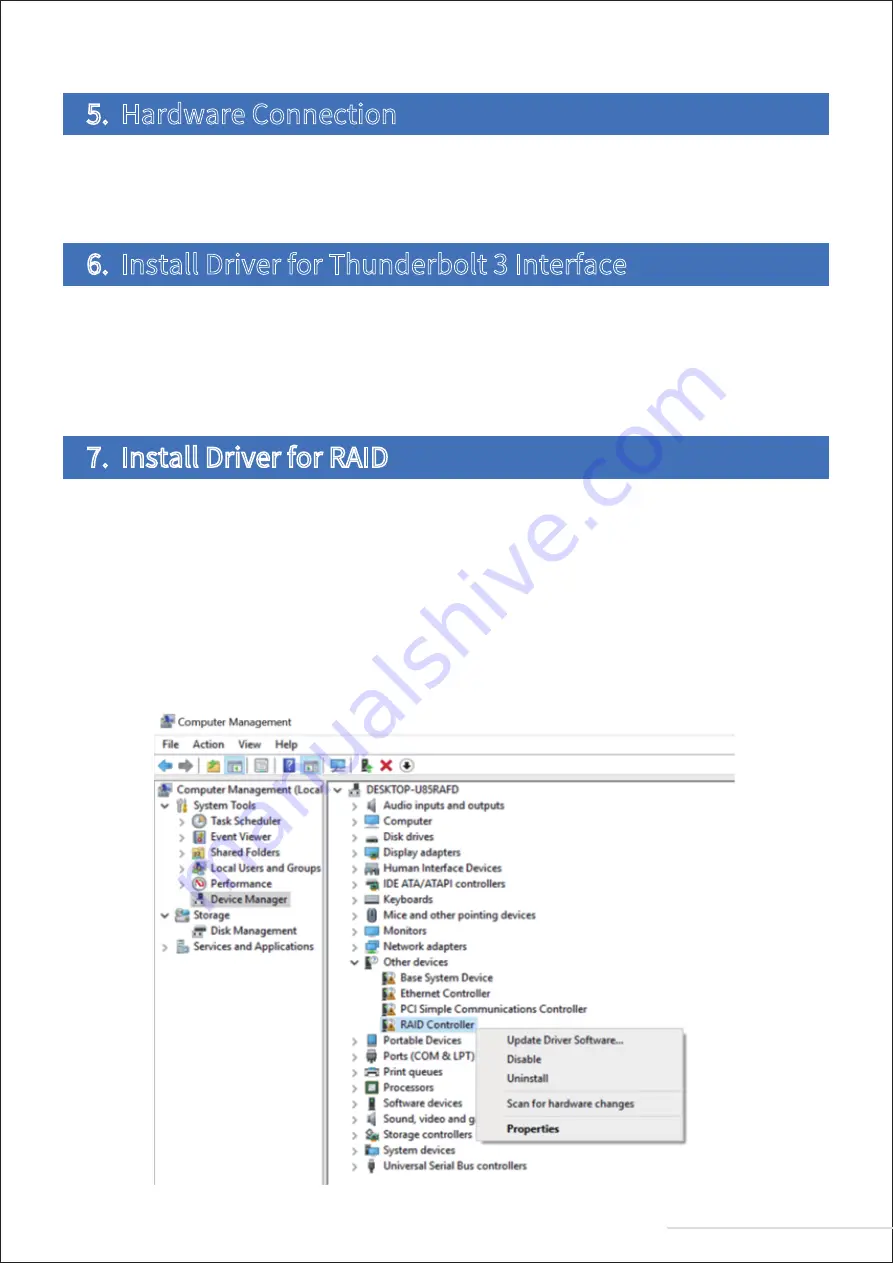
2.(For Windows users) Go to Device manager > Other devices > RAID controller. Right-click “Update drive software”, 
select the 64-bit system files relevant for your computer, and then select “Confirm”. When the driver installation 
process is successful, the question mark next to “RAID controller” will disappear.
3.(For Mac users) Please double click the driver you have downloaded.

7.  Install Driver for RAID

5

Model:D8 Thunderbolt 3

Summary of Contents for D8 Thunderbolt 3

Page 1: ...User Manual D8 Thunderbolt 3 Copyright 2017 TerraMaster All Rights Reserved Data Storage Master...

Page 2: ...tallation 1 2 3 4 1 System Requirements 2 5 Hardware Connection 6 Install Driver for Thunderbolt 3 Interface 7 Install Driver for RAID 5 5 5 8 Install RAID Manager Pro 9 Create Disk Array 10 Initialis...

Page 3: ...reseller quickly Operating System 64 bit Windows 8 10 or later MAC OS X 10 12 or Version later Hardware Requirement CPU Intel i5 Quad Core or higher Memory Minimum 4GB Interface Thunderbolt 3 Applicab...

Page 4: ...Shortpressoncetopoweron andpressfor4secondstopowero O Powered o Green light Powered on Red light Sleeping NO Description ITEM Power Jack Thunderbolt 3 Port DP Port Power input interface Please note t...

Page 5: ...l a hard drive please complete the following instructions 2 When the tray is completely inserted the handle will close Now hard drive installation is complete 4 Hard Disk Installation 4 Model D8 Thund...

Page 6: ...Install Driver for Thunderbolt 3 Interface A driver for RAID usually needs to be installed before you can use the device Otherwise your computer cannot recognise the device Therefore please visit Ter...

Page 7: ...es not contain a disk array Follow the steps below to create disk array 1 Connect your Thunderbolt 3 device to a computer 2 Power on the device 3 Start RAID Manager Pro 4 Type in your username and pas...

Page 8: ...All disk arrays must be initialised and formatted before you can use them For Mac users disk array initialisation and formatting can be completed as below 1 Go to GO Application Tool Disk Utility Ext...

Page 9: ...the menu then initialise and format it 4 If you having di culties initialising and formatting the array please see Windows help le After initialisation and formatting your device is now ready to use...

Reviews: