background image


PELLET STOVE AND TECHNICAL SPECIFICATIONS 


HEATING SYSTEMS


Summary of Contents for Pellet Stove Hybrid 22 kW

Page 1: ...1 PELLET STOVE HYBRID INSTALLATION AND USAGE MANUAL 22 kW HEATING SYSTEMS ...

Page 2: ...cy therefore please read this instruction book carefully before you start using the product and save it to refer to in the future This manual will help you to operate your device safely and efficiently For this reason you should pay attention to these Please read this instruction book carefully before you install and operate the product Follow the instructions and the rules on safe usage HEATING S...

Page 3: ...chnical Specifications 8 Fuel 11 Fuel Loading 12 Assembly Instructions 13 Flue Connection 16 Pellet Stove Operating Instructions 17 Electronic Control Panel 18 User Menu 20 Electric Connection 31 Cleaning and Maintenance 32 Problems Reasons and Solutions 40 HEATING SYSTEMS CONTENTS ...

Page 4: ...t has the cleanest combustion system among the solid fuel systems and the ash ratio after combustion is 0 2 Transport and storage of pellet are relatively easy compared to other fuels Thanks to its homogenous structure the thermal stability ensures that the system is continuously operative when it is approached and reduces the emission values of the exhaust gas Due to the fact that it is a source ...

Page 5: ...ture In light of this information we have been working as THERMODYNAMIC HEATING SYSTEMS a pioneer in the domestic heating sector since 1992 As a result of our research efforts hot air blowing and water based fully automatic pellet stoves have been driven to the market to provide the best service for you Hot blowing and water based thermodynamic pellet boilers with pellet fuel that a renewable and ...

Page 6: ...lly and use the product in accordance with the instructions Failure to read this manual users building residents and tertiary residents Misuse will result in the out of warranty When you reach the pellet stove first check visually During the delivery of the product if you detect damages that have occured during transportation of product you must notify the damage to the shipping company in order t...

Page 7: ...he pellet should not be loaded manually from the front door of the stove Smoke and flame during front loading can cause damage to our users and people around them When interfering with the product it is absolutely necessary to disconnect the device When the intervention to the product is completed the plug must be reinserted and the electronic control panel must be checked to see if it is open The...

Page 8: ...8 PELLET STOVE AND TECHNICAL SPECIFICATIONS HEATING SYSTEMS ...

Page 9: ...e Hybrid 22 kW Type Hybrid Capacity kW 22 Weight kg Capacity of Fuel Tank kg 20 Average Pellet Consumption Per Hour kg Efficiency 93 Length A mm 1120 Width B mm 630 Depth C mm 600 Diameter of Flue D mm 80 HEATING SYSTEMS ...

Page 10: ...10 HEATING SYSTEMS SMOKE OUTLET FUEL TANK COMBUSTION CHAMBER REDUCTOR INLET FRESH AIR INTAKE FLUE GAS OUTLET IGNITER CONTROL PANEL DOOR ...

Page 11: ... 10 12 No chemicals and additives were used in its manufacture Applicable of DIN PLUS Norm or Ö Norm M 7135 pellets should be used The fuel you use in your stove should not contain sulfur in wet and high places Sulfur and moisture can create sulfuric acid causing to pierce the body of the stove HEATING SYSTEMS ...

Page 12: ... that is capable of doing serious harm to fingers drives the auger and for this reason in THERMODYNAMIC pellet stoves a protective grille inside the hopper is placed Do not let the pellet accumulate on the bottom of the chamber Do not leave the remaining pellets on the stove the pellets may catch fire Do not fill the chamber excessively Unburned pellets in the grill should be cleaned to ensure bet...

Page 13: ...that the ventilation conditions for the product are appropriate Pellet stoves should not be operated with existing multiple chimney systems There should also be no places such as an extractor head skylight ventilation The chimney can be dispensed directly at short distances according to the location of the pellet stove or can be applied to the existing pit short distances The pellet stoves should ...

Page 14: ...14 HEATING SYSTEMS ASSEMBLY OF PELLET STOVE ...

Page 15: ...15 HEATING SYSTEMS ...

Page 16: ...ce of the device should be at most 1 meter Chimney connections must not pass through places where flammable and explosive materials are present The chimney connection pipe should be kept away from the fixtures to be deformed by heat If there is a need to install the chimney connection in such a way that human and domestic animals can reach and be damaged from heat absolutely thermal insulation sho...

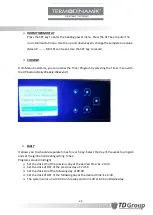
Page 17: ...on the screen After loading the fuel press and hold the ON OFF button for 3 seconds to operate the stove The stove starts to work Stove in order CHECK UP IGNITION STABILIZATION RUN MODE Press and hold for 3 seconds the stove starts to work automatically in the above order If the stove does not come out empty the pellet in the grate otherwise the grate will overflow If it is not for the second time...

Page 18: ...nds Reset Errors Push for 3 seconds Activation chrono P3 Enter in User Menu 1 Submenu Enter in User Menu 2 Push for 3 seconds Save data P4 Enter in Visualizations Menu Increase P5 Enter in Visualizations Menu Decrease HEATING SYSTEMS Power of Heating Fan Absolute Temperature Set Temperature Combustion Fan Clock Timer Warnings ...

Page 19: ... Safety High Voltage 2 signalled only if the Combustion Fan is On Block Er02 Extinguishing for exhaust under temperature Block Er03 Extinguishing for exhaust over temperature Block Er05 Encoder fan error no Encoder signal Block Er07 Encoder fan error Combustion Fan regulation failed Block Er08 Failed ignition Block Er12 Lack of voltage supply Block Er15 Run out of pellet Block Er18 Open door error...

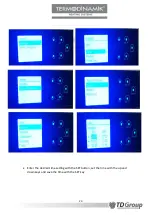
Page 20: ... menu The following menus will appear on the screen Use the up and down keys to switch between menus Use the SET key to enter and record the desired menu Use the ESC key to exit Use the ON OFF button to switch on off the panel and pellet stove USER MENU ...

Page 21: ...r and change the burning speed with the SET button For example 1 2 3 4 5 A A Automatic Combustion Use the SET key to record HEATING MANAGEMENT Press the SET key to enter the heating power menu Use the up or down keys to change the burning speed For example 1 2 3 4 5 A A Automatic Combustion Use the SET key to record ...

Page 22: ...u with the UP button Daily Weekly Weekend It allows you to schedule separate times for each day Select the day of the week to program and set the ignition and extinguishing times Programs around midnight Set the clock On of the previous day at the desired time Ex 20 30 Set the clock of OFF of the previous day at 23 59 Set the clock On of the following day at 00 00 Set the clock of OFF of the follo...

Page 23: ...23 Enter the desired time setting with the SET button set the time with the up and down keys and save the time with the SET key ...

Page 24: ...p and down keys and save the time with the SET key WEEKEND Choose between Monday Friday and Saturday Sunday then set the on off times With this menu the stove works at set times Monday Friday and Saturday Sunday Enter the desired time setting with the SET button set the time with the up and down keys and save the time with the SET key ...

Page 25: ...ill appear Use the SET key to set the speed of the screw pellet loading On the displayed screen 7 0 7 use the up and down keys to slow down the pellet loading speed or to set the acceleration values Registration and departure will occur at the same time Use the SET key to set the chimney fan speed Use ESC key for back out ...

Page 26: ... it does not work settings that must be done according to the room temperature Press ON to activate the remote control OFF to activate the remote control Press SET button to save your selection Automatically switch to manual operation 1 Press and release the SET key 2 Select Combustion Management 3 Select the Power 4 Press the up or down key 5 Press SET 6 Press ESC 7 You will see that the letter A...

Page 27: ...procedure is only used to fill the pot and speed up the ignition in the first combustion phase when the unit is in the off position Perform this operation when the fuel tank is completely empty LANGUAGE DATE AND TIME ADJUSTMENT Press SET button for a long time to enter Menu Settings Press SET button to enter INPUT SETTINGS Set date and date with SET button and make settings Sample English menu is ...

Page 28: ...the digit you want to change and then press the SET key to activate it SET CONTRAST Use the SET button to enter the menu for the screen sharpness setting contrast After setting the desired values with the up and down keys record with the SET key Use ESC key for back out ...

Page 29: ...alues with the up and down keys record with the SET key Use ESC key for back out MUTE KEYS Use the SET button to enter the menu for the volume setting of the panel keypad To turn on the buzzer sounds select ON and save with the SET button To turn off key tones scroll to OFF and press the SET button Use ESC key for back out ...

Page 30: ...enter the heating management menu by touching the SET key You can enter the Boiler Thermostat menu by pressing the SET key Use the up and down keys to change the heating value max 80 min 50 Use the SET key to register SYSTEM PARAMETERS MENU THIS MENU IS IN AUTHORIZED SERVICE NOT USED ...

Page 31: ...31 ELECTRIC CONNECTION ...

Page 32: ...e the correct operation of your stove over time Failure to do so may make the stove unsafe CLEANING THE GLASS Clean the pellet stoves with a clean fabric as shown in Picture 1 Clean the window every day CLEANING AND MAINTENANCE Picture 1 ...

Page 33: ...ning the door of the pellet stoves you can empty the drawer after the ash has cooled down as shown in Picture 2 and Picture 3 or you can remove it with a cold ash vacuum cleaner Clean the ash tray everyday Picture 2 Picture 3 Picture 4 ...

Page 34: ...te of the stove as shown in picture 5 and after the ash in the stove has cooled down put it in the ashtray or pull it off with a cold ash vacuum cleaner Do the cleaning every day to prevent the fuel from solidifying and accumulating in the stove Picture 5 Picture 6 ...

Page 35: ...35 Remove the ash emptying sheet of the pellet stove as shown in Figure 8 and use a clean fabric or vacuum cleaner Clean the ash emptying sheet every day CLEANING THE SHEET OF GRATE Picture 7 Picture 8 ...

Page 36: ...icture 9 after removing the grate You should clean the firebox before burning the stove every day CLEANING THE PELLET FLUX PIPE Use a wire brush to clean the pellet flow tube as shown in Figure 10 Clean the pellet flux pipe once a week to prevent clogging of the pipe Picture 9 Picture 10 ...

Page 37: ...e mirror of pellet stove with a clean fabric Remove the pellet stove mirror as shown in Fig 12 and clean the back of the mirror using the vacuum cleaner Clean the pellet stove mirror and the rear part every day Picture 11 Picture 12 ...

Page 38: ...orking condition and it is cold It is important for the safety of the person that the socket is pulled out in order to avoid possible electric shocks during maintenance and cleaning After all the maintenance and cleaning processes have finished the socket of the sobabe can be reinstalled ...

Page 39: ...overed with a layer of the pitch appearance over time Contact THERMODYNAMICS when any abnormal sound is heard in the flue fan or when vibration is felt Flue fan cleaning will be done by the service CLEANING THE FLUE The flue should be cleaned once a year and the flue should be checked if there is any problem in the flue draught ...

Page 40: ...t closed Pump malfunction Check the pump Temperature sensor malfunction Call the service Malfunction with control panel Call the service Extinguishing Pellet finishing in fuel tank Fill the fuel tank with pellet Peletin kalitesiz yada rutubetli olması Yüksek kaliteli pelet kullanınız Defective flue temperature sensor Call the service Defective chimney suction fan Call the service Yetersiz Fan Drau...

Page 41: ...LE ADRESS PHONE FAX COMPANY EXECUTIVE SIGN SEAL PRODUCT TYPE OF PRODUCT MARK MODEL BANDEROLE AND SERIAL NUMBER DATE AND PLACE OF DELIVERY PELLET STOVE HYBRID SELLER COMPANY TITLE ADRESS PHONE AND FAX INVOICE DATE AND NUMBER DATE SIGN SEAL ...

Page 42: ...42 HEATING SYSTEMS ...

Reviews: