Tenways Thermopad User Manual Download Page 11


11 


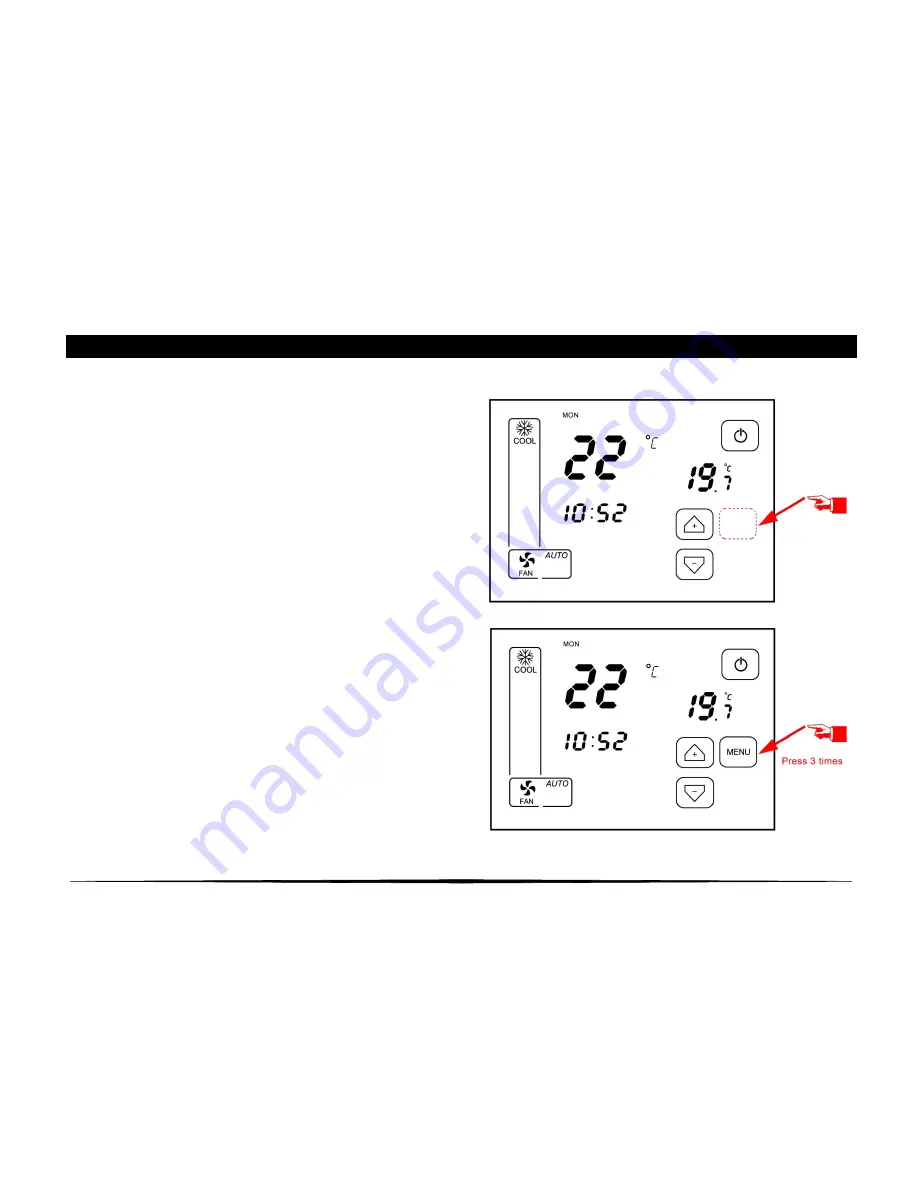
7.1. SETTING THE CURRENT DATE AND TIME


To the Schedule Timers, ThermoPad relies on Date and Time Set by the user 
 
To Set The Current Date and Time: 
 

1.

 Activate the 

MENU

 Button by touching the Screen 

Next to 

UP Navigation Button


2. 

Press the activated 

MENU

 Button 3 times. The 

SETTINGS Screen will display  
 
NOTE: When in SETTINGS MENU, the Week Day Icon 
and Minutes icon will be flashing 


Summary of Contents for Thermopad

Page 1: ...ThermoPad User Manual...

Page 2: ...nt Installation and relocation of this equipment should be carried out by qualified persons only Attempts by end users to install or move this equipment may lead to unsafe conditions or improper opera...

Page 3: ...lf consult a qualified engineer Do not relocate or reinstall the ThermoPad by yourself consult a qualified engineer Do not touch the ThermoPad with wet hands Do not use the ThermoPad in extreme enviro...

Page 4: ...4 2 LCD Description Parts Names...

Page 5: ...current time or the set time when programming the schedule timer 7 Timer Indicator SLEEP TIMER Single Instance Timer Setup TIMER Weekly Schedule Setup SLEEP TIMER 8 Minimum Maximum Temperature Used to...

Page 6: ...rs Displayed is some Setup Modes SETTINGS WAIT CLEANING 15 Sound on off indication currently not in use 16 Currently not in use 17 Malfunction indication 8888 18 Fan speed button Indicates the Fan Spe...

Page 7: ...l display the ON OFF Button Schedule Timer Room Temperature Day of the week and Time NOTE In OFF Mode if the Clock display Room Temperature and Schedule Timer are Disabled the Screen will show only th...

Page 8: ...ttons To raise the Room Temperature press To lower the Room Temperature press The set temperature changes 1o C each time the button is pressed When the Button is held down the Set Temperature advances...

Page 9: ...pending on the Type of Air Conditioning ThermoPad allows selection of up to 4 Fan Speed settings Low Medium High Auto To change the Fan Speed use the Fan Speed Button Fan Speed LOW Fan Speed MEDIUM Fa...

Page 10: ...ll display The Operation Mode Screen display will be active for 3 secons after which will return to Default Mode Using the NAVIGATION BUTTONS Choose the Operation Mode Desired COOL Cooling Operation M...

Page 11: ...nd Time Set by the user To Set The Current Date and Time 1 Activate the MENU Button by touching the Screen Next to UP Navigation Button 2 Press the activated MENU Button 3 times The SETTINGS Screen wi...

Page 12: ...Week Day are SUN MON TUE WED THU FRI SAT 4 To set the Minutes press the MINUTES Icon When activated the MINUTES Icon will start flashing a characteristic BEEP sound will support every touch Using the...

Page 13: ...13 7 3 SETTING THE CURRENT DATE AND TIME 5 To SAVE EXIT The SETTINGS Screen Press...

Page 14: ...ER operation enables switching the unit ON OFF by a preset time period from the current time Setting the SLEEP TIMER 1 Activate the MENU Button by touching the Screen Next to UP Navigation Button 2 Pr...

Page 15: ...ge to the time desired the Time setup is similar to Date and Time Setup 6 Press ON OFF Button to set whether the system Should switch ON or OFF NOTE The SLEEP TIMER Operation Number will flash at all...

Page 16: ...THE SLEEP TIMER 7 To activate SLEEP TIMER Operation Press button next to the Time Display 8 To deactivate SLEEP TIMER Operation Press button next to the Time Display 9 To SAVE EXIT The SETTINGS Screen...

Page 17: ...ON OFF Operation Mode Cool Heat Dry Auto HAUX Fan Fan speed Low Medium High Auto Temperature set point and the occurrence day of the week and time After programming each Schedule can be activated or d...

Page 18: ...Timer and then the Navigation Buttons or This will allow the user to navigate between Timer schedules NOTE Up to 50 Weekly Schedule Timers can be set 4 To Schedule the day or several days press on th...

Page 19: ...on Buttons change to the time desired the Time setup is similar to Date and Time Setup 6 Press ON OFF Button to set whether the system should switch ON or OFF NOTE When System Switch ON is enabled the...

Page 20: ...button next to the Time Display 9 To SAVE EXIT The SETTINGS Screen Display Press NOTE In SYSTEM SWITCH ON Mode it is possible to select the Operation Modes COOL HEAT AUTO DRY HAUX FAN NOTE When Time S...

Reviews: