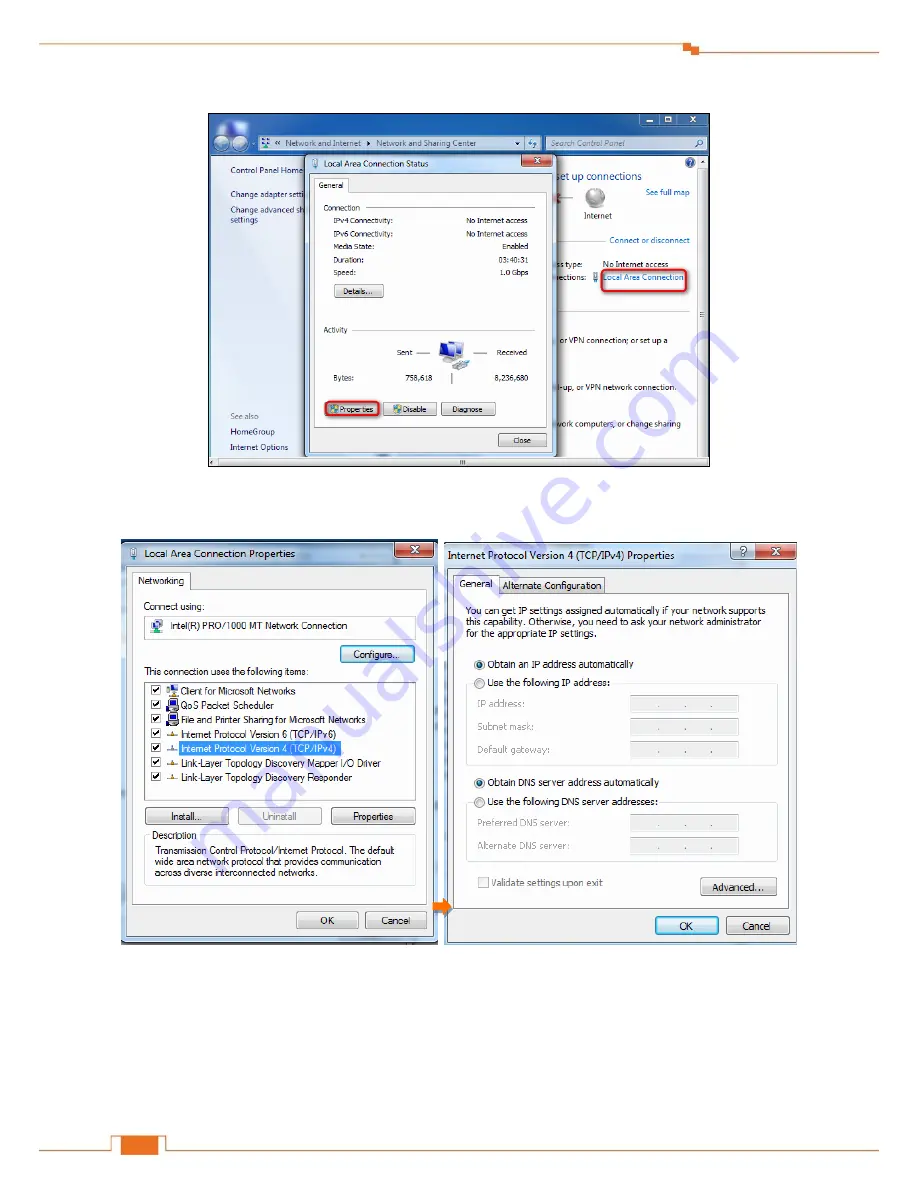
Tenda PH3 AV1000 User Manual Download Page 26


23 

Appendix 


Click 

Local Area Connection > Properties


Find  and double click 

Internet  Protocol  Version  4(TCP/IPv4)

. Select 

Obtain  an  IP  address 

automatically 

and 

Obtain DNS server address automatically 

and click 

OK


Click

 OK

 on the 

Local Area Connection Properties 

window (see 


for the screenshot). 

Summary of Contents for PH3 AV1000

Page 1: ......

Page 2: ...language in any form or by any means without the prior written permission of Shenzhen Tenda Technology Co Ltd Disclaimer Pictures images and product specifications herein are for references only To i...

Page 3: ...re Your Powerline Network 4 3 Add Adapters to a Private Powerline Network 6 III Manage Your Adapters 7 1 UI Installation 7 2 Run the UI 12 3 Change Device Name 13 4 Change Network Name 15 5 Reset 18 6...

Page 4: ...nsmit Internet data with electrical power which in a sense reduces the Ethernet cable cost and easily extends network coverage to where the electrical power can get within the valid range The rate of...

Page 5: ...d Solid The powerline signal of the adapter is poor try plugging the adapter closing to your router or modem until the PLC LED turns to green Ethernet Off No Ethernet cable is detected on the Ethernet...

Page 6: ...osition and use your Powerline Adapters how to connect them and access the Internet Here s an example for you 1 Install Your Adapters Attention The adapter can only be used in vertical directions Plug...

Page 7: ...r computer If you cannot access the Internet after the operation above please refer to Q1 for solution 2 Secure Your Powerline Network Two or more powerline adapters under the same electrical circuit...

Page 8: ...pter for 1 second and the PLC LED on the adapter starts blinking Then press the Pair button on the other adapter for 1 second Both buttons must be pressed within two minutes Observe the PLC LEDs on th...

Page 9: ...rs to a private powerline network follow the steps below Press the Pair button on any powerline adapter in the security powerline network for 1 second Within two minutes plug in the new powerline adap...

Page 10: ...n instructs you to install the adapter s UI on your computer If you are a Windows 8 user simply follow steps below If you are using other operation systems instructions herein are also good for refere...

Page 11: ...Your Adapters 8 After you read the license agreement shown as below select I accept the agreement and click Next Click Browse on below screen to locate where to install the UI and click Next to go fo...

Page 12: ...Manage Your Adapters 9 Keep clicking Next until the screen below displays Then check the Create a desktop icon option and click Next Click Install to install the UI...

Page 13: ...Manage Your Adapters 10 WinPcaP Setup Wizard will be displayed as below Click Next to go forward Click I Agree...

Page 14: ...Manage Your Adapters 11 Click Install Click Finish Click Finish to complete the installation...

Page 15: ...Adapters 12 After you finish the installation a UI shortcut will appear on your desktop 2 Run the UI After the UI is installed double click icon on your desktop to run the UI The main interface is sho...

Page 16: ...twork name if you do not customize a Powerline network name or use pair button to pair the adapters with each other To establish a same powerline network powerline adapters MUST share an identical net...

Page 17: ...Manage Your Adapters 14 Select the adapter whose name you want to change and specify a new name in the Device name edit box and click OK...

Page 18: ...s network name in a powerline network you MUST change the other adapters as well If not the adapter will exit from the current powerline network Also if you change the default network name HomePlugAV...

Page 19: ...Manage Your Adapters 16 Select all adapters whose name you want to change Type a new network name in Network Name edit box...

Page 20: ...Your Adapters 17 Click OK to activate the settings After successful network name configuration the Network Name will be changed from HomPlugAV into Private which means it is a private and encrypted n...

Page 21: ...ugAV once the device resets to factory default You can reset the adapters here or use the hardware button Pair button on the device To reset the adapters Click to start configuration Select Reset Sele...

Page 22: ...her adapters with different network name will disappear from the list If you want to add the adapter which you reset to the Powerline network again you need to use the pair button or reset all of othe...

Page 23: ...Manage Your Adapters 20 Click Browse to locate and upload the upgrade file you have downloaded Click OK to start upgrading...

Page 24: ...r We take Windows 8 Windows 7 and Windows XP as examples here Windows 8 Right click the icon on the bottom right corner of your desktop Click Open Network and Sharing Center Tips If you cannot find th...

Page 25: ...y and click OK Click OK on the Ethernet Properties window see for the screenshot Windows 7 Click the icon on the bottom right corner of your desktop Click Open Network and Sharing Center Tips If you c...

Page 26: ...erties Find and double click Internet Protocol Version 4 TCP IPv4 Select Obtain an IP address automatically and Obtain DNS server address automatically and click OK Click OK on the Local Area Connecti...

Page 27: ...ght click Local Area Connection and select Properties Scroll down to find and double click Internet Protocol TCP IP Select Obtain an IP address automatically and Obtain DNS server address automaticall...

Page 28: ...l circuit Q2 I cannot access the Internet after finishing the operations in Secure Your Powerline Network what should I do A2 Please follow the instructions below step by step to troubleshoot a Check...

Page 29: ...d to the same electricity meter are able to interconnect automatically no configuration required Yet there is still an included utility for advanced features such as Upgrade private network etc See Ma...

Page 30: ...Website http www tendacn com E mail support tenda com cn 4 Technical Specifications Hardware Specifications Standards RJ45 IEEE 802 3 IEEE 802 3u IEEE 802 3ab PLC HomePlugAV2 Button 1 Pair Button LED...

Page 31: ...ce may not cause harmful interference and 2 this device must accept any interference received including interference that may cause undesired operation This equipment has been tested and found to comp...

Page 32: ...Caution Any changes or modifications not expressly approved by the party responsible for compliance could void the user s authority to operate the equipment NOTE 1 The manufacturer is not responsible...

Reviews: