background image

F96CTN and G96CTN (Series A): Installation, Start-up, Operating, Service and Maintenance Instructions

Manufacturer reserves the right to change, at any time, specifications and designs without notice and without obligations.

11

A11307

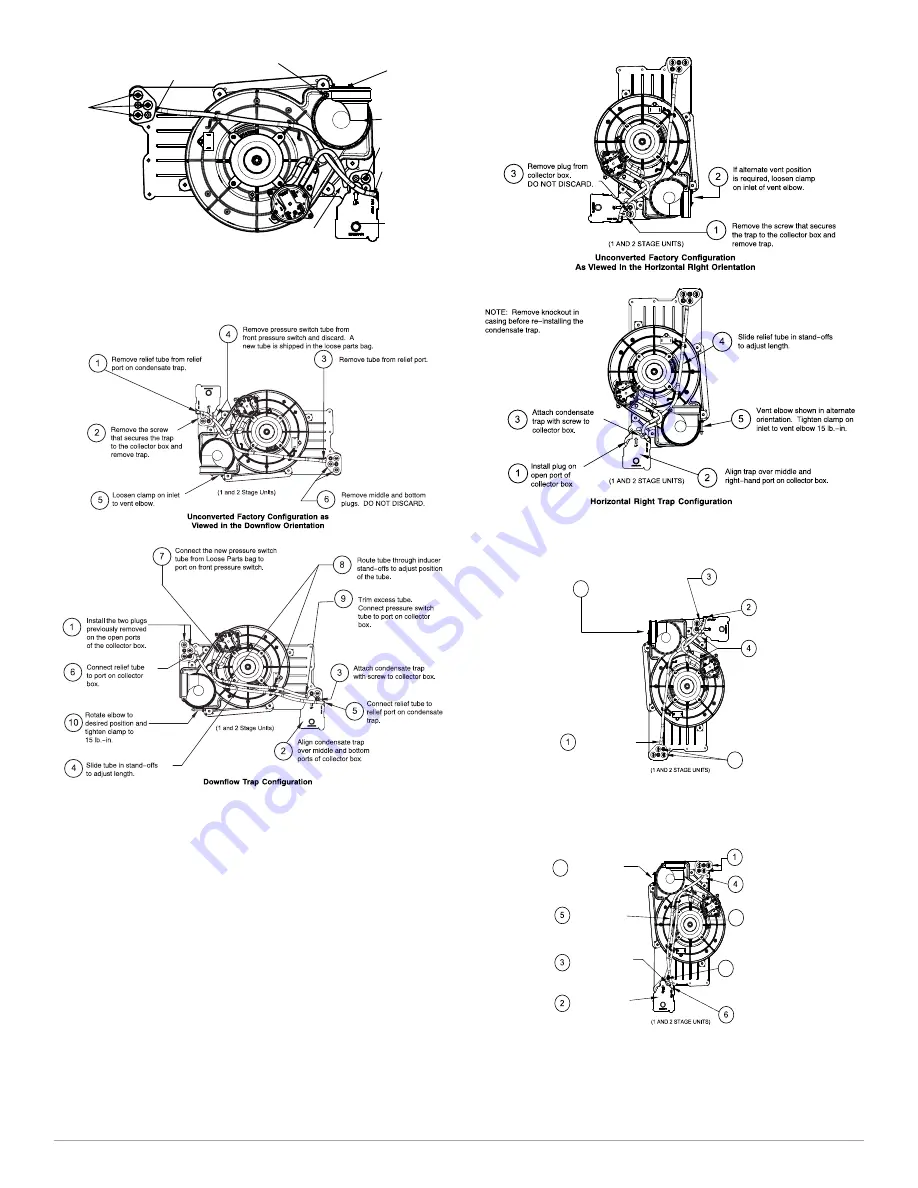
Fig. 8 – Upflow Trap Configuration

(Appearance may vary)

A11587

Fig. 9 – Downflow Trap Configuration

(Appearance may vary)

Condensate Trap - Horizontal Orientation.

When  the  furnace  is  installed  in  the  horizontal  right  position,  the

condensate trap will  be initially located  at the bottom  of the collector

box, as received from the factory. See the top image in 

Fig. 10

. When the

furnace  is installed  in  the  horizontal left  position,  the  condensate  trap

will be initially located at the top of the collector box, as received from

the factory. See the top image in 

Fig. 11

. In both cases the trap must be

repositioned on the collector box for proper condensate drainage. See the

bottom images in 

Fig. 10

 and 

Fig. 11

.

A field-supplied, accessory Horizontal Installation Kit (trap grommet) is

required  for  all  direct-vent  horizontal  installations  (only).  The  kit

contains a rubber casing grommet designed to seal between the furnace

casing and the condensate trap. See 

Fig. 12

.

A11573

Fig. 10 – Horizontal Right Trap Configuration

(Appearance may vary)

A11574

Fig. 11 – Horizontal Left Configuration

(Appearance may vary)

Condensate Trap

Relief Port

Collector Box

Plugs

Pressure Switch 

Port

Condensate Trap

Outlet

Condensate Trap

Relief Port

Collector Box 

Plug

Vent Elbow

Vent Elbow Clamp

Vent Pipe Clamp

UPFLOW TRAP CONFIGURATION

1 & 2 Stage Units

If alternate vent position
is required, loosen clamp
on vent elbow inlet.

Remove relief tube
from port on collector
box.

Remove the screw that secures the 
condensate trap to the collector box
and remove trap.

Remove relief tube from
relief port on condensate
trap.

Remove front pressure
switch tube and discard. 
A new tube is shipped in
the Loose Parts bag.

Remove middle and right
plug from collector box. 
DO NOT DISCARD.

5

6

Unconverted Factory Trap Configuration

As Viewed in the Horizontal Left Orientation

Rotate elbow to
desired position
and torque clamp
on inlet 15 lb.-in.

Slide relief tube in
stand-offs to adjust
length.

Attach condensate
trap with screw to 
collector box.

Align trap over middle
and right-hand port on
collector box.

Install two plugs previously
removed in open ports on
collector box.

Connect relief tube to port
on collector box.

Connect the new pressure switch
tube from Loose Parts bag to port
on front pressure switch.

Route pressure switch tube
underneath relief tube and
connect to port on 
collector box.

Connect relief tube to relief
port on condensate trap.

Horizontal Left Trap Configuration

9

7

8

NOTE:  Remove knockout in
casing before re-installing the 
condensate trap.

Summary of Contents for A Series

Page 1: ...NTENANCE PROCEDURES 60 WINTERIZATION 67 SEQUENCE OF OPERATION 71 PARTS REPLACEMENT INFORMATION GUIDE 75 MODEL NOMENCLATURE 75 Most states in the USA and jurisdictions in Canada have laws that require the use of Carbon Monoxide CO alarms with fuel burning products Examples of fuel burning products are furnaces boilers space heaters generators water heaters stoves ranges clothes dryers fireplaces in...

Page 2: ...ed to the exterior of the building at a minimum height of eight 8 feet above grade directly in line with the exhaust vent terminal for the horizontally vented gas fueled heating appliance or equipment The sign shall read in print size no less than one half 1 2 inch in size GAS VENT DIRECTLY BELOW KEEP CLEAR OF ALL OBSTRUCTIONS 4 INSPECTION The state or local gas inspector of the side wall horizont...

Page 3: ...TH HAZARD Failure to follow this warning could result in property damage personal injury or death This furnace was manufactured to operate with natural gas When fuel supply is Liquid Propane LP this furnace must be converted with a factory approved LP conversion kit See furnace rating plate for approved conversion kit WARNING FIRE EXPLOSION ELECTRICAL SHOCK AND CARBON MONOXIDE POISONING HAZARD Fai...

Page 4: ...tection of leaks to check all connections as specified in the Gas Piping section 6 Always install furnace to operate within the furnace s intended temperature rise range with a duct system which has an external static pressure within the allowable range as specified in the Start Up Adjustments and Safety Check section See furnace rating plate 7 When a furnace is installed so that supply ducts carr...

Page 5: ...e may cause the furnace and or vent to fail prematurely customer discomfort and or vent freezing Failure to follow these guidelines is considered faulty installation and or misapplication of the furnace and resulting failure damage or repairs may impact warranty coverage For accessory installation details refer to the applicable instruction literature NOTE Remove all shipping materials loose parts...

Page 6: ...ional Electrical Code NEC NFPA 70 CANADA Current edition of Canadian Electrical Code CSA C22 1 Condensate Drain Connection US Current edition of National Standard Plumbing Code Section 8 7 Canada Current edition of National Plumbing Code of Canada in Canada ELECTROSTATIC DISCHARGE ESD PRECAUTIONS PROCEDURE 1 Disconnect all power to the furnace Multiple disconnects may be required DO NOT TOUCH THE ...

Page 7: ...mount of combustion air and ventilation air required for the furnace Follow the guidelines below to ensure that the furnace and other gas appliances have sufficient air for combustion CAUTION PERSONAL INJURYAND OR PROPERTY DAMAGE HAZARD Improper use or installation of this furnace may result in premature furnace component failure Unless otherwise prohibited this gas furnace may be used for heating...

Page 8: ... OUTDOOR OPENINGS one inlet and one outlet combustion and ventilation air opening to the outdoors a One opening MUST commence within 12 in 300 mm of the ceiling and the second opening MUST commence within 12 in 300 mm of the floor b Size openings and ducts per Fig 6 and Table 3 c TWO HORIZONTAL DUCTS require 1 sq in 645 sq mm of free area per 2 000 BTUh 1 100 mm2 kW of combined input for all gas a...

Page 9: ...TER TOTAL INPUT 100 000 30 000 130 000 divided by 4 000 32 5 Sq In for each two Vertical Ducts or Openings 60 000 40 000 100 000 divided by 3 000 33 3 Sq In for each Single Duct or Opening 80 000 30 000 110 000 divided by 2 000 55 0 Sq In for each two Horizontal Ducts OTHER THAN FAN ASSISTED TOTAL 1 000 S BTUH GAS INPUT RATE FAN ASSISTED TOTAL 1 000 S BTUH GAS INPUT RATE ACH 30 40 50 40 60 80 100 ...

Page 10: ...the space 3 In spaces that use the Indoor Combustion Air Method infiltration should be adequate to provide air for combustion permanent ventilation and dilution of flue gases However in buildings with unusually tight construction additional air MUST be provided using the methods described in the Outdoor Combustion Air Method section 4 Unusually tight construction is defined as Construction with a ...

Page 11: ...ntal Left Configuration Appearance may vary Condensate Trap Relief Port Collector Box Plugs Pressure Switch Port Condensate Trap Outlet Condensate Trap Relief Port Collector Box Plug Vent Elbow Vent Elbow Clamp Vent Pipe Clamp UPFLOW TRAP CONFIGURATION 1 2 Stage Units If alternate vent position is required loosen clamp on vent elbow inlet Remove relief tube from port on collector box Remove the sc...

Page 12: ...PPLICATIONS It it NOT required for applications using single pipe or ventilated combustion air venting NOTICE The condensate trap extends below the side of the casing in the horizontal position A minimum of 2 in 51 mm of clearance is required between the casing side and the furnace platform for the trap to extend out of the casing in the horizontal position Allow at least 1 4 in per foot 20 mm per...

Page 13: ...et of the drain elbow 4 From inside the casing insert the formed grommet end of the elbow through the 7 8 in knockout in the casing 5 Pull the grommet through the casing from the outside until it is seated in the knockout 6 Attach the plain end of the drain elbow to the outlet stub on the drain trap Secure the drain elbow to the trap with the spring clamp A11342A Fig 14 Formed Rubber Drain Grommet...

Page 14: ...casing 16 Open the spring clamp and insert the long end of the adapter or the 1 2 in CPVC pipe into the outlet stub on the drain tube 17 Connect additional condensate piping to a code approved drain or to a condensate pump approved for use with acidic furnace condensate and compatible with mineral and vegetable oils such as canola oil Allow at least 1 4 in per foot 20 mm per meter of slope down an...

Page 15: ... outlet air duct flanges or air conditioning coil casing when used DO NOT cut main furnace casing side to attach supply air duct humidifier or other accessories All supply side accessories MUST be connected to duct external to furnace main casing A10493 Fig 20 Duct Flanges Return Air Connections The return air duct must be connected to bottom sides left or right or a combination of bottom and side...

Page 16: ...n Noncombustible Flooring Subbase not required 12 9 16 319 19 483 13 3 16 335 19 5 8 498 Downflow applications on combustible flooring Subbase required 11 13 16 284 19 483 13 7 16 341 20 5 8 600 Downflow Applications on Combustible Flooring with coil assembly coil or coil box Subbase not required 12 5 16 319 19 483 13 5 16 338 20 508 17 1 2 445 Upflow Applications on Combustible or Noncombustible ...

Page 17: ... must be connected to return air opening bottom inlet DO NOT cut into casing sides left or right Bypass humidifier connections should be made at ductwork or coil casing sides exterior to furnace See Fig 22 Bottom Return Air Inlet These furnaces are shipped with bottom closure panel installed in bottom return air opening Remove and discard this panel when bottom return air is used To remove bottom ...

Page 18: ...return use in the horizontal position refer to Fig 23 If both side and bottom openings are used in Fig 23 each opening used will require a filter A filter rack or any field supplied accessory air cleaner can also be installed in the common return duct prior to entering the return air opening in any orientation Refer to the instructions supplied with the Media Cabinet filter rack or accessory air f...

Page 19: ...0 800 378 0 06 15 0 10 25 0 15 39 0 34 85 0 23 59 1000 472 0 07 18 0 13 34 0 21 52 0 32 81 1200 566 0 08 20 0 17 43 0 27 68 16 x 25 Filter 406 x 635 mm Factory Accessory Washable Representative After Market Filter Media Fiberglass Pleated CFM L s 1 in 2 5 cm 1 in 2 5 cm 2 in 5 cm 1 in 2 5 cm 2 in 5 cm 600 283 0 04 10 0 06 15 0 09 22 0 20 51 0 13 34 800 378 0 05 13 0 08 21 0 13 32 0 29 72 0 20 49 1...

Page 20: ...n Guidelines reference tables available from your local distributor The duct system should be sized to handle the required system design CFM at the design external static pressure The furnace airflow rates are provided in Table 17 Air Delivery CFM With Filter When a furnace is installed so that the supply ducts carry air circulated by the furnace to areas outside the space containing the furnace t...

Page 21: ...USTION AIR PIPE SEE VENTING SECTION Install 12 x 22 204 x 559 mm sheet metal in front of and above the burner compartment area The sheet metal MUST extend above the furnace casing by 1 in 25 mm with the door removed A 1 in 25 mm clearance minimum between top of furnace and combustible material is required The entire length of furnace must be supported when furnace is used in horizontal position to...

Page 22: ...nstall a sediment trap externally in riser leading to furnace as shown in Fig 31 Connect a capped nipple into lower end of tee Capped nipple should extend below level of furnace gas controls Place a ground joint union between furnace gas control valve and exterior manual equipment gas shutoff valve A11035 Fig 31 Typical Gas Pipe Arrangement A 1 8 in 3 mm NPT plugged tapping accessible for test gau...

Page 23: ...mage Improper servicing could result in dangerous operation serious injury death or property damage Before servicing disconnect all electrical power to furnace When servicing controls label all wires prior to disconnection Reconnect wires correctly Verify proper operation after servicing Always reinstall access doors after completing service and maintenance WARNING ELECTRICAL SHOCK HAZARD Failure ...

Page 24: ... not used the field and factory spliced connections must be located inside the external electrical box Do not leave splice connections unprotected inside the furnace The J Box cover mounting bracket and screws are shipped in the loose parts bag included with the furnace See Fig 33 for J Box mounting locations The J Box mounting bracket and green ground screw is used as a grounding point for all li...

Page 25: ...Align the J Box bracket with the pilot holes inside the furnace casing 3 Install 2 screws through the outside of the casing to secure the J Box bracket to the furnace casing 4 Route field power wiring into external electrical box 5 Pull furnace line voltage power wires through strain relief bushing of the external electrical box 6 Pull the ground wire of the field line voltage wiring through the s...

Page 26: ... 2 Humidifier HUM The HUM terminal is a 24 VAC output energized when the blower is operating during a call for heat Connect an accessory 24 VAC 0 5 amp maximum humidifier if used to the in male quick connect HUM terminal and COM 24V screw terminal on the control board thermostat strip NOTE If the humidifier has its own 24 VAC power supply an isolation relay may be required Connect the 24 VAC coil ...

Page 27: ...ermostat Strip To HUM Terminal On Furnace Control Board To Humidifier Leads 24 V THERMOSTAT TERMINALS PL2 HOT SURFACE IGNITER INDUCER MOTOR CONNECTOR 115 VAC L2 NEUTRAL CONNECTIONS 115 VAC L1 LINE VOLTAGE CONNECTIONS EAC 1 TERMINAL 115 VAC 1 0 AMP MAX PL1 LOW VOLTAGE MAIN HARNESS CONNECTOR TRANSFORMER 24 VAC CONNECTIONS 3 AMP FUSE STATUS AND COMM LED LIGHTS SW1 SETUP SWITCHES AND BLOWER OFF DELAY ...

Page 28: ...for additional information and setup procedure 2 Outdoor Air Temperature Sensor must be attached in all dual fuel application 3 Refer to ICP thermostat Installation Instructions for additional information and setup procedure 4 When using a Humidity Sensing Thermostat set DEHUMIDIFY OPTIONS to H DE ENRGZD FOR DEHUM 5 HUM 24VAC terminal is 24 VAC and is energized when the low pressure switch closes ...

Page 29: ...NAHA001CV or NAHA002CV ainsi que l ensemble du drain de condensation extérieur fourni par le fabricant de cette fournaise ont été certifiés ULCS 636 pour l application des composantes Royal Pipe IPEX PVC qui sont certifiées à ce standard Au Canada l apprêt et le ciment doivent être du même fabricant que le système d évacuation L apprêt GVS 65 Purple et le ciment solvant GVS 65 doivent être utilisé...

Page 30: ... terminations must be from the same manufacturer A12220 Fig 40 Sample Inlet Air Pipe Connection for Polypropylene Venting Systems Venting Systems Direct Vent 2 Pipe System In a direct vent 2 pipe system all air for combustion is taken directly from outdoor atmosphere and all flue products are discharged to outdoor atmosphere Combustion air and vent pipes must terminate together in the same atmosph...

Page 31: ...s used The External Vent Trap Kit is only approved for PVC ABS DWV venting systems CAREFULLY FOLLOW THE INSTRUCTIONS PROVIDED WITH THE EXTERNAL VENT TRAP KIT FOR LAYING OUT THE VENTING SYSTEM AND THE DRAIN SYSTEM The instructions included with this furnace DO NOT APPLY to vent systems that are located below the furnace WARNING CARBON MONOXIDE POISONING HAZARD Failure to follow the instructions out...

Page 32: ... appropriate location for termination consider the following guidelines 1 Comply with all clearance requirements stated in Fig 45 or Fig 46 per application 2 The vent termination must be located at least 3 feet from an inside corner and follow the clearance distances in the Inside Corner Termination drawing 3 Termination or termination kit should be positioned where vent vapors will not damage pla...

Page 33: ...he heating season If ventilation fans are present in these areas the combustion air pipe must terminate outdoors as a Direct Vent System A13406 Fig 43 Combustion Air Pipe Attachment A96128 Fig 44 Pipe Vent and Combustion WARNING CARBON MONOXIDE POISONING HAZARD Failure to follow the instructions outlined below for each appliance being placed into operation could result in carbon monoxide poisoning...

Page 34: ...al air supply inlet 6 ft 1 8 M 3ft 9 M above if within 10 ft 3 M horizontally L Clearance under a veranda porch deck or balcony 12 in 305 mm Permitted only if veranda porch deck or balcony is fully open on a minimum of two sides beneath the floor See Note 4 Manufacturer s Recommendation See Notes 3 8 M Clearance to each side of the centerline extended above or below vent terminal of the furnace to...

Page 35: ...tion See Note 8 K Clearance to a mechanical air supply inlet 6 ft 1 8 M 3ft 9 M above if within 10 ft 3 M horizontally L Clearance under a veranda porch deck or balcony 12 in 305 mm Permitted only if veranda porch deck or balcony is fully open on a minimum of two sides beneath the floor See Note 4 Manufacturer s Recommendation See Notes 3 8 M Clearance to each side of the centerline extended above...

Page 36: ...riveway located on public property 7 ft 2 1 M Clearance under a veranda porch deck or balcony N P No operable windows doors or intakes of any type are permitted on Wall B between the vent termination and the inside corner when the vent termination is at least 3 ft 1 M away and not more than 6 ft 2 M away from an inside corner The following items on Wall A must be located at least 3 ft 1 M away fro...

Page 37: ... pipe termination when permitted that re directs the flue gas away by use of an elbow or tee certified to ULC S636 from the adjacent property line must be used See Fig 48 The concentric vent kit currently cannot be modified to attach an elbow to the vent portion of the rain cap A tee attached to the rain cap could potentially direct the flue gas plume toward the intake air stream and contaminate t...

Page 38: ...valent Vent Length of the venting system The measured length of pipe used in a single or 2 pipe termination is included in the total vent length Include deductions from the Maximum Equivalent Vent Length MEVL contained in the Venting Tables for elbows and flexible vent pipe Factory accessory concentric vent terminations or pipe lengths and elbows used for standard vent terminations do not require ...

Page 39: ...THAT SIZE FURNACE may be used Combustion Air and Vent Piping Insulation Guidelines NOTE Use closed cell neoprene insulation or equivalent The vent pipe may pass through unconditioned areas The amount of exposed pipe allowed is shown in Table 12 1 Using winter design temperature used in load calculations find appropriate temperature for your application and furnace model 2 Determine the amount of t...

Page 40: ...Ft Winter Design Temp F Unit Size 40 000 BTUH 60 000 BTUH Uninsulated 3 8 in Insulation 1 2 in Insulation Uninsulated 3 8 in Insulation 1 2 in Insulation Pipe Dia in 1 2 2 1 2 2 1 2 2 1 2 2 3 1 2 2 3 1 2 2 3 20 20 20 20 20 50 45 20 60 50 20 30 30 25 20 75 65 60 20 85 75 65 0 10 5 5 20 25 20 20 30 25 15 15 10 10 20 40 30 25 20 45 40 30 20 5 20 15 10 20 20 15 10 5 20 25 20 15 20 30 25 20 40 15 10 5 ...

Page 41: ...38 51 64 38 51 64 76 38 51 64 76 38 51 64 76 7 6 1 6 1 6 1 6 1 15 2 13 7 6 1 18 3 15 2 6 1 9 1 9 1 7 6 6 1 22 9 19 8 18 3 6 1 25 9 22 9 19 8 18 3 0 1 5 1 5 6 1 7 6 6 1 6 1 9 1 7 6 4 6 4 6 3 0 3 0 6 1 12 2 9 1 7 6 6 1 13 7 12 2 9 1 29 1 5 6 1 4 6 3 0 6 1 6 1 4 6 3 0 1 5 6 1 7 6 6 1 4 6 6 1 9 1 7 6 6 1 40 4 6 3 0 1 5 4 6 4 6 3 0 1 5 6 1 4 6 4 6 3 0 6 1 6 1 4 6 3 0 Winter Design Temp C Unit Size 80 0...

Page 42: ...e Unit Size 60 000 1 80 000 100 000 2 120 000 Altitude feet Pipe Dia in 1 2 2 3 1 2 2 3 4 2 2 3 4 2 3 4 0 2000 20 100 175 200 15 55 130 175 200 20 80 175 200 10 75 185 2001 3000 95 165 185 10 49 125 165 185 15 75 165 185 70 175 3001 4000 16 90 155 175 115 155 175 155 175 5 65 165 4001 4500 15 85 150 170 44 110 150 165 10 70 170 N A 60 160 4501 5000 80 145 165 145 160 65 150 165 5001 6000 75 140 15...

Page 43: ...zontal offsets with 90 deg Elbows Short offsets can be difficult to slope and may trap con densate Use 45 deg Elbows where possible to ensure conden sate drainage Slope vent pipe back to the furnace at least per foot 7 6 21 7 1 8 5 287 7 5 675 725 61 3 172 7 6 276 7 7 287 7 2 7 1 8 5 25 86 6 0 080 48 9 17 9 17 1 7 7 7 0 2 9 17 25 66 21 1 2 3 4 6 7 5 5 Rotate vent elbow to required position Any oth...

Page 44: ...ERTICAL Fig 55 Downflow Configurations Appearance may vary See Notes for Venting Options A11327A HORIZONTAL LEFT VERTICAL VENT CONFIGURATION A11328A HORIZONAL LEFT LEFT VENT CONFIGURATION 1 2 3 4 5 6 7 5 Any other unused knockout may be used for combustion air connection 1 2 3 4 5 6 7 5 Rotate vent elbow to required position 1 2 3 4 5 6 7 5 Rotate vent elbow to required position Any other unused k...

Page 45: ... strain on the vent elbow attached to the inducer 1 Apply the gaskets to the vent pipe and combustion air pipe adapters If supplied remove and discard round center slug from interior of gasket See Fig 58 NOTE The vent pipe adapter can be distinguished from the inlet pipe adapter by the absence of an internal pipe stopping ring The vent pipe can pass through the vent pipe adapter it cannot pass thr...

Page 46: ... 1 4 in turn Be sure pipe is fully inserted into fitting socket 14 Wipe excess cement from joint A continuous bead of cement will be visible around perimeter of a properly made joint 15 Handle pipe joints carefully until cement sets 16 Horizontal portions of the venting system shall be supported to prevent sagging Space combustion air piping and vent piping hangers as shown in Table 15 Support pip...

Page 47: ... pipe adapter to 15 lb in 13 Pilot drill a 1 8 in hole in the combustion air pipe adapter 14 Complete the vent and combustion air pipe as shown in Install the Vent and Combustion Air Pipe A13076 Fig 59 Optional Vent Pipe Flush with Adapter Installing the Vent Termination Roof Terminations A roof termination of any type will require a 4 in 102 mm flashing for a 2 in 50 mm ND concentric vent kit NAH...

Page 48: ...NOTE Do not allow insulation or other materials to accumulate inside of pipe assembly when installing it through hole 4 Locate assembly through sidewall with rain shield positioned no more than 1 in 25 mm from wall as shown in Fig 41 5 Disassemble loose pipe fittings Clean and cement using same procedures as used for system piping DO NOT CEMENT POLYPROPYLENE FITTINGS 2 Pipe and 1 Pipe Vent Termina...

Page 49: ...c vent kits are ULC S636 listed Material Description Type ASTM ULC UL Specification Pipe Fittings Solvents Primers Cements PVC Pressure Pipe Schedule 40 D1785 UL 1738 D2466 or D2665 F656 D2564 DWV Schedule 40 D1785 D2665 SDR 26 N A D2241 SDR 21 N A D2241 IPEX Schedule 40 ULC S636 ULC S636 ULC S636 ULC S636 Royal Pipe Schedule 40 ULC S636 ULC S636 ULC S636 ULC S636 ABS ABS Schedule 40 D2661 D2468 C...

Page 50: ...ent or air inlet piping system Add equiv length of 3 90º long radius elbows use the highest number of elbows for either the vent or inlet pipe 3 x 5 ft 1 5 M 15 ft 4 6 M Example from polypropylene vent manufacturer s instructions Verify from vent manufacturer s instructions Add equiv length of 45º long radius elbows use the highest number of elbows for either the vent or inlet pipe 0 x 0 ft 0 M Ad...

Page 51: ...710 705 700 695 685 680 675 OFF ON ON 940 945 940 935 935 930 920 900 890 875 ON OFF OFF 1115 1120 1125 1120 1120 1115 1110 1100 1095 1085 ON OFF ON 1285 1290 1295 1295 1285 1250 1220 1185 1155 1120 ON ON OFF 1400 1370 1340 1310 1280 1245 1215 1185 1150 1115 ON ON ON 1400 1370 1340 1310 1280 1245 1215 1185 1150 1115 Maximum Clg Airflow2 1400 1370 1340 1310 1280 1245 1215 1185 1150 1115 CF Switches...

Page 52: ...4 Heating SW1 High Heat Airflow3 1235 1245 1250 1255 1255 1260 1255 1220 1190 1160 Low Heat Airflow3 1005 1010 1015 1015 1020 1000 995 990 980 970 Unit size 0802120 Clg CF Switch settings External Static Pressure ESP Clg Switches SW2 3 SW2 2 SW2 1 0 1 0 2 0 3 0 4 0 5 0 6 0 7 0 8 0 9 1 0 Clg Default OFF OFF OFF 1745 1755 1755 1760 1755 1750 1745 1725 1705 1685 CF Switches SW3 3 SW3 2 SW3 1 Low Clg ...

Page 53: ...irflow2 2160 2165 2175 2170 2160 2150 2135 2120 2065 2020 CF Switches SW3 3 SW3 2 SW3 1 Cont Fan Default OFF OFF OFF 750 740 745 730 715 See note 4 Continuous Fan Airflow SW3 OFF OFF ON 750 740 745 730 715 See note 4 OFF ON OFF 900 900 915 910 905 See note 4 OFF ON ON 1070 1075 1095 1095 1090 1085 1095 1080 1065 1070 ON OFF OFF 1070 1075 1095 1095 1090 1085 1095 1080 1065 1070 ON OFF ON 1070 1075 ...

Page 54: ...ired cooling airflow 1 Remove blower door 2 Locate CF setup switches on furnace control 3 Determine air conditioning tonnage used for low cooling when used or desired continuous fan airflow 4 Configure the switches for the required airflow 5 Replace blower door Additional Setup Switches SW4 The furnace control has three additional setup switches labeled SW4 Setup switches SW4 are used for applicat...

Page 55: ...proper operation 6 Check and verify burner orifice size in furnace NEVER ASSUME ORIFICE SIZE ALWAYS CHECK AND VERIFY WARNING FIRE OR EXPLOSION HAZARD Failure to follow this warning could result in personal injury death and or property damage Never purge a gas line into a combustion chamber Never test for gas leaks with an open flame Use a commercially available soap solution made specifically for ...

Page 56: ...tain low fire input rate See Fig 63 a Turn gas valve ON OFF switch to OFF b Loosen set screw on manifold tower pressure tap with 3 32 in hex wrench or remove the 1 8 inch NPT plug from the manifold pressure tap on the gas valve c Connect a water column manometer or similar device to manifold pressure tap d Turn gas valve ON OFF switch to ON e Move setup SW1 2 on furnace control to ON position to l...

Page 57: ...ermometers in return and supply ducts as near furnace as possible Be sure thermometers do not see heat exchanger so that radiant heat does not affect readings This practice is particularly important with straight run ducts 2 When thermometer readings stabilize subtract return air temperature from supply air temperature to determine air temperature rise NOTE Temperature rise can be determined for l...

Page 58: ...3 and refer to Fig 60 and Table 17 The continuous fan speed can be further adjusted at a conventional thermostat using the continuous fan speed select function Changing the continuous fan speed at a conventional thermostat DOES NOT change the low speed cooling airflow selected via SW3 at the control board Refer to the section titled continuous Blower Speed selection for Thermostat Adjust Thermosta...

Page 59: ... 950 45 3 7 1 6 44 3 2 1 3 44 3 3 1 4 44 3 4 1 4 750 42 3 3 1 4 42 3 4 1 4 42 3 5 1 5 42 3 6 1 5 4001 775 43 3 7 1 6 43 3 8 1 6 42 3 3 1 4 42 3 4 1 4 1220 800 43 3 5 1 5 43 3 6 1 5 43 3 7 1 6 43 3 8 1 6 825 44 3 8 1 6 43 3 4 1 4 43 3 5 1 5 43 3 6 1 5 850 44 3 5 1 5 44 3 7 1 5 44 3 8 1 6 43 3 4 1 4 5000 875 44 3 3 1 4 44 3 5 1 5 44 3 6 1 5 44 3 7 1 6 1524 900 44 3 2 1 3 44 3 3 1 4 44 3 4 1 4 44 3 5...

Page 60: ...71 343 857 62 58 116 290 22 164 327 818 64 56 112 281 23 157 313 783 66 54 109 273 24 150 300 750 68 53 106 265 25 144 288 720 70 51 103 257 26 138 277 692 72 50 100 250 27 133 267 667 74 48 97 243 28 129 257 643 76 47 95 237 29 124 248 621 78 46 92 231 30 120 240 600 80 45 90 225 31 116 232 581 82 44 88 220 32 113 225 563 84 43 86 214 33 109 218 545 86 42 84 209 34 106 212 529 88 41 82 205 35 103...

Page 61: ...posed of 1 or 2 digits The first digit is the number of short flashes the second digit is the number of long flashes For an explanation of status codes refer to service label located on control door or Fig 66 and the troubleshooting guide which can be obtained from your distributor Retrieving Stored Fault Codes The stored status codes will NOT be erased from the control memory when 115 or 24 v pow...

Page 62: ...nd or Replacing Air Filter The air filter type may vary depending on the application or orientation The filter is external to the furnace casing There are no provisions for an internal filter with this furnace See Filter Arrangement under the Installation section of this manual NOTE If the filter has an airflow direction arrow the arrow must point toward the blower To clean or replace filters proc...

Page 63: ...oned at the same hole location during reassembly c Mark blower wheel orientation and cutoff plate location to ensure proper reassembly d Remove screws securing cutoff plate and remove cutoff plate from housing e Remove bolts holding motor mounts to blower housing and slide motor and mounts out of housing f Remove blower wheel from housing g Clean wheel per instructions on degreaser cleaner Do not ...

Page 64: ...r assembly 18 Check igniter resistance Nominal resistance is 40 to 70 ohms at room temperature and is stable over the life of the igniter 19 Clean burner with a brush and a vacuum A11403 Fig 68 Burner Assembly 20 Clean the flame sensor with fine steel wool 0000 grade Do not use sand paper or emery cloth To reinstall burner assembly 1 Install the Hot Surface Igniter HSI and bracket in burner assemb...

Page 65: ... 2 Remove control door 3 Disconnect pressure switch tube from pressure switch port NOTE Ensure the pressure switch tube disconnected from the pressure switch is higher than the collector box opening or water will flow out of tube 4 Remove the collector box plug from the top port on the upper corner of the collector box See Fig 61 5 Attach a funnel with a flexible tube to port on the collector box ...

Page 66: ...ored insulation is evident replace heat tape 3 Check that heat tape power supply circuit is on Cleaning Heat Exchangers The following items must be performed by a qualified service technician Primary Heat Exchangers If the heat exchangers get an accumulation of light dirt or dust on the inside they may be cleaned by the following procedure NOTE If the heat exchangers get a heavy accumulation of so...

Page 67: ...e inducer housing overfill condensate trap and flow to an open drain 8 Replace the rubber plug in the port on the collector box 9 Remove the middle unused rubber plug from the port on the collector box opposite the condensate trap See Fig 61 10 Repeat Steps 5 through 8 11 If a condensate pump is used check with pump manufacturer to verify pump is safe for use with antifreeze used Allow pump to sta...

Page 68: ...imultaneously until the heartbeat flashes When done put setup switch SW1 1 in the OFF position Was there a previous status code other than the heartbeat Go to section below for the status code that was flashed Does the control respond to W W1 W2 Y1 Y Y2 and G 24V thermostat signals Run system through a minimum heat maximum heat or cooling cycle to check operation Status codes are erased after 72 h...

Page 69: ...eck connections and retry If current is near typical value 4 0 6 0 nominal and burners will not stay on repeat check in maximum heat If burners will still not stay on replace control If burners operate in maximum heat then switch to intermediate heat check manifold pressure If OK check burner carryover and flame sensor location Clean flame sensor with fine steel wool and recheck current Nominal cu...

Page 70: ...ross PL13 3 BLUE and PL13 4 GREEN The voltage should be near 0 VDC but it will fluctuate briefly several times a second If you have an analog voltmeter the needle will briefly go high several times a second If you have a digital voltmeter with a bar graph it will show a large change in magnitude on the bar graph several times a second If you have a standard digital voltmeter it will show a brief f...

Page 71: ... the low heat pressure switch LPS closes If the high heat pressure switch HPS fails to close and the low heat pressure switch LPS closes the furnace will operate at low heat gas flow rate until the high heat pressure switch closes for a maximum of 2 minutes after ignition b Igniter Warm Up At the end of the prepurge period the Hot Surface Igniter HSI is energized for a 17 sec igniter warm up perio...

Page 72: ...h 115 vac whenever the blower motor BLWM is operating When the thermostat is satisfied the R to G and Y1 or R to G and Y1 and Y2 circuits are opened The outdoor unit stops and the furnace blower BLWM and electronic air cleaner terminal EAC 1 will remain energized for an additional 90 sec Jumper Y1 to DHUM to reduce the cooling off delay to 5 sec See Fig 38 4 Dehumidification Mode See Fig 38 and Fi...

Page 73: ...ighest CF selection airflow as shown in Fig 60 Momentarily turning off the FAN switch again at the thermostat will shift the continuous blower airflow up one more increment If you repeat this procedure enough you will eventually shift the continuous blower airflow to the lowest CF selection as shown in Fig 60 The selection can be changed as many times as desired and is stored in the memory to be a...

Page 74: ...s A Installation Start up Operating Service and Maintenance Instructions Manufacturer reserves the right to change at any time specifications and designs without notice and without obligations 74 A190153 Fig 73 Wiring Diagram ...

Page 75: ...or module when used Pressure switch es TO OBTAIN INFORMATION ON PARTS Consult your installing dealer or classified section of your local telephone directory under Heating Equipment or Air Conditioning Contractors and Systems headings for dealer listing by brand name or contact INTERNATIONAL COMFORT PRODUCTS a division of Carrier Corporation LEWISBURG TN 37091 TN 37091 U S A Have available the mode...

Page 76: ...alog No 440 014900 00 REV B Replaces 440 01 4900 00 REV A F96CTN and G96CTN Series A Installation Start up Operating Service and Maintenance Instructions Manufacturer reserves the right to change at any time specifications and designs without notice and without obligations 76 ...

Reviews: