background image

Place the Airwall where it can reach the Conductor on your shared network. Once 

you set up DHCP on your network, you can skip steps 2 and 3 when setting up 

any additional Airwalls.

For the latest info,

see Airwall help:

Airwall – 110

DHCP Quick Start

Plug in the Airwall


Locate the Airwall in an area that 

complies with its safe operating guidelines, then plug it in 

or apply power. 

Check DHCP – Ensure there is a DHCP server and a DNS 

resolver or DNS server for the local domain accessible 

from the shared network. 

Create a DNS SRV record  – On the DNS server, add a 

SRV record pointing to the Conductor URL: 

_service._proto.name TTL class SRV priority 

weight port target

For example, if your shared network domain is  

example.com and the Conductor hostname is cond-01, 

then the SRV record should be: 

_ifmap._tcp.example.com. 3600 IN SRV 10 0 

8096 cond-01.example.com

*Use the TTL, priority and weight for your DNS environ-

ment. Port 8096 is the default, but you can change it in 

the Conductor and set it to an alternate port.

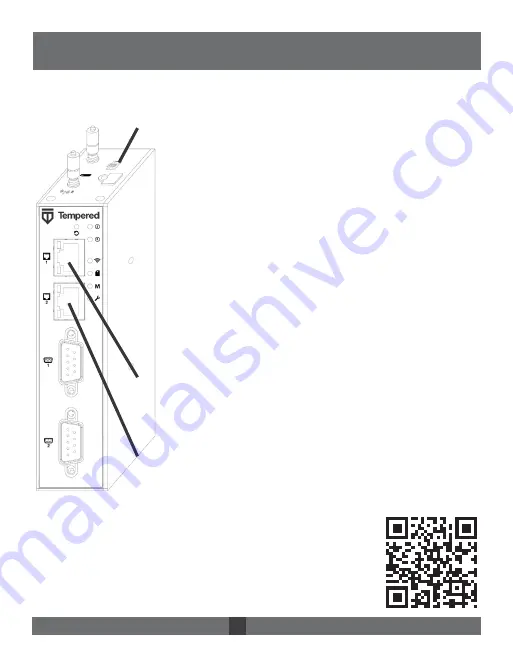
Connect to your network  – Connect the Airwall to your 

network using Port 1.  The DHCP server assigns an IP ad-

dress, netmask, and a default gateway to the Airwall. The 

Airwall then does a DNS lookup and configures itself using 

the Conductor address.

Connect to devices –  Connect the devices you want to 

protect to the Airwall on Port 2.

1

2

3

4

5

Once the Airwall is connected to the Conductor, you can man-

age and configure it there (including serial ports). For alternate 

methods of provisioning the Airwall or installing the console 

port driver, go to Airwall help at https://webhelp.tempered.io/

webhelp/.

The Airwall should now be recognized in the Conductor, 

showing up on the Licensing tab, or on the Airwalls page as  

ready to manage.

Airwall™ -110 Series            DOC-0079  EN    Revised: May 6, 2020   QUICK START GUIDE

Summary of Contents for Airwall 110 Series

Page 1: ...ply power Connect to your network Plug in to your network using port 1 Connect a computer to the Airwall Plug in using the micro USB console port located on the bottom Using a terminal macOS Linux or...

Page 2: ...example com 3600 IN SRV 10 0 8096 cond 01 example com Use the TTL priority and weight for your DNS environ ment Port 8096 is the default but you can change it in the Conductor and set it to an alterna...

Page 3: ...d installation instructions MODELS support tempered io 1 206 452 5500 ext 2 www tempered io 3101 Western Ave Ste 550 Seattle WA 98121 Airwall 110e and Airwall 110g Platform Guide 1 Multi purpose butto...

Page 4: ...C 250V AC Max current 2 0A DC Power Input DC 9 48V 0 55A 0 1A Over voltage protection Reverse polarity protection Storage Temp range 45 to 85 C 49 to 185 F Operating Temp range 40 to 70 C 40 to 158 F...

Page 5: ...ands B1 B2 B3 B4 B5 B7 B8 B12 B13 B18 B19 B20 B25 B26 B28 4G LTE TDD bands B38 B39 B40 B41 Specifications continued pg 2 Regulatory approvals Global IECEE CB Scheme safety European Union LVD EMCD RoHS...

Page 6: ...ACC HW ANT LTE 5 ACC HW ANT LTE 3 in Japan 1x 3 pin power connector 1x 2 pin relay connector DIN rail mounting kit Power Supply ACC HW 110 PSU 25W AC Power cables ACC HW PWR C13 NA North America ACC H...

Page 7: ...ed or operating in conjunction with any other antenna or transmitter If this device is installed with an antenna other than the type included with it you must select an antenna and cabling system that...

Page 8: ...RS 232 RS 422 RS 485 1 TX Data 2 RxD TX Data 3 TxD RX 4 RX 5 GND GND GND 6 7 RTS 8 CTS 9 This device also has a normally open relay contact that is connected when the device is fully functional and ha...

Page 9: ...e equipment is not in a hazardous condition due to uneven mechanical loading Circuit Overloading Consideration should be given to the connection of the equipment to the supply circuit and the effect t...

Page 10: ...1 On the Airwall s Diagnostics page you can put it into diagnostic mode and download a diagnostics report If the Airwall is offline you can put it in Diagnostics mode to download the report 2 Create y...

Reviews: