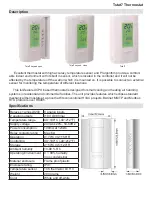
background image

Tstat7 Thermostat


       The wiring diagram above outlines the basic functions the TSTAT7 thermostat can do for you. 

With four analog/digital inputs you can plug in occupancy sensors, flow sensors, fan status, freeze 

protection, power meters and BTU meters just to name a few. There are 2 analog outputs that can be 

used for modulating valves and modulating dampers. It comes equipped with a RS485 network that 

can be connected to a controller like a boiler as illustrated above.

       On the other side we have five relay output capabilities which can be used for air handler units, 

fan coil units, heat pumps and many other different types of hydronic applications.    


       The TSTAT7 thermostat is compatible with any desire you need and the perfect fit for your next 

installation.

Operational Functions


    The buttons both the up arrow and down arrow al-

low the consumer to increase or decrease the desired 

set-point they wish to have. To adjust the set-point on the 

room sensor can only be done when the occupied symbol 

is being displayed on the LCD display. To increase the 

set-point temperature by a degree simply hit the up arrow 

button. To decrease the set-point temperature by a de-

gree simply hit the down arrow button and continue either 

step until desired set-point is achieved. After the set-point 

is increased or decreased the LCD screen will display the 

current set-point, until the temperature in the room reach-

es the desired set-point (warmer/cooler) of the occupant.

1) Adjustable set-points

2) There are six buttons that operate the Tstat7:

Buttons

Functions

Top button (right side)

Increases setpoint

Second button from top (right 

side)

Decreases setpoint

FAN Mode: Middle button (right 

side)

Adjusts manually/automatically the fan speed to 

satisfy cool air temperature

Main MENU: Second button 

from bottom (right side)

Optimizes the settings of heating/cooling, clock, 

schedule, etc 

Ok: First button from bottom 

(right side)

To save or  enter a setting in the main menu

Override switch 

unmarked (center of front cover)

For new occupancy adjustments

Summary of Contents for Tstat7

Page 1: ...ilities The unit provides features which eclipse standard mechanical thermostats at a price that fits conventional HVAC projects BACnet MS TP and Modbus RTU protocols over RS485 Specifications Relays x 1amps 24V 8 analog inputs 2 analog outputs 10V 100ma Temperature range 40 100 C 40 212 F Supply voltage 24VAC 20 50 60Hz Power consumption 100mA at 12VDC Relay contacts rating Max 6A Operation 0 70 ...

Page 2: ... with one another Make sure to keep wiring and equipment controllers six feet from power distribution motors etc If these conditions are not satisfied irregularities can occur with the system With this easy to install and manage product building developers manag ers can deliver a system that exceeds expectations Comfort control is made possible at a cost savings like no other ...

Page 3: ... To adjust the set point on the room sensor can only be done when the occupied symbol is being displayed on the LCD display To increase the set point temperature by a degree simply hit the up arrow button To decrease the set point temperature by a de gree simply hit the down arrow button and continue either step until desired set point is achieved After the set point is increased or decreased the ...

Page 4: ...ormal state b When press mode key it will be switched between fan mode and heat cool When press up and down keys it will go into the fan mode list or heat cool list press mode press down Tstat7 Thermostat ...

Page 5: ...ou can also program the thermostat to operate at a lower level when the room or building is unoccupied saving energy and costs on your electric bill what s more the earth will become more and more beautiful and ecological b Now you are in the normal state when the menu key is pressed the unit will switch between schedule clock and advanced screens To change the unit s ID press menu and keep pressi...

Page 6: ... re attach the front panel to the now mounted panel Refasten the screw at the base connect ing both panels OR Tstat7 Thermostat Set net ID Baudrate and protocol through main menu button 1 Press the menu several times to display advanced and then press OK 2 Press menu again Press multiple times until the net ID option is found Change by up and down key 3 Press menu again Press multiple times until ...

Page 7: ...y7uyu9n3 download T3000 software and install it 2 Connect Tstat7 to PC via RS485 at pin 19 and 20 Start the software T3000 it will open below the view 3 Click the button to scan and the following view will appear then close the popup It shows the tstat7 has been connnected ...

Page 8: ...will display the basic information of Tstat7 5 Click button input it will show all the information of input same as output When you press input1 you can change the name according to your demand When you press range a pop up window will appear there are different choices ...

Page 9: ...6 When press the setting button it will show the parameter view When click PIDs Table it will open a PID popup ...

Page 10: ...Modbus Register List The register list is very long it can be downloaded as an excel spreadsheet 03ModbusBacnetRegis terList xls at the following link http tinyurl com ybaj9d3u ...

Reviews: