Temco Builder Direct Vent 36CDVXRRN Installation Instructions And Homeowner'S Manual Download Page 9

9

CDVX Series Direct Vent Gas Fireplace

20012253

The fireplace, when installed, must be 
electrically connected and grounded in 
accordance with local codes or, in the ab-
sence of local codes, with the current CSA 
C22.1 Canadian Electrical Code.

For USA installations follow local codes 
and the national electrical code  ANSI/
NFPA No. 70.

It is strongly suggested that wiring of the 
Electrical Junction Box be carried out by a 
licensed electrician.

Ensure that the power to the supply line 
has been disconnected before commenc-
ing this procedure.                

The electrical junction box has been fitted standard on 
this model to allow for the easy connection of an op-
tional fan kit. 

To connect the electric box to the house electrical sup-
ply follow the steps below.
1.  Unscrew the retaining screw holding the electric 

cover to the outside of the unit. (Fig. 9)

2.  Remove the knockout from the electric cover plate.
3.  Insert the wire connector through the hole in the 

electric cover plate and secure.

120V Electrical Hook Up

4.  Insert the house wire through the connector on the 

cover plate.

5.  Secure the wires from the receptacle to the incoming 

line.

6.  The receptacle has four wires connected to it. The 

receptacle is set up for a split system. The top plug 
of the receptacle is wired separately from the bottom 
one.

7.  Green is ground. White is neutral, Black and red are 

line voltage to each plug on the receptacle.
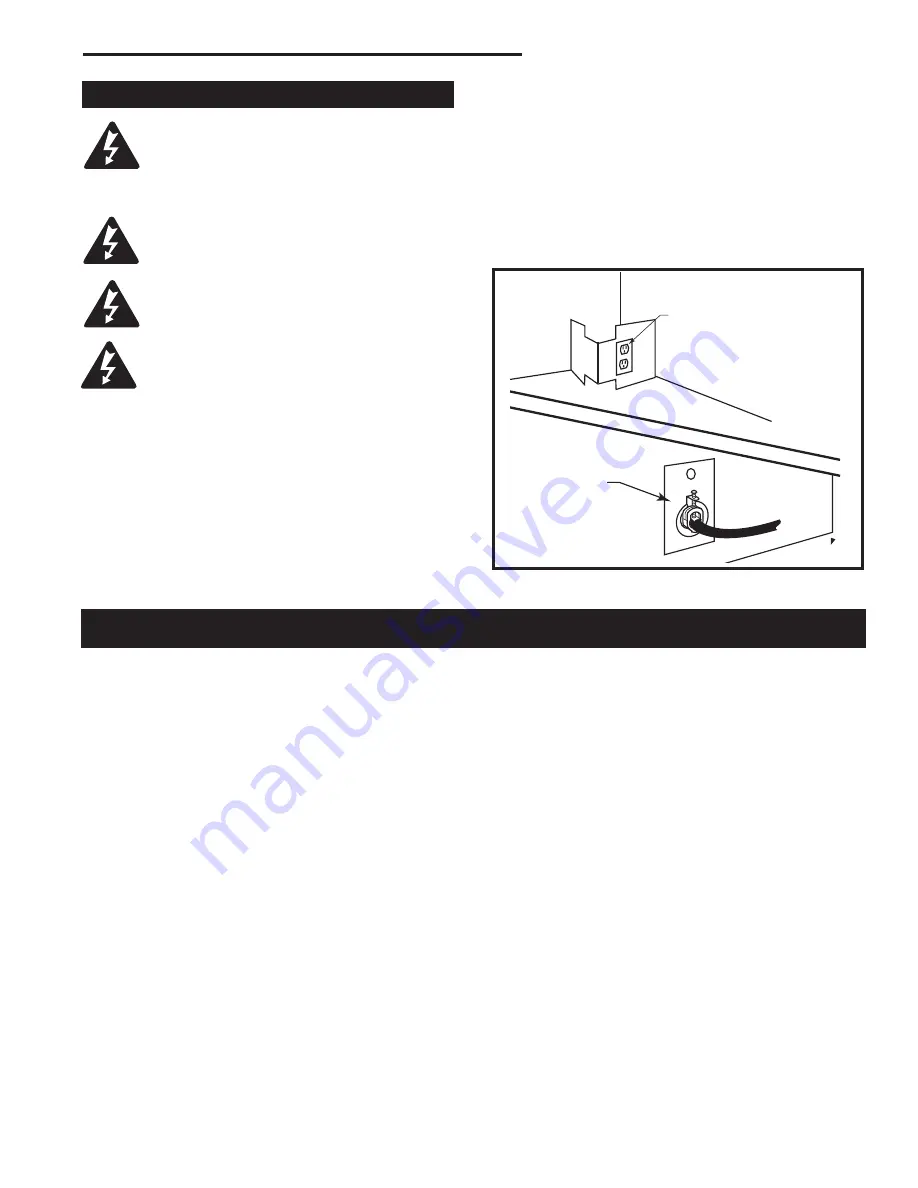
FP1597

Fig. 9

  Electric receptacle.

FP1597

receptacle install

12/05

OUTSIDE

INSIDE

BACK OF UNIT

Electric Receptacle

Electric Receptacle 

Cover Plate

Your fireplace is approved to be vented either through 
the side wall, or vertically through the roof.

• 

Only CFM Corporation venting components specifi-
cally approved and labelled for this fireplace may be 
used.

• 

Vent terminations shall not be recessed into a wall or 
siding.

• 

Horizontal venting which incorporates the twist lock 
pipe must be installed on a level plane without an 
inclining or declining slope.

• 

Horizontal venting which incorporates the use of flex 
venting shall have an inclining slope from the unit of 
1” (25 mm) per 24” (610 mm).

General Venting

There must not be any obstruction

 such as bushes, 

garden sheds, fences, decks or utility buildings within 
24” (610mm) from the front of the termination hood.
Do not locate termination hood where excessive snow 
or ice build up may occur. Be sure to check vent termi-
nation area after snow falls, and clear to prevent ac-
cidental blockage of venting system. When using snow 
blowers, make sure snow is not directed towards vent 
termination area.

Location of Vent Termination 

It is imperative the vent termination be located observ-
ing the minimum clearances as shown on the next  
page.
*Check with local codes or in absence of same with 
CSAB149.1 Installation Codes (1991) for Canada or fol-
low the current National Fuel Gas Code, ANSI Z223.1/
NFPA 54 for installations in the USA.

Summary of Contents for Builder Direct Vent 36CDVXRRN

Page 1: ...om your neighbor s phone Follow the gas suppliers instructions If you cannot reach your gas supplier call the fire department WARNING IF THE INFORMATION IN THIS MANUAL IS NOT FOLLOWED EXACTLY A FIRE OR EXPLO SION MAY RESULT CAUSING PROPERTY DAMAGE PER SONAL INJURY OR LOSS OF LIFE PLEASE READ THIS MANUAL BEFORE INSTALLING AND USING APPLIANCE INSTALLER CONSUMER SAFETY INFORMATION FOR YOUR SAFETY Inst...

Page 2: ...36CDVXR Venting How to Use the Vent Graph 12 Rear Wall Venting Applications Installation Exterior outside wall 7 20 from rear of unit 12 Rear Wall Vent Installation Flex Vent PIpe 14 Rear Wall Vent Application Exterior outside wall 13 20 from rear of unit 15 Rear Wall Vent Application Exterior outside wall 20 32 from rear of unit 15 Vertical Sidewall Applications Installation 16 Below Grade Instal...

Page 3: ...uld any solid fuels wood coal paper or cardboard etc be used in this fireplace 10 The flow of combustion and ventilation air must not be obstructed in any way 11 When fireplace is installed directly on carpeting vinyl tile or any combustible material other than wood the fireplace must be installed on a metal or wood panel extending the full width and depth of the fireplace IMPORTANT PLEASE REVIEW THE F...

Page 4: ...s 12 05 Fireplace Dimensions Rear Vent Fig 1 Fireplace specifications and framing dimensions Ref 36CDVXR A 35 895 mm B 34 883 mm C 32 816 mm D 33 838 mm E 21 537 mm F 16 422 mm G 25 635 mm H 18 470 mm I 22 559 mm J 3 83 mm K 2 73 mm L 1 35 mm M 14 356 mm N 8 216 mm O 7 187 mm P 1 35 mm Q 3 83 mm R 7 187 mm S 8 216 mm Framing Dimensions If using Rigid 45 with Starter Pipe T 68 1734 mm 58 1483 mm U 4...

Page 5: ...s D N Low Voltage Access P R S C M 10175 CDVT specs 1 06 H Fireplace Dimensions Top Vent Fig 2 Fireplace specifications and framing dimensions Ref 36CDVXT A 35 895 mm B 34 883 mm C 32 816 mm D 33 838 mm E 21 537 mm F 16 422 mm G 25 635 mm H 8 203 mm J 3 83 mm K 2 73 mm L 1 35 mm M 14 356 mm N 8 216 mm O 7 187 mm P 1 35 mm Q 3 83 mm R 7 187 mm S 8 216 mm Framing Dimensions T 58 1483 mm U 41 1051 mm ...

Page 6: ...0 J F G H I Mantel Leg CFM164a Mantel Leg Chart 06 22 01 sta Black Surround Face CFM170 DV Builder Front View O N M L K Side of Combustion Chamber CFM164a Mantel Mantel Leg FromSide Ref Leg Depth Ref of Comb Opening F 10 254 mm K 11 292 mm G 8 203 mm L 9 241 mm H 6 152 mm M 7 191 mm I 4 101 mm N 5 140 mm J 2 51 mm O 3 89 mm Fig 4b Combustible mantel leg minimum installation CFM146 A B C D E V W X ...

Page 7: ...ws This yields a 5 8 16 mm thick drywall space Removing the standoff and having the tabs on the standoff face the rear of the unit yields a 3 4 19 mm drywall space Fig 5 NOTE Drywall must stop at standoffs and not touch top of unit Hood Installation CAUTION Hood MUST be permanently installed 1 Remove top louvre Carefully remove hood from inside top louvre opening 2 Remove three 3 sheet metal screw...

Page 8: ...tion and testing of any gas connection It is most convenient to bring the gas line in from the rear right side of the valve as this allows fan installation or removal without disconnecting the gas line The gas line connection can be made with properly tinned 3 8 copper tubing 3 8 rigid pipe or an ap proved flex connector Since some municipalities have additional local codes it is always best to con...

Page 9: ...l Black and red are line voltage to each plug on the receptacle FP1597 Fig 9 Electric receptacle FP1597 receptacle install 12 05 OUTSIDE INSIDE BACK OF UNIT Electric Receptacle Electric Receptacle Cover Plate Your fireplace is approved to be vented either through the side wall or vertically through the roof Only CFM Corporation venting components specifi cally approved and labelled for this fireplace...

Page 10: ...let 3 91cm 3 91cm J Clearance to nonmechanical air supply inlet 6 15cm for appliances 10 000 6 15cm for appliances to building or the combustion air inlet to any Btuh 3kW 12 30cm for 10 000 Btuh 3kW 9 other appliances appliances 10 000 Btuh 3kW and 23cm for appliances 10 000 100 000 Btuh 30kW 36 91cm Btuh 3kW and 50 000 Btuh for appliances 100 000 Btuh 30kW 15kW 12 30cm for appliances 50 000 Btuh ...

Page 11: ...e Clamp Apply High Tempera ture Sealant FP1471a Fig 12 Apply high temperature sealant to 4 and 7 pipes Outside Corner Inside Corner Termination Clearances Termination clearances for buildings with combustible and noncombustible exteriors G Combustible 6 152 mm Noncombustible 2 51 mm F Combustible 6 152 mm Noncombustible 2 51 mm G Balcony with no side wall M Combustible Noncombustible 12 305 mm M B...

Page 12: ...plications Exterior Outside Wall 7 178 mm to 20 508 mm From Rear of Unit With this application the following rigid pipe kits may be used 7 to 13 178 330 mm to outside wall 7TCRVT 13 to 20 330 305 mm to outside wall 7TCRVT1320 45 elbow with 20 508 mm Starter for corner applica tions When installed as a rear vent unit this appliance may be vented directly to a termination located on the rear wall be...

Page 13: ...rame as shown For 7TCRVT1320 cut a 10 H x 9 W 264 x 240 mm hole Noncombustible Walls Fig 17 Hole opening must be 7 190 mm in diameter STEP 2 Install interior firestop as shown in Figure 18 STEP 3 Remove telescoping collar from termination Firestop FP1600 Fig 18 Install firestop Bend Tab STEP 4 Bend tab on outer casing up and insert collar onto fire place collars Fig 18 STEP 5 Twist the termination co...

Page 14: ...that has the twist lock embosses on it onto the collar of the fire FP1473 corner flex install 4 04 djt C L to Floor 29 749 mm Termination Flex Section Appliance Collars FP1473 Fig 20 Grasp the vent pipe close to the collar and bend to 45 angle Do not exceed 45 place Twist the collar to lock it onto the fireplace Run a screw through the tab and into the collar to secure the collar onto the fireplace 6...

Page 15: ...4 622 mm 13 20 330 508 mm 3 Proceed with Step 3 of Rear Wall Vent Application Exterior Outside Wall 20 to 32 508 813 mm from Rear of Unit section below Rear Wall Vent Application Exterior Outside Wall 20 32 508 813 mm From Rear of Unit Using Flex Vent Kit 7TCD45KT 1 Determine where the termination is to be installed Fig 25 2 Locate the hole 27 692 mm off the floor This is the center line of the ter...

Page 16: ...e to the face of the outer wall Horizontal plane means no vertical rise exists on this portion of the vent assembly The maximum horizontal vent run is 20 ft 6 1 m when the vertical vent rise is 7 ft 2 3 m Fig 26 The maximum number of 90 elbows per side wall installation is three 3 If a 90 elbow is used in the horizontal vent run level height maintained the maximum horizontal vent length is reduced...

Page 17: ...RVT1320 cut a 10 H x 9 W 264 x 240 mm hole Noncombustible Walls Fig 17 Hole opening must be 7 5 190 mm in diameter STEP 2 Slide venting component on collar of fireplace Secure component to fireplace by running a screw self tap ping through tab into outer casing Fig 30 CFM143 2 2 01 sta Ensure Pipes are Concentric CFM143a Fig 30 Always start vertical run with 7TCDV90 on 36CDVR unts 7TCDV90 STEP 3 Mea...

Page 18: ...commend a window well with adequate and proper drainage Ensure sidewall venting clearances are observed The maximum horizontal run with 24 vertical rise is 36 914 mm from the back of the fireplace to the face of the exterior wall See vent graph Page 12 for extended horizontal run if the vertical rise exceeds 24 610 mm 1 Establish vent hole through the wall Fig 17 2 Remove soil to a depth of approxi...

Page 19: ...aps Every 3 914 mm Fig 36 Support straps for horizontal runs Example Maximum horizontal length 0 x 45 elbows 10 3 m 1 x 45 elbows 8 2 6 m 2 x 45 elbows 7 2 1 m 3 A minimum of an 8 vertical rise 4 Two sets of 45 elbows offsets within these vertical installations From 0 to a maximum of 8 2 4 m of vent pipe can be used between elbows Fig 37 5 7DVCS must be used to support offsets Fig 36 This applicat...

Page 20: ... sure upper flange is below the shingles Fig 40 8 Install appropriate pipe sections until the venting is above the flashing Fig 40 9 Install storm collar and seal around the pipe 10 Add additional vent lengths for proper height Fig 41 TWL101a Twist Lock Pipe 2 8 99 djt 3 5 Sheet Metal Screws per Joint Storm Collar TWL101a Fig 40 Roof flashing Sealant FP1022 Typical Straight Up Installation 1 26 00 dj...

Page 21: ... and horizontal dimensions for a Direct Vent flue system Vertical dimension from the floor of the unit to the center of the horizontal vent pipe 3 4 5 6 7 8 9 10 11 12 13 14 15 16 17 18 19 20 21 22 23 24 25 26 27 28 29 30 3 4 5 6 7 8 9 10 11 12 13 14 15 16 17 18 19 20 eg A eg B CFM102 DV Graphic 9 28 00 sta Fig 42 Sidewall venting graph Dimensions in feet 36 CDVXT Top Vent Baffle The 36CDVXT is shipp...

Page 22: ...is used in the horizontal vent run level height maintained the maximum horizontal vent length is reduced by 36 914 mm This does not apply if the 90 elbows are used to increase or redirect a vertical rise Example According to the chart the maximum horizontal vent length in a system with a 7 5 2 3 m vertical rise is 20 6 m and if a 90 is required in the horizontal vent it must be reduced to 17 5 2 m...

Page 23: ...ed and install the horizontal vent sections The sec tions which go through the wall are packaged with the starter kit and can be cut to suit if necessary Fig 48 Sealing the gaps between the vent pipe and firestop with high temperature sealant will restrict cold air being drawn in around fireplace STEP 6 Guide the vent terminations 4 and 7 collars into their respective vent pipes Double check that th...

Page 24: ...er to the Sidewall Vent Graph for extended horizontal run if the vertical rise exceeds 24 610 mm 1 Establish vent hole through the wall Fig 17 2 Remove soil to a depth of approximately 16 406 mm below base of snorkel Install drain pipe Install win dow well not supplied Refill hole with 12 305 mm of coarse gravel leaving a clearance of approximately 4 102 mm below snorkel Fig 53 3 Install vent syste...

Page 25: ...m 1 x 45 elbows 8 2 6 m 2 x 45 elbows 7 2 1 m A minimum of an 8 2 4 m vertical rise Max 10 3m Max Height 40 12m Min Height 7 2 3m FP1244 through the roof max min dims 12 02 Pipe Straps Every 3 914mm FP1244 Fig 55 Support straps for horizontal runs Two sets of 45 elbows offsets within these vertical installations From 0 to a maximum of 8 2 m of vent pipe can be used between elbows Fig 56 7DVCS must...

Page 26: ...per height Fig 60 11 Apply high temperature sealant to 4 and 7 collars CFM110 Typical ceiling roof support 10 90 Typical Roof Support Application Typical Ceiling Sup port Application CFM110 Fig 58 Roof and ceiling supports TWL101a Twist Lock Pipe 2 8 99 djt 8 Sheet Metal Screws 3 per joint Sealant Storm Collar TWL101a Fig 59 Roof flashing If there is a room above ceiling level firestop spacer must b...

Page 27: ...on Starter Kit Model 7TDVSKV Vertical Venting for 7TDVSKV A order 1 12 to 6 12 roof pitch for 7TDVSKV B order 7 12 to 12 12 roof pitch for 7TDVSKV F order flat roof Starter Kit for Below Grade Installation Model 7TDVSKS Snorkel Kit Twist Lock Pipe Model 7FDVSKS Snorkel Kit Flex Vent Pipe Starter Pipe Model 7TDVP 20 8 24 Starter Pipe Bulk 90o Elbow 7TCDV90 For Rear to Vertical 7TDV90 For Extended Ru...

Page 28: ...film on the glass It is therefore recommended the glass be cleaned two or three times with a non ammonia based household cleaner and warm water We recommend gas fireplace glass cleaner within the first few weeks of operation After the initial cleaning process the glass should be cleaned two or three times during each operating season depending on the environment in the house The use of any non approv...

Page 29: ...fied service provider for service and adjustment Flame Characteristics L O H I FP390 FLAME ADJUSTMENT KNOB 11 21 96 Turn counterclockwise to increase flame height Turn clockwise to decrease flame height SIT 820 Valve Fig 64 Flame adjustment knob for SIT valve SIT RN RP FP1541 Fig 65 Correct pilot flame appearance Lava Rock Ember Material Figure 63 Ember Material and Lava Rock Placement Separate the ...

Page 30: ...llow these instruc tions exactly B BEFORE LIGHTING smell all around the heater area for gas Be sure to smell next to the floor because some gas is heavier than air and will settle on the floor WHAT TO DO IF YOU SMELL GAS Do not try to light any fireplace Do not touch any electric switch Do not use any phone in your building Immediately call your gas supplier from a neighbor s phone To Turn Off Gas to...

Page 31: ... to repair it call a qualified service technician Force or attempting repair may result in a fire or explosion D Do not use this appliance if any part has been under water Immediately call a qualified service technician to inspect the appliance and replace any part of the control system and any gas control that has been under water 5 Turn the remote switch if used OFF Turn the wireless remote if used...

Page 32: ...umper wire accross terminals at wall switch if burner comes on replace defective wall switch If okay jumper wires across wall switch wires at valve if burner comes on wires are faulty or connections are bad B Thermopile may not be 1 Be sure wire connections from thermopile at generating sufficient gas valve terminals are tight and thermopile is fully millivoltage inserted into pilot bracket 2 One o...

Page 33: ...ow Air Shutter Adjustment Screw Slot Fully Open FC112 Fig 71 Adjust air shutter to fully open 8 Install the new conversion orifice 9 Loosen the adjusting screw that holds the air shutter to the burner tube Rotate the air shutter to the fully open position Fig 71 10 Install the burner tube and secure with the two 2 screws removed earlier 11 Burner orifice installation complete Pilot Conversion NOTE I...

Page 34: ...t orifice and replace with conversion orifice 3 Install the enclosed identification label F to the valve body where it can be easily seen Testing for Leaks 1 Apply gas to the system and light the pilot 2 With a soapy solution check for leaks around the pilot assembly where the tube enters the pilot assembly Tighten fitting if necessary 3 Light the main burner and check for leaks around the new pressur...

Page 35: ...ccasional checkup and cleaning and some may require adjustment If repair is necessary it should be performed by a qualified technician 1 Turn off pilot light at gas valve 2 Allow fireplace to cool if it has been operating 3 Remove window frame assembly Refer to Window Frame Assembly Removal section 4 Vacuum burner compartment especially around orifice primary air openings 5 Visually inspect pilot Bru...

Page 36: ...0012251 1b Log Middle Assy 20012108 2 Hood 20010312 3 Burner Tube 20010333 4 Orifice Burner Natural not shown 72386 5a Orifice Pilot Natural not shown 10002268 5b Orifice Pilot Propane not shown 10002269 6a PIlot Assy SIT RN 20010203 6b Pilot Assy SIT RP 20010202 7 Pilot Tubing w Fittings SIT 10001296 8 Pilot Hood 10002385 9 Manifold Tubing not shown 20010162 10 Thermocouple RN RP 53373 11 Thermopile...

Page 37: ...rd 6 ft 51865 18 Door Assy 20010207 19 Frame Window 20010320 20 Clamp Frame Window 10000949 21 Top Louvre Assy 20010179 22 Bottom Louvre Assy 20010179 23 ON OFF Switch 51842 24 Grommet 20010348 25 Wire Bushing Assy not shown 20010346 26 Lava Rock 20000376 27 Ember Material 51915 Fuel Conversion Kits Conversion Kit NG to LP 36CDVX Kit 20010507 Ref Description 36CDVX ...

Page 38: ... to secure the strips to the metal panels No further securing is required 3 Power to the fan can be supplied by plugging the supplied lead into a conveniently located wall socket or by using the receptacle in the bottom of the unit Optional Accessories Available Fan Kits FP1602 FK12 fan install 12 05 Fan Gas Lines Valve FP1602 Fig 75 FK12 fan placement Receptacle The fireplace when installed must b...

Page 39: ... is found to be the fault of the manufacturer repairs will be authorized at no charge to the customer parts and or labor Any part and or component replaced under the provisions of this warranty is covered for six months or the remainder of the original warranty whichever is longest This warranty is limited to the repair of or replacement of part s found to be defective in material or workmanship p...

Page 40: ...dy State D O E Fireplace Efficiency Fan OFF Fan ON AFUE 36CDVXRRN 66 9 76 76 5 63 36CDVXRRP 66 9 77 78 63 36CDVXTRN 57 76 76 5 63 36CDVXTRP 57 77 78 63 410 Admiral Blvd Mississauga Ontario Canada L5T 2N6 800 668 5323 www cfmcorp com CFM Corporation ...

Reviews: