background image

How to Get the device working:

• Make sure your Wi-Fi network work in 802.11 b/g/n 

2.4GHz and internet available;

• Download the APP from Apple store or Google Play;

• Register an account in APP and login with your 

email address or Mobile phone number;

• Setup the device Wi-Fi connection;

• Mount device on specified location;

• Test and check the Device and APP working state;

• Check working with Alexa and Google Home if necessary;

3. PRODUCT DESCRIPTION

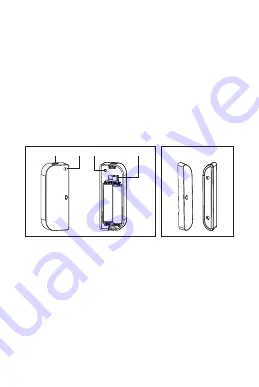
This main device components are showing as following:

1) Latch button: press the Latch button to take apart the 

battery cover from the device part in order to change the 

batteries or setup the Wi-Fi network.

2) Button: Long press for 5 seconds this button to enter the 

Wi-Fi network mode.  Switch between EZ mode and AP mode 

by long press the button more than 5 seconds.

3) Tamer button: Loose this button will trigger a 

tempered Alarm to Mobile Phone;

4) LED indicator: indicate the device working state:

• Fast blinking in Red: EZ mode (Smart config) for 

Wi-Fi configuration;

• Slow blinking in Red: AP Mode for Wi-Fi configuration;

Lock button

LED Button Tamper button

Device Part

Magnet Part

Summary of Contents for TLL331091

Page 1: ...Smart Door Window Sensor User Manual TLL331091...

Page 2: ...e phone depending on the internet connection quality Besides working with APP this device is compatible with Amazon Alexa and Google Home This device can be installed on Door Window and Drawer which o...

Page 3: ...components are showing as following 1 Latch button press the Latch button to take apart the battery cover from the device part in order to change the batteries or setup the Wi Fi network 2 Button Lon...

Page 4: ...or move the magnet part to close the device the LED indicator will ash 2 To check the device is Wi Fi connected or not if the LED indicator turns purple the device is not Wi Fi connected If the LED i...

Page 5: ...the relevant parameters of the router before WiFi con guration WiFi passwords do not include special characters such as When the device is con gured in WiFi the mobile phone and device are as close as...

Page 6: ...the Wi Fi network that the device is going to work with then waiting around 30 seconds for the Wi Fi configuration finished until a device is successfully added 6 4 Change the device name and share it...

Page 7: ...mode make sure your APP is internet available and device and APP both work in EZ mode Then input the Wi Fi network password to nish the device adding If you want to change the Wi Fi network please che...

Page 8: ...d or not If not please repeat the Device adding again 6 6 Remove device 1 Click Remove Device to remove this device from your account click Restore manufacturer Defaults to remove the device from your...

Page 9: ...the radio signal strength 2 This Sensor should only be placed indoor and away from water and other extreme weather conditions 7 2 Using one of the following methods to mount the device to the wall do...

Page 10: ...nd the magnet are oriented towards each other 4 Screw the magnet holder to the moving part of the door or window 5 Mount the device part on to battery cover 6 Mount the magnet part to the holder 7 3 C...

Page 11: ...e frame that is to take the magnet part apart from device part if the LED is ashing once in blue and state in APP changes between open and close 2 Take down device part from the battery cover the LED...

Page 12: ...unt and password that you registered in Tellur Smart Now you nish the Alexa Link 6 Your Brightfun App has been skilled with Alexa and now you can control any device added to your Tellur Smart App reme...

Page 13: ...5 If you use a dual band router select the 2 4GHz network to add the device You also need to enable the router s broadcasting function Set encryption method as WPA2 PSK and authorization type as AES o...

Page 14: ...quickly 2 times per second the device has entered EZ pairing mode If the indicator ashes slowly one time 3 seconds the device has entered AP pairing mode Under EZ mode press the reset button for 5 se...

Page 15: ...d device Can I control device with 2G 3G 4G network When adding the device for the rst time the device and the phone need to be connected to the same WiFi network Once the device has been successfully...

Page 16: ...ion of Google Home app You have the newest version of Google app Android only The device display language is set to English US You have the Tellur Smart app and a related account Add devices in Tellur...

Page 17: ...now After you assign rooms for devices your devices will be listed in the Home Control page Now you can control your smart devices through Google Home Take bedroom light as the example the supported v...

Page 18: ...corresponds to the standards stated in the manufacturer s declaration of conformity The product is in compliance with the following standards and or other normative documents RED 2014 53 EU Applied st...

Page 19: ...It is the responsibility of the user to dispose of the equipment using a designated collection point or service for separate recycling of waste electrical and electronic equipment WEEE and batteries a...

Reviews: