background image

English

   - 23 -

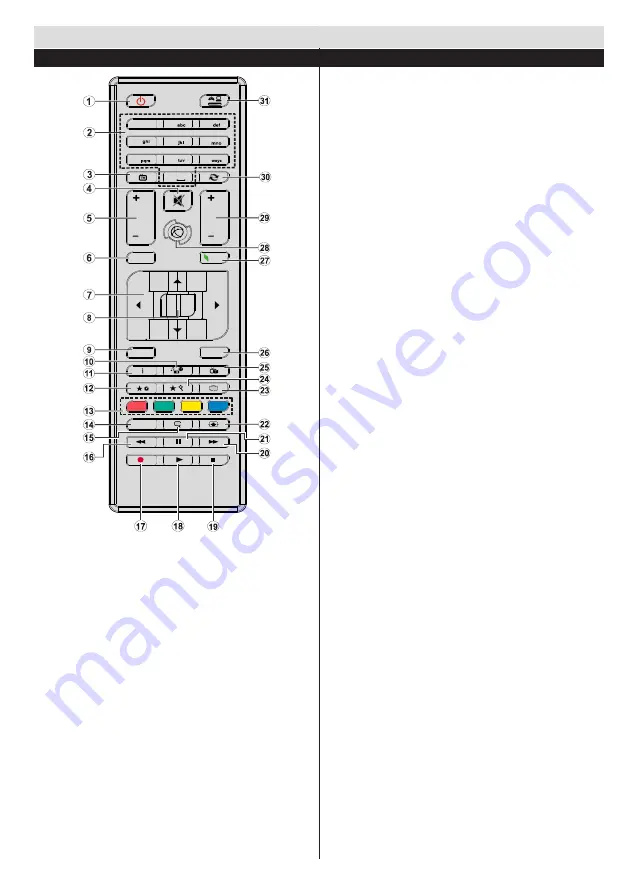
1.  Standby: 

On / Off switch of the TV

2.  Numeric buttons:

 Used to navigate channels 

and enter passwords, text etc.

3.  TV:

 Displays channel list / Switches among 

broadcast types

4.  Mute: 

Completely turns off the volume of the 

TV

5.  /-

6.  Menu: 

Displays TV menu

7.  Navigation buttons: 

Helps navigate menus, 

content etc. and displays the subpages in TXT 

mode when pressed Right

8.  OK: 

Confirms user selections, holds the page 

(in TXT mode), views channel list (DTV mode)

9.  Back:

 Returns to previous screen, opens index 

page (in TXT mode)

10. Media browser:

 Opens the media browsing 

screen

11.  Info:

 Displays information about on-screen 

content, shows hidden information (reveal - in 

TXT mode)

12. My button 1 (*)

13. Coloured Buttons

14. Language:

 Switches between sound modes 

(analogue TV), displays and changes audio/

subtitle language (where available)(digital TV)

15. Subtitles:

 Turns subtitles on and off (where 

available)

16. Rapid reverse:

 Moves frames backwards in 

media such as movies

17. No function

18. Play:

 Starts to play selected media

19. Stop:

 Stops the media being played

20. Rapid advance:

 Moves frames forward in 

media such as movies

21. Pause:

 Pauses the media being played

22. Screen:

 Changes the aspect ratio of the screen

23. Text:

 Displays teletext (where available), press 

again to superimpose the teletext over a normal 

broadcast picture (mix)

24. My button 2 (*)

25. EPG (Electronic programme guide):

 Displays 

the electronic programme guide

26. Exit:

 Closes and exits from displayed menus or 

returns to previous screen

27. Quick Menu:

 Displays a list of menus for quick 

access

28. 

No function

29. Pro/-

30. Swap:

 Quickly cycles between previous and 

current channels

31. Source: 

Shows all available broadcast and 

content sources

Getting Started 

Remote Control 

1

2

3

4

5

6

0

LANG.

BACK

MENU

OK

EXIT

Q.MENU

/

V

/

V

P

P

7

8

9

.,/@

MY BUTTON 1 

Press MY BUTTON 1  for five seconds when on a 

desired source, channel or link, until the  “MY BUTTON 

IS SET” message is displayed on the screen. This 

confirms  that  the  selected  MY  BUTTON  is  now 

associated with the selected function.

MY BUTTON 2 

This button's main function is to switch between 

DVB-T, DVB-C and DVB-S broadcasts. However, if 

you press MY BUTTON 2 for five seconds, you can 

set a function to it as described in My Button 1. 

Note  that  if  you  perform  first  time  installation,  MY 

BUTTON 2 will return to its default function, switching 

between DVB-T, DVB-C and DVB-S broadcasts. 

Summary of Contents for L22F275A3

Page 1: ...s into the Remote 22 Connect Power 22 Antenna Connection 22 Remote Control 23 Connections 24 Media Browser Menu 26 Quick Menu 26 TV Menu Features and Functions 27 General TV Operation 29 Using the Cha...

Page 2: ...e that no open flame sources such as lit candles are placed on top of the TV To prevent injuries this TV must be securely attached to a wall carefully by following the instructions if the option is av...

Page 3: ...Hazard The accessories supplied with or This pro duct may contain a coin button cell battery If the coin button cell battery is swallowed it can cause severe internal burns in just 2 hours and can lea...

Page 4: ...te TV DVB T C S S2 HDMI inputs are for connecting a device that has a HDMI socket USB input OSD menu system Scart socket for external devices such as DVD Players PVR video games etc Stereo sound syste...

Page 5: ...SATELLITE INPUT LNB socket located on the back of the TV satellite aerial or cable REAR OF THE TV Notification Manufactured under license from Dolby Laboratories TRADEMARK ACKNOWLEDGMENT Dolby and the...

Page 6: ...media such as movies 21 Pause Pauses the media being played 22 Screen Changes the aspect ratio of the screen 23 Text Displays teletext where available press again to superimpose the teletext over a n...

Page 7: ...it optional we recommend that you plug all your cables into the back of the TV before mounting on the wall Insert or remove the CI module only when the TV is SWITCHED OFF You should refer to the modul...

Page 8: ...system that organizes available broadcasts in accordance with a recognizable channel sequence if available Cable Installation If you select CABLE option and press OK button on the remote control To co...

Page 9: ...e while playing a file Media Browser Menu You can play photo music and movie files stored on a USB disk by connecting it to your TV Connect a USB disk to one of the USB inputs located on the side of t...

Page 10: ...Only available in Scart mode with SCART PIN8 high voltage low voltage switching Film Mode Films are recorded at a different number of frames per second to normal television programmes Turn this featur...

Page 11: ...lite settings Other Settings Displays other setting options of the TV set Menu Timeout Changes timeout duration for menu screens Scan Encrypted Channels When this setting is on the search process will...

Page 12: ...l List options Configuring Parental Settings To prohibit viewing of certain programmes channels and menus can be locked by using the parental control system To display parental lock menu options the P...

Page 13: ...d and downloaded successfully the next time the TV powers up it will have the new software version Note If the TV fails to come on after the upgrade unplug the TV for 2 minutes and plug in again Troub...

Page 14: ...EG1 MPEG2 MPEG1 768x576 30P MPEG2 1920x1080 30P vob MPEG2 1920x1080 30P mp4 MPEG4 Xvid H 264 mkv H 264 MPEG4 VC 1 avi MPEG2 MPEG4 Xvid H 264 flv H 264 VP6 Sorenson H 264 VP6 1920x1080 30P Sorenson 352...

Reviews: