background image

StreamPro Deployment Guide 

P/N 95B-6129-00 (August 2021) 


EAR-Controlled Technology Subject to Restrictions Contained on the Cover Page.


Page 17 


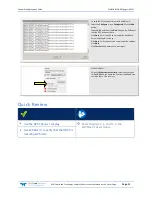
Step by Step Data Collection 

1. 

Open or create a measurement file. 

2. 

Press 

F4 

to start pinging. 

3. 

At the start/stop position, press 

F5 

to start the transect.  

4. 

Enter the starting distance from the shore. 

5. 

Select 

Left 

or 

Right 

bank. 

6. 

Wait for 10 shore ensembles. 

7. 

Move across the river. 

8. 

At the stop/start position, wait for 10 shore ensembles. 

9. 

Press 

F5 

to end the transect.


10.

Enter the ending distance from the shore. 

11.

Repeat steps 3 through 10 to collect at least four transect that agree with each other within 5% of 

the mean of all the samples. 

The ADCP operator must make sure that the maximum permissible rela-

tive residual (MPRR) is met before leaving the site.


See Dynamic Residual Analysis, Chapter 6 in the WinRiver II User’s Guide. 


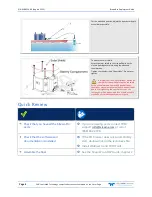
Figure 2. 

Overview of Data Collection 

Summary of Contents for Everywhereyoulook STREAMPRO

Page 1: ...icense license exception or other approval from the appropriate U S Government agency before being exported from the United States or provided to any foreign person Diversion contrary to U S law is prohibited STREAMPRO DEPLOYMENT GUIDE P N 95B 6129 00 August 2021 2021 Teledyne RD Instruments Inc All rights reserved ...

Page 2: ...Client Services Administration rdicsadmin teledyne com Web http www teledynemarine com rdi For all your customer service needs including our emergency 24 7 technical support call 1 858 842 2700 Self Service Customer Portal Use our online customer portal at http www teledynemarine com rdi and click on the Support link to download manuals or other Teledyne RDI documentation Teledyne Marine Software ...

Page 3: ... StreamPro documentation including the StreamPro ADCP Guide Please read the manual WinRiver II Software TRDI s river and coastal data acquisition software package where the primary use is for discharge calculation Although this is its primary function it can be used for general coastal survey applications TRDI Toolz Software Utility and testing software package that can be used to test the StreamP...

Page 4: ...Batteries Thumb Screw M4 81B 4018 00 Battery cover Washer Small OD 8MM SST M4WASHSMOD Electronic chassis cover plate Washer Split Lock SST M4WASHSPL Electronic chassis cover plate Installing Documentation and Software The StreamPro system includes a CD with the documentation To install the StreamPro Documentation CD 1 Insert the CD into the drive and follow the browser instructions on the screen I...

Page 5: ...ector Do NOT turn the coupling ring on the transducer cable any further once it clicks into place Over tightening the coupling ring will cause the locking teeth to break Do NOT use any tools to tighten the coupling ring It should only be finger tight To adjust the transducer angle and depth Locate the embossed arrow on the top edge of the transducer and rotate the transducer so that the arrow is p...

Page 6: ...hield screws when placing the sunshield back on the electronic housing M6 standoff bolts Should any movement occur on the M6 standoff bolts due to over tightening the sun shield screws the Loctite seal will be broken and thus allowing the M6 standoff bolts to subsequently become loose Quick Review Check that you have all the StreamPro parts If you are missing parts contact TRDI support rdifs teled...

Page 7: ...y loosening the four thumb screws 3 Open the battery compartment door by loosening the three thumbscrews 4 Place the battery holder in the housing making sure the battery contacts on the holder match the two springs inside the housing 5 Close the battery compartment door and tighten the thumbscrews Only tighten the battery cover thumbscrews finger tight 6 Install the solar shield Check that the ba...

Page 8: ... pack Turn on the StreamPro power switch 2 Plug in the SD1000U device to a USB port and determine the Com port used See the WinRiver II SD1000U Bluetooth Communication Setup Card for instructions 3 Run the ParaniWin program and connect to the ADCP With the Bluetooth modules used since August 2017 or a repaired older unit where the Bluetooth module was replaced you may need to Mode 0 and Authentica...

Page 9: ...y take several seconds to accept the Comm Port selection In this example the Comm Port is set to Com Port 40 10 Click the Test Port button The StreamPro banner appears break StreamPro ADCP Teledyne RD Instruments c 2015 All rights reserved Firmware Version 31 xx 11 Click the Close button to exit the Test Port Dialog 12 Click the Close button once more to exit the Peripherals Configuration Dialog 1...

Page 10: ...w Connect to the StreamPro using a Bluetooth connection For instruction on using the SD1000U USB Bluetooth device see Chapter 2 in the WinRiver II Software User s Guide and the instructions and Bluetooth CD included with the device See the WinRiver II SD1000U Bluetooth Communication Setup Card for instructions A PDF copy is installed with the software ...

Page 11: ...rom the battery pack on the SXBlue II GPS unit Newer SXBlue II battery packs have a curved back and require spacers to attach it to the sunshield Attach the SXBlue II GPS unit to the StreamPro sunshield using the 6 32 panel screws and spacers The GPS LEDs and power switch should be facing the front of the float Attach the sunshield to the StreamPro electronics chassis It is important to only gentl...

Page 12: ...transducer on the float Connect the transducer cable to the electronics chassis Attach the antenna mount to the float with the 10 32 socket head screw flat washer and split washer Attach the antenna to the antenna mount using the 8 32 screw flat washer and split washer The antenna connector should be facing towards the GPS unit Only hand tighten the 8 32 screw to avoid stripping the plastic thread...

Page 13: ... is connected to Click Next Enter the GPS communication Baud Rate Parity and Stop Bit settings Click Next Verify the port and communication settings Click Next Click Test Port and observe the messages Start WinRiver II Using the Measurement Wizard select the checkbox for Ext GPS and configure the Com port and baud rate to match that of the receiver Quick Review Use the GPS Tabular 1 display Read C...

Page 14: ...system for the tethered boat and then proceeds to install the StreamPro in a standard RiverRay boat Tethered boat measurements can also be performed from a bridge or other structure across the river This tends to provide reduced control over the tethered boat motion in the water as the bridle line length is longer giving the Boat more freedom to move with the water currents Measurements taken from...

Page 15: ...menu click Execute ADCP Test to verify the ADCP is functioning properly See Chapter 3 Tutorials and Chapter 9 QA QC in the WinRiver II User s Guide Compass Calibration Next the Hydrologist performs a compass calibration After ensuring that the system is well away from sources of magnetic interference the Hydrologist starts the compass calibration within the application and then either slowly rotat...

Page 16: ...erature sensor initially affects the temperature measurement Within five minutes it reaches equilibrium and the temperature is accurate within 1 C If the temperature sensor is not allowed to sufficiently equilibrate within the body of water to be measured it can impact Speed Of Sound velocity and discharge measurement accuracy Tethered boat The StreamPro is moved to the center of the river and the...

Page 17: ...y collecting at least two bins of data and marks the position on the tagline for future reference Measure the distance to the shore from the StreamPro The StreamPro is positioned to the op posite bank where two bins of data are reliably collected Again the tagline is marked and the distance to the shore from the StreamPro is measured See Chapter 3 Tutorials and Chapter 10 Acquiring Discharge Data ...

Page 18: ...ogist reaches the marked position at the other bank of the meas urement location they hold that position while they collect the required number of edge ensembles meas ure the distance to the bank end the transect and enter the ending edge distance in the WinRiver II soft ware After completing each transect the Hydrologist performs a cursory review of the results and pre pares to start the next tra...

Page 19: ...or Right bank 6 Wait for 10 shore ensembles 7 Move across the river 8 At the stop start position wait for 10 shore ensembles 9 Press F5 to end the transect 10 Enter the ending distance from the shore 11 Repeat steps 3 through 10 to collect at least four transect that agree with each other within 5 of the mean of all the samples The ADCP operator must make sure that the maximum permissible rela tiv...

Page 20: ...ates and does not overshoot the edge The goal is to go from edge to edge and not overshoot at either edge Doing so will allow you to obtain the most accurate measurements in particular the area measurements Move the ADCP at a slow steady pace in the water during transects Collect a minimum of four transects that agree with each other to within 5 of the mean of all the samples The ADCP operator mus...

Page 21: ...eferred to as a Pass across the river Measurement A collection even number of four or more Transects made of up of an equal number of Transects from Left to Right as Right to Left Measured Discharge The average of the discharges from the four or more transects Site Measurement Conditions Moving Bed Moving Bottom Movement downstream typically of near bed sediment Moving Bed conditions will bias bot...

Page 22: ...ds commands to the ADCP lets the user collect data visually displays the data post processes the data and generates reports SxS Pro needs a Registration Code to enable data collection however data playback does not require a code Please refer to the SxS Pro Quick Start Guide Registration section for further details Contact rdi sales teledyne com to purchase an SxSPro license Q View Software User s...

Reviews: