background image

Echotrac MKIII Operator's Manual 4.06

Page 20 of 48

January 21, 2019

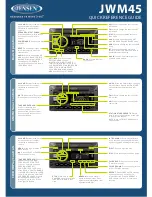
5.2 Parameter Entry System

Parameter values are changed by 
accessing one of the six menus 
available on the LCD display. Changing 
between menus is accomplished using 
the right and left arrow keys located in 
the right side of the Display Panel. 
Selection of a particular parameter is 
made using the Up and Down arrow 
keys and the Enter Key.

Figure 6: Parameter Entry System with Display and Keypad

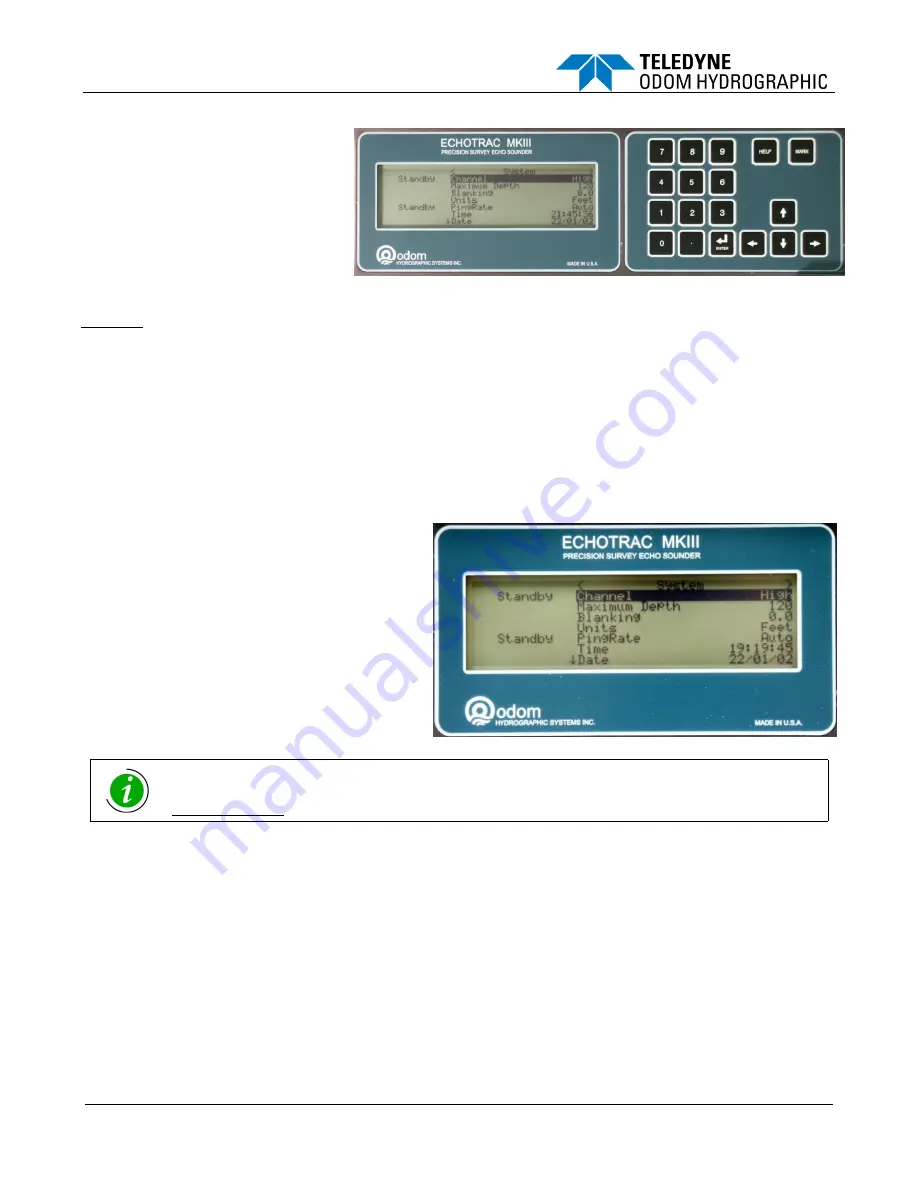
Example: Change the Blanking value.
Using the Left or Right arrow key, scroll across the display until the System menu is displayed.
Press the Up or Down arrow key through the parameters until Blanking is displayed in “reverse video”.
Press the Enter key. 
This puts the unit in the parameter change mode. At this point, the value for blanking should be displayed in 
blinking “reverse video”.
Slew the individual digits up or down, or enter a new value using the keypad.
Press the Enter key again to exit the parameter change mode.

HELP 

can be obtained for any parameter by highlighting the parameter and pressing the 

HELP

 key. A description 

of that parameter will be printed on the chart.

5.2.1 System Menu

The 

System 

menu contains parameters that are 

most frequently accessed during normal operation.

5.2.1.1

Hi Channnel

Select whether the high frequency channel is turned 
on and whether the type of data is bathymetry, side 
Scan port or side scan stbd.

5.2.1.2

Low Channel

Select whether the low frequency channel is turned 
on.

Turning both channels on does not automatically change the serial output to DBT (dual bottom 
tracking). Changing the output string requires selecting the new configuration in the 
Communications menu.

5.2.1.3

Maximum Depth

This is the most extreme depth to which the tracking gate will be expected to expand in a search for valid return 
echoes. Limiting the Maximum Depth value to one not much larger than the deepest expected water depth in the 
work area will enable the sounder to acquire the bottom more quickly. The default value is 45m or 150ft. Minimum 
values are 10m and 15ft.

5.2.1.4

Blanking

Blanking is used to mask the transmit pulse, transducer ringing, or any other unwanted acoustic returns in the 
upper water column, from the digitizer. It is used when these returns could be mistaken as bottom echoes or when 
the operator needs to force the sounder to "see below" an interference layer. The value is entered as the distance 
from the water surface and is indicated on the chart as a solid black line printed at the selected depth. The default 
value for Blanking is “0” while the value can be increased to the Maximum Depth value.

Summary of Contents for Echotrac MKIII

Page 1: ...MANUAL Version 4 06 Teledyne Odom Hydrographic Teledyne Marine Fabriksvangen 13 3550 Slangerup Denmark Telephone 45 47 38 00 22 Fax 45 47 38 00 66 www teledynemarine com odom hydrographic Number of pages 48 Date 21 January 2019 ...

Page 2: ...ill reflect how the data and what data will be printed when both channels are turned on If Chnl2 Dark is selected Channel 2 will be printed darker than Channel 1 If Chnl2 only is selected then only Channel 2 will be printed 3 08 04 14 2005 P Oostenrijk Updated manual for firmware version 3 08 Added section on how to request parameter settings through the serial port 3 20 01 16 2006 P Oostenrijk Ad...

Page 3: ...all sounders 4 03 05 23 2008 P Oostenrijk Updated Scale change functionality Updated CVM channel handling as 1 and 2 instead of 1 and 3 4 04 19 12 2016 A Moeller Updated Odom logo and front page Updated header and footer format Updated 1 5 LCD Chart Panel Updated wording in 2 3 7 VGA 4 05 A Moeller Contact details updated page 1 5 3 2 3 Expanded with two paragraphs and table of pulse widths at cer...

Page 4: ......

Page 5: ...lation 9 2 1 1 Power 9 2 1 2 Cabling 9 2 1 3 Fuses 9 2 1 4 Chart Paper 10 2 2 Transducer Installation 11 2 2 1 THROUGH HULL Installation 12 2 2 2 SEA CHEST Installation 12 2 2 3 OVER THE SIDE Transducer Installation 12 2 2 4 HULL MOUNT Installation 12 2 3 Echotrac MKIII Cable Connections 13 2 3 1 Serial 1 13 2 3 2 Serial 2 13 2 3 3 Serial 3 13 2 3 4 Serial 4 13 2 3 5 GPS In 13 2 3 6 GPS Out 14 2 3...

Page 6: ...ameters and settings 40 8 1 External Ethernet Control of Echotrac Parameters 40 8 2 Serial Ports Serial 2 40 8 3 Serial Ports Serial 3 40 8 4 Serial Ports HEAVE 40 8 5 ETHERNET Port 40 9 Uploading Firmware 41 9 1 Upgrading Motorola Processor Firmware 41 9 2 Upgrading DSP Firmware and Transceiver Processor Firmware 41 Appendix A LCD15 Module 43 A 1 Connections to the MKIIIE 43 A 1 1 Mouse and Keybo...

Page 7: ...d LED backlighting The transflective display was chosen because of its excellent visibility in all light conditions from bright sun to darkened wheelhouse 1 1 4 LCD Chart Panel An alternative to the printer module is the LCD chart panel It is a 1024x768 pixel color active matrix display with a 500 NIT back light The LCD chart panel records echosounder data on internal drives An export is possible ...

Page 8: ...nual the following definitions apply and in the format shown Warnings alert the user to potential harm to personnel Ignoring warnings may lead to injury health hazards or death Cautions alert the user to improper use of the system Ignoring cautions may lead to accidental damage to the equipment or loss of data Notes provide additional system or operating information not related to the safety of pe...

Page 9: ...mately 6 amps and an average current load of 3 amps In the case of charger type unregulated supplies the output should be floated across a battery load and not connected solely to the echo sounder s DC input Details of the power cable are given in section 2 3 Should the DC input voltage polarity be applied in reverse an audible alarm within the unit will sound regardless of the POWER switch settin...

Page 10: ...ake up spool behind the paper access door at the far left of the chart panel The motor that drives the take up spool does not advance the paper as is the case in some echo sounders Movement of paper across the print head is accomplished by the stepper motor In this configuration previously printed chart can be pulled from the take up assembly for review and simply re wound without disturbing the r...

Page 11: ...take up spool either with a small piece of tape or by inserting the paper in the slot of the take up spool Inserting the paper in the slot requires folding up the edges of the paper Replace the end cap to the take up spool and insert the take up roll into the chart the same way as the supply roll 12 Close both doors and press the feed button until the paper is aligned Close the print head release ...

Page 12: ...lled standpipe is incorporated into the sea chest design in order to provide hydrostatic pressure equalization Transducer cables generally leave these assemblies through stuffing tubes designed to maintain the watertight integrity of the chest 2 2 3 OVER THE SIDE Transducer Installation A temporary mount of this type is frequently constructed by welding a length of pipe to a flat plate that has be...

Page 13: ...I 5 GND 2 3 3 Serial 3 Serial 3 is used for interfacing a positioning system to the Echotrac MKIII The Echotrac MKIII will read NMEA GLL or GGA sentences though this port Connector PN Pin Number Signal Description DB9 Male 3 Data from the positioning system to the Echotrac MKIII 5 GND 2 3 4 Serial 4 Serial 4 is used for interfacing a motion reference sensor to the Echotrac MKIII The Echotrac MKIII...

Page 14: ...s the user to connect a monitor to the Echotrac MKIII to see the same data that is in the LCD display Connector PN Pin Number Signal Description VGA Male 1 Red 2 Green 3 Blue 4 ID2 5 GND TEST 6 GND 7 GND 8 GND 9 NC 10 GND 11 ID0 12 ID1 13 HS 14 VS 15 ID3 2 3 8 LAN The LAN connection is the Ethernet port for the Echotrac MKIII Connector PN Pin Number Signal Description 10BASE T 1 TX 2 TX 3 RX 6 RX ...

Page 15: ... TX2 TX2 is used when there is a separate low frequency transducer from the high frequency transducer The low frequency transducer is connected here Connector PN Pin Number Signal Description MS3116J14 5P A Shield C Low Frequency D Low Frequency 2 3 12 DC The DC connector is used to supply DC input power The range of the DC power is 18 30 VDC Connector PN Pin Number Signal Description MS3116J12 3S...

Page 16: ...wer Switch from the OFF position to Stby and confirm that the LCD display comes on showing first the Sign on Message and is followed shortly by display of the SYSTEM Menu The printer should also print the Sign on message Should you feel that a return to the sounder s default parameter values is called for select the Default Reset parameter in the SYSTEM menu and press Enter 4 Depending on water de...

Page 17: ... disables printing only the MKIII continues to sound and the Digitizer continues to function outputting digital depths 4 2 FEED Pressing the CHART FEED switch fast advances blank paper from the printer This feature is convenient in loading paper on the re winder but is often used to advance blank paper to make room for hand annotation 4 3 TAKE UP The CHART TAKE UP push button switch activates the ...

Page 18: ...nd has three positions OFF Stby and ON 5 1 1 1 OFF The main power switching circuitry is open in this position Please note that the MKIII automatically switches between AC and DC operation when an appropriate source of power is applied to the unit Should both AC and 24VDC be applied to the unit at the same time the MKIII will automatically favor the 24VDC supply 5 1 1 2 STANDBY Stby The main power...

Page 19: ...ansceiver module the DSP attempts to keep the bottom return at between 80 and 90 percent of full scale without allowing the signal to be over amplified and to saturate the receiver resulting in clipping 5 1 2 2 Tx Power The amplitude of the transmit pulse applied to the transducer is set using the Tx Power control Thirteen positions AUTO and 1 MAX 12 allow for fine adjustment to suit varying condi...

Page 20: ...ost frequently accessed during normal operation 5 2 1 1 Hi Channnel Select whether the high frequency channel is turned on and whether the type of data is bathymetry side Scan port or side scan stbd 5 2 1 2 Low Channel Select whether the low frequency channel is turned on Turning both channels on does not automatically change the serial output to DBT dual bottom tracking Changing the output string...

Page 21: ...orrect number of days in the month as well as compensating for leap years 5 2 1 8 Min Depth Alarm Any digitized depths less than this value will activate the sonic alarm This facility is most often used to warn the operator that a hazard to navigation exists 5 2 1 9 No Echo Alarm Turning this parameter On will make the Sonic Alarm indicator beep with every missed ping This can serve to alert the o...

Page 22: ... Channel If anything the proper adjustment of the low frequency is more critical than that of the high In particular the amount of transmit ringing can directly affect the minimum depth to which the sounder will operate Having the ability to adjust the transmit frequency to the particular transducer so that it produces the least amount of spurious oscillation or ringing can truly optimize the soun...

Page 23: ... special conditions The 10Log scale is intended for use in calibration bar checks The Manual parameter is intended for use in very shallow water applications where the special shallow water transducer is employed Once Manual is selected no TVG is applied to the signal so the Rx Gain setting becomes the sole controlling factor over receiver gain 5 2 2 6 Hi and Low Step Interval Hi and Low Step Inte...

Page 24: ...ayer Use the SB TVG Range parameter to limit the duration of the increased TVG gain so the second return is not amplified as well Using this parameter depends of having the high frequency reliably tracking the top of the silt layer To use this parameter set the MKIII to transmit dual frequency Set the gain for the high frequency to Auto As an initial step set the Sub bottom TVG to a value of 3 Set...

Page 25: ...ge can be seen on the chart and display See section 6 3 Calibration for bar checks procedures 5 2 3 4 DRAFT and INDEX Hi and Lo Draft is the correction value added to the measured depth to adjust for the difference between the depth of the transducer and the water s surface a dr k where a is the measured depth dr equals the draft depth of the transducer below the water surface Index constant k is ...

Page 26: ...le on the chart If the digitized depth approaches either scale limit in Auto a new scale center is computed which will place the bottom digitized depth at a point 10 20 or 30 of the way into the chart display area This overlap is necessary to prevent redundant scale changes in areas where the bottom varies near either edge of the chart Auto 20 is the default and desirable in most bottom conditions...

Page 27: ... line will be printed 2 meters above the bottom The low frequency channel line is twice as thick as the high frequency line to differentiate it 5 2 4 6 Plot Gate The limits of the tracking gate can be printed on the chart by turning On the Plot Gate feature Plotting the gate can be useful in confirming the operation of the digitizer 5 2 4 7 Annotate The three choices are available under this param...

Page 28: ...ker than the High frequency data If High Only is selected then only the high frequency channel will be printed If Low Only is selected only the low frequency channel will be printed 5 2 4 14 Heave Correction This parameter determines if the data on the chart is corrected for heave if a motion sensor is connected to the Echotrac 5 2 5 Communications Menu The status and condition of all four serial ...

Page 29: ...manual Fix mark and output the NMEA sentence out through the Ethernet port 5 2 5 5 Heave Com 4 The dedicated Heave input port Com 4 looks for heave data in the TSS1 27 ASCII character format Choices are 1 Heave 2 Off Selecting Heave enables the serial port and causes a thick black line to be printed near the top of the chart Upon reading a value on Com4 the Raw heave value is printed graphically a...

Page 30: ...played try using a NULL Modem between the Echotrac and the sensor 5 2 6 3 Printer Test Selecting Printer test and pressing the Enter key starts the printer generating a Zebra Pattern in shades of gray across the full width of the chart The printer will continue producing the pattern until the Enter key is pressed a second time Using this function one can check for missing dots in the record or tes...

Page 31: ...st the RXGAIN controls until the desired chart quality is obtained and no digitizer alarms are displayed Adjustment of the Tx Power control may be called for at this point A balance between RXGAIN and Tx Power is generally desired In many situations AUTO power will satisfy record quality requirements while at other times where local bottom conditions dictate some variation of the Tx Power RXGAIN r...

Page 32: ...le depth information from the project depth and bottom material set the Scale Change parameter to manual Set End Of Chart and Chart Width to values that include the depths to which the BAR will be lowered 3 Deploy the BAR below the transducer to a depth of 5 meters or less 4 Select the calibrate submenu and the Bar Depth parameter Adjust the Bar Depth value until it agrees with the known depth of ...

Page 33: ...T string is output until another string is selected in the Communications menu When SBT is selected but the unit is operating in dual frequency the high frequency depth is output 7 1 1 2 Echotrac DBT Dual Bottom Tracking Using a single frequency The following description applies to the selection of Dual Bottom Tracking in the Auxiliary Menu with only one frequency high or low active DBT One Freque...

Page 34: ...ts are in tenths of feet and in lower case when the units are in centimeters Example FetDB sp DDDDD sp DDDDDCR 7 1 1 3 Heave Using a single frequency The following description applies to the selection of the HEAVE output string in the Communications Menu with only one frequency high or low active HEAVE One Frequency Active Character Character Description 1 sp F Space Fix Mark 2 3 et ET Centimeter ...

Page 35: ...a 18 or Heave Direction 19 20 21 22 HHHH Heave Data x xx Always Centimeter Resolution 23 CR Carriage Return The characters of 2 3 are in upper case when the units are in tenths of feet and in lower case when the units are in centimeters Example FET sp B sp sp sp 184 sp sp sp 193 1234 CR Fix Mark Dual Freq 18 4FT for High 19 3 for Low 12 34m heave 7 1 1 4 DESO25 The following description applies to...

Page 36: ...eave Data decimal 9 sp Space 10 m m indicates meters 11 CR Carriage Return 12 LF Line Feed DESO DDV Draft Character Character Description 1 D Always D 2 G Always G 3 5 DD Draft Data 6 Period 7 8 DD Draft Data decimal 9 sp Space 10 m m indicates meters 11 sp Space 12 CR Carriage Return 13 LF Line Feed DESO DDV Sound Velocity Character Character Description 1 C Always C 2 S Always S 3 6 DDDD Sound V...

Page 37: ...in the past was handwritten on the chart record can be transmitted to the Echotrac via the RS232 return line ASCII Serial Input Up to 80 ASCII characters per line can be accommodated Event Line Fix Mark A single line across the chart is produced by sending HEX 06 ASCII ACK or Control F An event line will be printed across the chart at the end of the current sounding cycle and will not delay or int...

Page 38: ...of the parameters entered via the front panel keypad may also be entered via the serial port or LAN port from an external computer or terminal The external control feature allows remote input of the operating parameters from data files or through the computer keyboard Some restrictions apply to external parameter inputs which because of their absolute nature are only tested against minimum and max...

Page 39: ...e chart The parameter IDs for sending settings are the same as for requesting settings For example to set the chart speed you would use a parameter ID 15 Querying Parameter settings To query a setting use the following 6 character sequence CTRL P Request ID space Parameter ID The Request ID is a command that the Echotrac recognizes as the command for a parameter value request The Echotrac will the...

Page 40: ...rts HEAVE The Heave port enables the Echotrac MKIII to accept data from a motion compensator to apply corrections for the vertical movement caused by swells The Echotrac MKIII will only correct the depth for Heave No corrections are done for Roll and Pitch If the Echotrac is set up to output data on any string other than HEAVE and is reading data from the motion sensor it will print a line at the ...

Page 41: ...files must be obtained from Odom Hydrographic Systems Inc The files are not on the web site but are forwarded by email or on a CD disk Once these files have been obtained put them in a known folder in the computer with the Odom Flash Program 3 Power the Echotrac MKIII to Standby go to the System Menu and reset the unit Go to the Communication Menu and set the baud rate of Com1 to 19200 4 Connect t...

Page 42: ...he DSP board if it is a TMS320LF2407FGEA use the files in the MK3 2407 Serial Flash Programming directory If is a TMS320LF2407AFGEA chip use the MK3 2407A Serial Flash Programming directory 10 Run the serhost1 exe file if the DSP is connected to com1 of the computer or serhost2 exe file if the DSP is connected to com2 of the computer When prompted with a file name type in MK3Digi hex the program s...

Page 43: ...ormat using the built in conversion utility There are many versions of XTF file formats this generated format may not be compatible with all software programs Shortcuts to the eChart software are available on the Taskbar and in the START menu The hard drive in the LCD15 Module is partitioned into two sections the C drive and the D drive The Windows 7 embedded operating system is installed on the C...

Page 44: ...f USB Memory Stick USB memory devices are very useful when transferring data from the module to another processing computer Flash devices and portable hard drives are both compatible A USB memory device can be inserted in any of the four front USB ports The device will appear as an additional hard drive in Windows Always make sure that the inserted device has been cleared of any viruses A 1 4 LCD1...

Page 45: ...lications on the D drive a The C drive has a limited size of only about 3 0GB b The write filter uses memory to store its image so the larger the drive the more memory required c Any application i e ini files or settings can be stored on the non protected volume but would disappear if they were on C drive when rebooted All OS related programs are installed in C Program Files All user applications ...

Page 46: ...r not to damage the equipment The modification should only be carried out by a trained electrical technician or engineer 1 Open the MKIII or CV200 2 Locate the AUX connector 3 Disconnect the AUX connector from connector J4 4 Remove the lid covering the transmitter board and locate the low frequency transmitter board the one with the biggest transformer 5 Locate J2 AUX OUT ...

Page 47: ...AUX connector cut the strip holding the unused cable 7 Connect the unused cable to J2 AUX OUT on the low frequency board Do not connect both connectors from the AUX connector at the same time as this will burn off the COM board 8 Assemble the system and the Silas output is ready ...

Page 48: ...any equipment for service you must follow the Teledyne RESON equipment return procedure stated below a Contact a Teledyne RESON office to obtain an approved Return Material Authorization RMA number b Follow the instructions in the supplied document and pack the equipment in the original shipping containers c Ship the equipment to your Teledyne RESON representative to the applicable address d Ensur...

Reviews: