background image


Installation for PCIe Applications

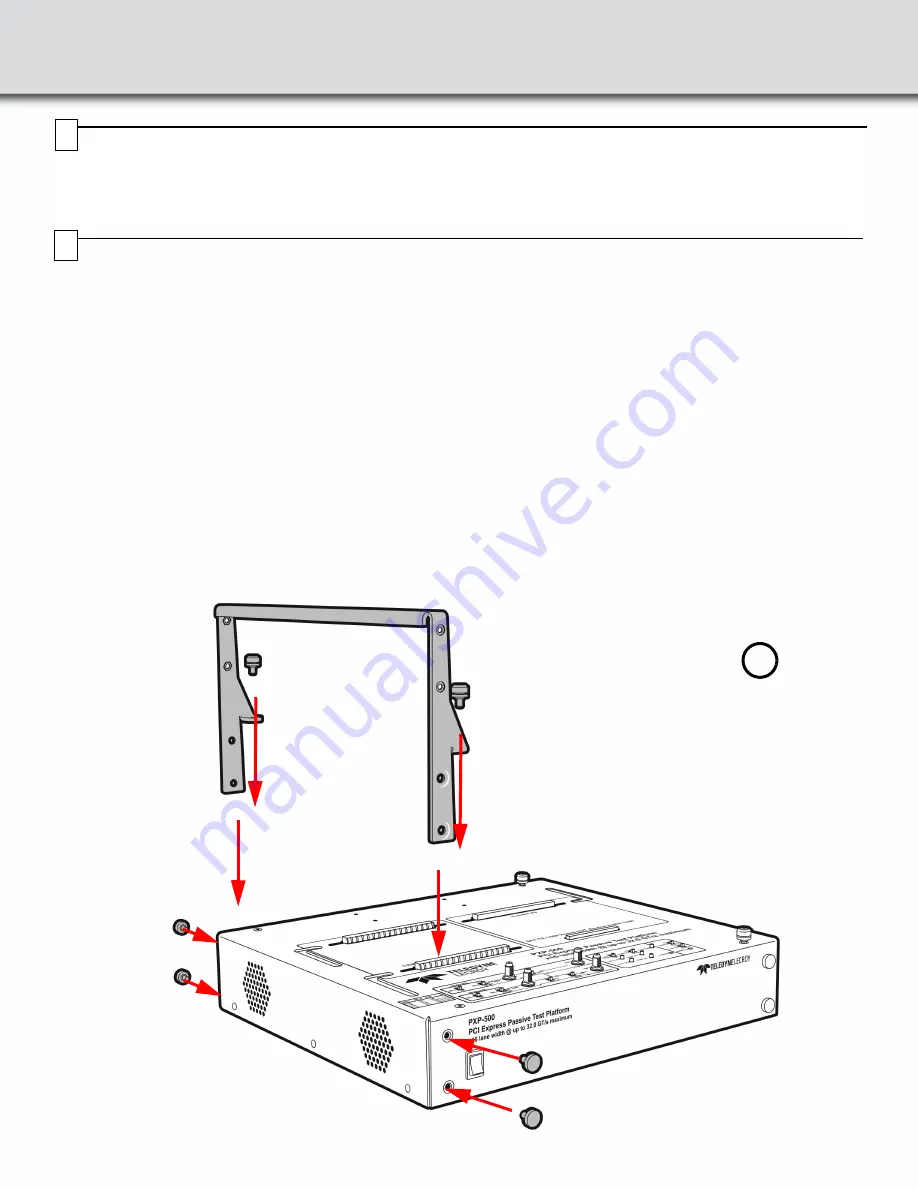
Follow the procedure below when installing a Summit Z5 Exerciser and a Summit Z5 Controller for PCIe applications:

If you are testing a device other than a CEM based DUT, the installation steps are similar but the support bracket, controller, 
exerciser and DUT face to the right.

1.

Remove six large thumbscrews attached to the left side of the PXP500 Test Platform and position the PCIe Device 
Support Bracket over the left side of the test platform. Then install and secure the Support bracket using six large 
thumbscrews.

2.

Install and secure the controller bracket into the PXP500 Test Platform using 4 Phillips head screws.

3.

Position the Summit Z5 Controller, the Summit Z5 Exerciser and the DUT over the PXP500 Test Platform.

4.

Plug the Summit Z5 Controller board into its bracket, plug the Summit Z5 Exerciser board into its slot near the control-
ler and plug the DUT board into the CEM slot. Secure the Exerciser and the DUT boards with a small thumbscrew to 
attach it to the PCIe Device Support Bracket.

5.

Attach the ribbon cable between the Summit Z5 Controller board and the Summit Z5 Exerciser board. 

Note: See the Summit Z5 Exerciser documentation for more details on installation and connectivity.

4

1

     Unpacking the Test Platform

Inspect the received shipping container for any damage. Unpack the container and account for each of the system 
components listed on the accompanying packing list. Visually inspect each component for absence of damage. 
In the event of damage, notify the shipper and Teledyne LeCroy. Retain all shipping materials for shipper’s inspection.

3

Summary of Contents for PXP500

Page 1: ...onnect two of their own devices and use the Test Platform as a PCIe backplane by adding an interposer that will allow an analyzer to capture protocol traffic between the devices The right side of the...

Page 2: ...it Z5 Exerciser and the DUT over the PXP500 Test Platform 4 Plug the Summit Z5 Controller board into its bracket plug the Summit Z5 Exerciser board into its slot near the control ler and plug the DUT...

Page 3: ...5 2...

Page 4: ...6 3 Summit Z5 Controller module Summit Z5 Exerciser plug in card PCIe DUT...

Page 5: ...4 5 See note below Note PCIe Device Support Bracket removed for clarity Summit Z5 Controller cable...

Page 6: ...Installation of Bracket Extension Install the bracket extension according to the illustration below Adjust the height according to the requirements of the DUT bracket 5...

Page 7: ...nstallation for GenZ Applications Follow the steps below when using the PXP500 Platform with GenZ devices applications 1 Install the bracket on the side of the platform where the GenZ connectors are 6...

Page 8: ...2 Attach the GenZ bracket to the PXP500 This will allow to secure the GenZ DUT...

Page 9: ...On Off 0 3 3000 ppm On On 0 5 5000 ppm Z5 Slot External Clock for Z5 Slot comes from Ref Clk In connector Internal Clock for Z5 Slot comes from Internal Clock default setting DUT Slot External Clock f...

Page 10: ...device to turn off all systems connected to 12V power Disable When set to Disable the PWRDIS signal has no effect on the system Default setting Dual Port Enable Dual Port Enable signal Active low Thi...

Page 11: ...ons Temperature Operating 41 F to 104 F 5 C to 40 C Temperature Non Operating 4 F to 140 F 20 C to 60 C Humidity Operating 5 to 80 RH non condensing 86 F or 30 C Humidity Operating 50 max RH non conde...

Page 12: ...oy Customer Support Online Download Periodically check the Teledyne LeCroy Protocol Solutions Group web site for software updates and other support related to this product Software updates are availab...

Reviews: