background image

18 

www.teledex.com

    Y SERIES EXP100 USER GUIDE

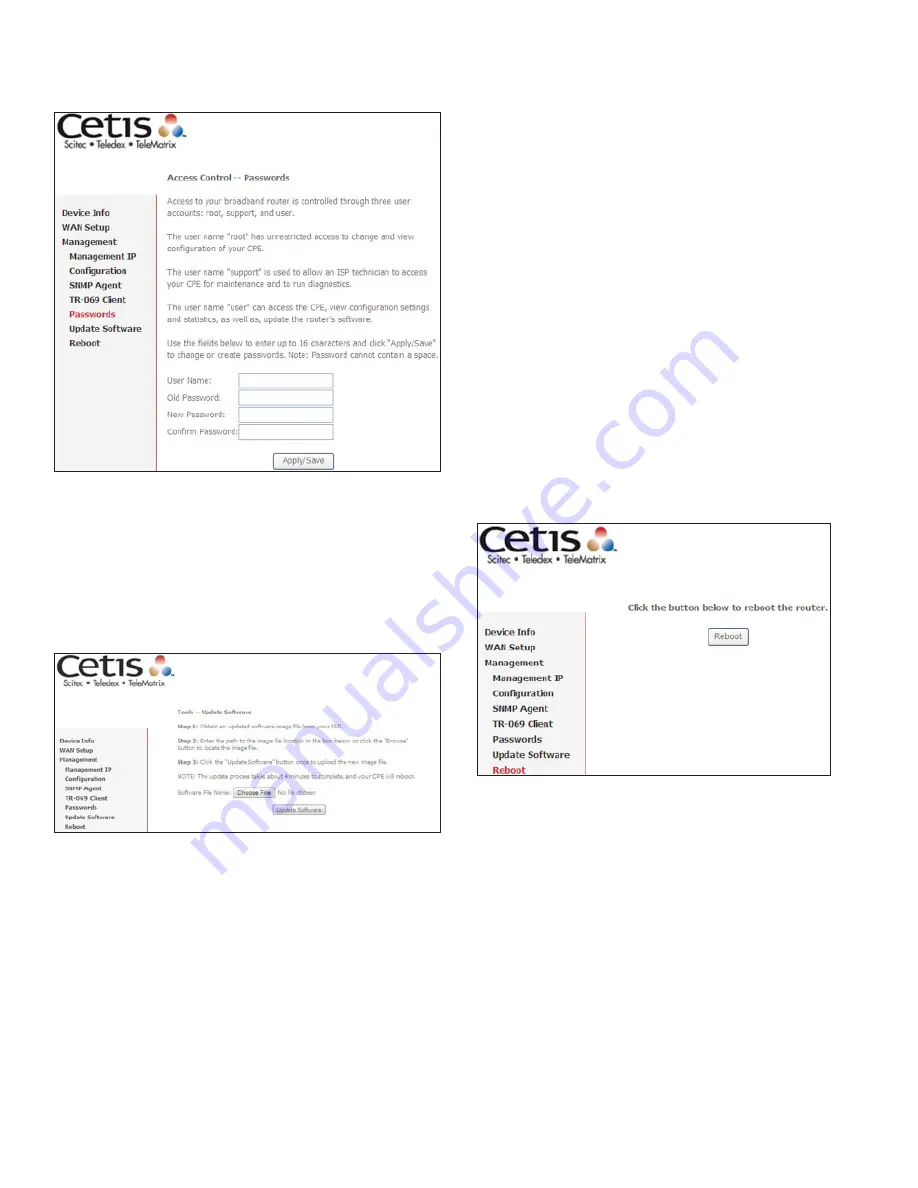
Use the fields below to change password settings. 
Click 

Apply/Save to continue.

NOTE: Passwords can be up to 16 characters in 
length.

6.6 Update Software

This option allows for firmware upgrades from a 
locally stored file.

STEP 1: 

 Obtain an updated software image 
file from your ISP.

STEP 2:    Enter the path and filename of the 

firmware image file in the 

Software 

File Name field or click the Browse 
button to locate the image file.

STEP 3:  

 Click  the 

Update Software button 

once to upload and install the file.

NOTE:  The update process will take about 4 
minutes to complete. The device will reboot 
and the browser window will refresh to the 
default screen upon successful installation. It is 
recommended that you compare the 

Software 

Version on the Chapter 4 Device Information 
screen with the firmware version installed, to 
confirm the installation was successful. 

6.7 Reboot

To save the current configuration and reboot the 
router, click 

Reboot. 

NOTE:  You  may  need  to  close  the  browser 
window and wait for 4 minutes before reopening 
it. It may also be necessary, to reset your PC IP 
configuration.

Summary of Contents for EXP100

Page 1: ...Y SERIES EXP100 USER GUIDE ADSL2 Router ...

Page 2: ...f electric shock from lightening Also do not use the telephone to report a gas leak in the vicinity of the leak Never install telephone wiring during stormy weather conditions Follow the manual s instruction for wiring which should comply article 725 and article 300 in national electrical code for class 2 circuit and wiring in duct All the installation should performed by qualified personnel CAUTI...

Page 3: ... reached the end of its usefullife itmustbetakentoarecycling centre and processed separate from domestic waste The cardboard box the plastic contained in the packaging and the parts that make up this router can be recycled in accordance with regionally established regulations Never dispose of this electronic equipment along with your household waste you may be subject to penalties or sanctions und...

Page 4: ...xDSL BER Test 10 4 2 3 xDSL Tone Graph 11 Chapter 5 WAN Setup 12 5 1 ATM Interface 12 5 2 WAN Service 12 5 3 Interface Grouping 12 5 3 1 Automatically Add Clients with Following DHCP Vendor IDs 13 5 4 Multicast 14 Chapter 6 Management 15 6 1 Management IP 15 6 1 1 IP Address 15 6 1 2 Config Version 15 6 1 3 IGMP Snooping Mode 15 6 1 4 Disable Local Management 15 6 2 Configuration 15 6 2 1 Backup S...

Page 5: ...g supported in the module One of the LAN ports is located on the rear of the module for connecting to a wireless AP module The other two LAN ports are located on the front panel A phone jack is also supported on the front panel for telephone line pass through 1 1 Features RADIUS client IP MAC address filtering Static route RIP RIP v2 routing functions Dynamic IP assignment NAT PAT IGMP Proxy DHCP ...

Page 6: ...nts Power ON Connect the power adapter to the power port Attach the power adapter to a wall outlet or other DC source Reset Button Presstheresetbuttonfor5seconds thenrelease the LED will be flashing for 10 seconds After that the system will reboot to factory defaults 2 1 2 FRONT PANEL LAN1 LAN2 Connect directly to your computer laptop or Internet access device TEL 1 2 Connect to a telephone for li...

Page 7: ...terface or other management protocols The factory default configuration can be restored either by pushing the reset button for more than five seconds until the power indicates LED blinking or by clicking the Restore Default Configuration option in the Restore Settings screen For Parameter Rules in backup settings please see Appendix C Parameter Rules 3 2 IP Configuration 3 2 1 STATIC IP MODE In st...

Page 8: ... local administration i e LAN access the PC running the browser must be attached to the Ethernet and not necessarily to the device For remote access i e WAN use the IP address shown on the Chapter 4 Device Information screen and login with remote username and password STEP 2 A dialog box will appear such as the one below Enter the default username and password as defined in section 3 1 Default Set...

Page 9: ...st Subsequent chapters will introduce the other main menu options in sequence The Device Info Summary screen displays at startup This screen shows hardware software IP settings and other related information 4 1 WAN Select WAN from the Device Info submenu to display the configured PVC s Heading Description Interface Name of the interface for WAN Description Name of the WAN connection Type Shows the...

Page 10: ...nformation corresponding to the xDSL type The ADSL2 example is shown here Click the Reset Statistics button to refresh this screen 4 2 2 xDSL BER TEST Click xDSL BER Test on the xDSL Statistics screen to test the Bit Error Rate BER A small pop up window will open after the button is pressed as shown below ...

Page 11: ...he test or click Close to cancel the test After the BER testing is complete the pop up window will display as follows 4 2 3 xDSL TONE GRAPH Click Draw Tone Graph on the xDSL Statistics screen and a pop up window will display the xDSL bits per tone status as shown below ...

Page 12: ...802 1Q VLAN ID IGMP Shows Internet Group Management Protocol IGMP status NAT Shows Network Address Translation NAT status Firewall Shows the security status Connect Disconnect Shows the connection status Remove Select interfaces to remove To remove a connection select its Remove column radio button and click Remove To Add a new WAN connection click the Add button and follow the instructions NOTE U...

Page 13: ... is for PPPoE while the other PVCs are for IP set top box video The LAN interfaces are ENET1 ENET2 ENET3 and ENET4 The Interface Grouping configuration will be 1 Default ENET1 ENET2 ENET3 and ENET4 2 Video nas_0_36 nas_0_37 and nas_0_38 The DHCP vendor ID is Video If the onboard DHCP server is running on Default and the remote DHCP server is running on PVC 0 36 i e for set top box use only LAN sid...

Page 14: ...14 www teledex com Y SERIES EXP100 USER GUIDE 5 4 Multicast Input new IGMP protocol configuration fields if you want modify default values shown Then click Apply Save ...

Page 15: ... subscriptions to any multicast group 6 1 4 DISABLE LOCAL MANAGEMENT After disabling the local management ticking the checkbox the user can not access the web page via the LAN side 6 2 Configuration This includes Backup Settings Update Settings and Restore Default screens 6 2 1 BACKUP SETTINGS To save the current configuration to a file on your PC click Backup Settings You will be prompted for bac...

Page 16: ... support the reset to default If the Reset button is continuously pressed for more than 5 seconds the boot loader will erase the configuration data saved in flash memory 6 3 SNMP Agent Simple Network Management Protocol SNMP allows a management application to retrieve statistics and status from the SNMP agent in this device Select the Enable radio button configure options and click Save Apply to a...

Page 17: ...Choose Any_WAN LAN Loopback or a configured connection Option Description Display SOAP Messages on Serial Console Enable Disable SOAP messages on serial console This option is used for advanced troubleshooting of the device Connection Request Authorization Tick the checkbox to enable User Name Username used to authenticate an ACS making a Connection Request to the CPE Password Password used to aut...

Page 18: ...age file STEP 3 Click the Update Software button once to upload and install the file NOTE The update process will take about 4 minutes to complete The device will reboot and the browser window will refresh to the default screen upon successful installation It is recommended that you compare the Software Version on the Chapter 4 Device Information screen with the firmware version installed to confi...

Page 19: ... Line T Phone1 T Bound to PIN 4 of Tel RJ45 connector on front panel through built in microfilter 2 ADSL Line R Phone2 R Bound to PIN 5 of Tel RJ45 connector on front panel through built in microfilter 3 12Vdc Input 4 12Vdc Input 5 Ground 6 Ground 7 Phone2 T Bounded to PIN 3 of Tel RJ45 connector on front panel directly 8 Phone2 Bounded to PIN 6 of Tel RJ45 connector on front panel directly Append...

Page 20: ...P Server Supports TR 069 for Remote Management CLI Command Bridge Functions IEEE 802 1d VLAN Support RFC 1483 2684 Multi Protocol Encapsulation Over AAL5 GMP Proxy IGMP snooping Routing Functions Static route RIP and RIPv2 NAT PAT DHCP Server DHCP Relay DHCP Client DNS Proxy ARP Security Functions PAP CHAP TCP IP Port Filtering Rules Port Triggering Forwarding Packet and MAC Address Filtering Acce...

Page 21: ...sName ADSL Router SysName System Location SysLocation unknown SysLocation System Contact SysContact unknown SysContact Trap Manager IP TrapIPAddress 0 0 0 0 TrapIPAddress TR 069 Client Configuration Inform PeriodicInformEnable FALSE PeriodicInformEnable Inform Interval PeriodicInformInterval 300 PeriodicInformInterval ACS URL URL URL ACS User Name Username admin Username ACS Password Password admi...

Page 22: ...document subject to change without notice CetisTM Teledex TeleMatrix Scitec ExpressNet and Teledex iPhoneTM are trademarks or registered trademarks of Cetis Inc TDX Y EXP100 UG 032013 Toll Free 1 800 462 9446 Tel 1 719 638 8821 Email info teledex com www teledex com ...

Reviews: