background image

20

Customising the Feature Settings

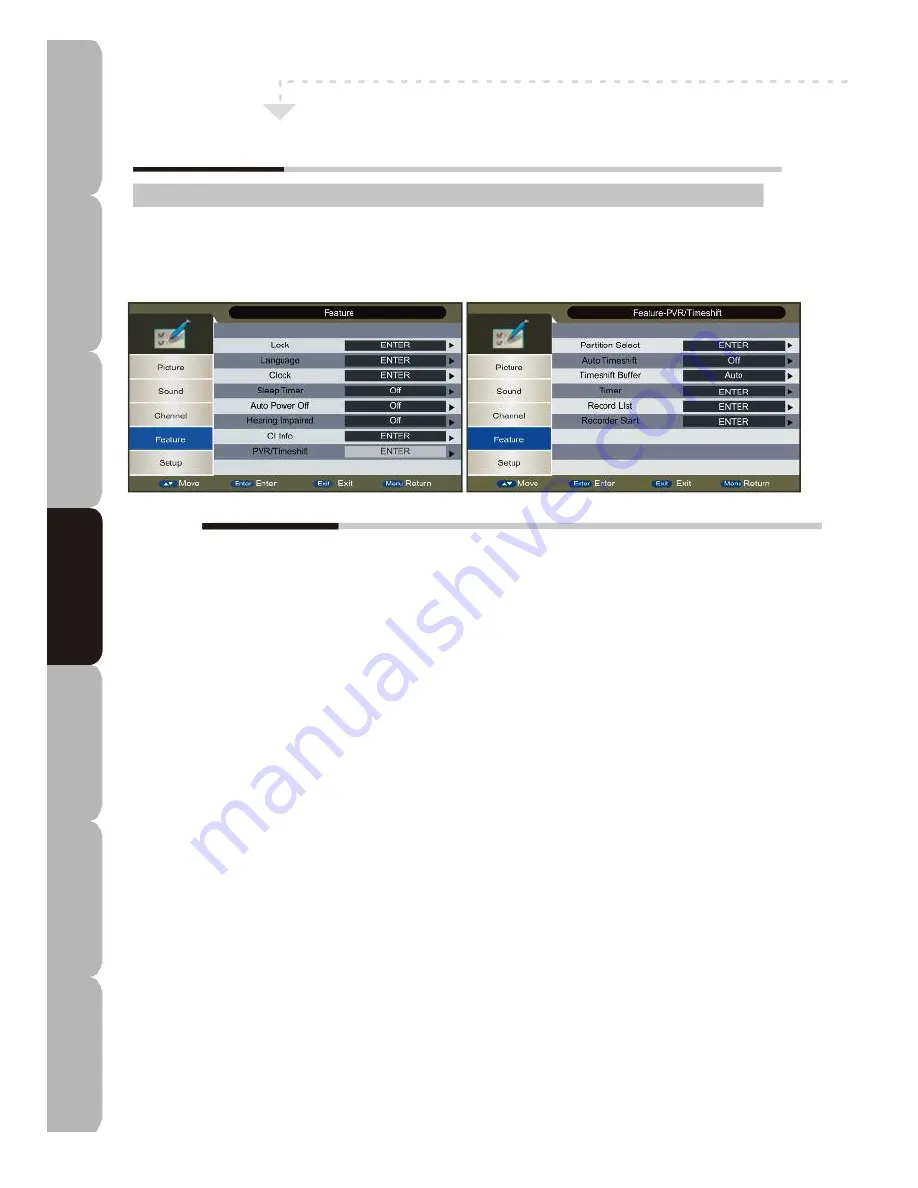
Feature MENU:

Allows you to set up a variety of features: Lock, Language, Clock, Sleep Timer, Auto Power Off, Hearing
Impaired, CI Info and PVR/Timeshift.

The Feature menu includes the following options:

Lock
Lock Channel: 

Allows channel to be locked: a password is required. The password also needs to be entered when

the user tries to change the settings on items such as Reset TV System.

Parental Guidance: 

Allows user to set age level required to watch a program.

Change Pin Code: 

Press the

NUMERIC 

buttons to change password. The default password is 0000

.

Language

Allows various subtitle and audio track languages to be set. The available options are:

OSD Language

English/French/Italian/Spanish/Portuguese/German

Preferred Subtitle

:

English/French/German/Italian/Spanish/Portuguese/ Danish/Czech/Dutch/Finnish/Swedish/Greek/Russian/
Polish/Turkish/Norwegian

Preferred Audio

:

English/French/German/Italian/Spanish/Portuguese/Danish/Czech/Dutch/Finnish/Swedish/Greek/Russian/
Polish/Turkish/Norwegian/Irish

DTV Teletext Language

:

English/French/German/Italian/Spanish/Portuguese/Danish/Czech/Dutch/Finnish/Swedish/Greek/Russian/
Polish/Turkish/Norwegian/Welsh/Gaelic/Irish

ATV Teletext Language

:

West/Greek/East/Arabic/Cyrillic/Russian/Hebrew/Farsi

Clock

Allows user to check or set the current system 

Date

Time

Time Zone 

and 

DST

. DST (Daylight Saving 

Time) is not available when Time Zone is set to Auto and, if it is set to On, it will be one hour ahead of GMT.

Sleep Timer

Sets the system to go to standby mode automatically after a set time. The options are 

Off, 10 min, 20 min, 30 min,

60 min, 90 min, 120 min, 180 min

or 

240 min

. Alternatively, you can hold the 

SLEEP 

button down.

Auto Power Off

Sets automatic TV shutdown after the last user action. The possible settings are 

Off

1 Hour

2 Hours 

and 

4 Hours.

Hearing Impaired:  

Allows a subtitle to be inserted in the current scene if the user is hearing impaired.

CI Info:

Press 

ENTER 

to read information on the Common Interface Card such as Module information, Smart

Card information, language, software download etc. Only available with the DVB-T source after inserting a CAM and
a Smart Card when PVR is not running.

PVR/Timeshift:  

ess 

ENTER 

to manage all Personal Video Recording and Timeshift tasks. Only available with the

DVB-T source when PVR is not running.

Customising TV operation

S

pe

ci

fic

at

io

ns


Tr

ou

bl

es

ho

ot

in

g

U

si

ng

 D

V

D

U

si

ng

 T

V

In

st

al

lin

g

In

tr

od

uc

in

g

S

af

et

W

ar

ni

ng

s

Fe

at

ur

es

Fe

at

ur

es


LE

D

 T

V

LE

D

 T

V

Summary of Contents for TY2/19D

Page 1: ...INSTRUCTION MANUAL TY2 19D TY2 22D with built in DVB T S2 DVD GB 1...

Page 2: ......

Page 3: ...ug being damaged liquid is spilt on it objects have fallen onto it or the TV has been exposed to rain or moisture does not operate normally or has been dropped WARNING TO REDUCE THE RISK OF FIRE OR EL...

Page 4: ...res Basic Operation 14 Customising the Picture Settings 17 Customising the Sound Settings 18 Customising the Channel Settings 19 Customising the Feature Settings 20 Customising the Setup Settings 22 S...

Page 5: ...its uncompressed digital and audio signals using a single cable This TV supports high definition video input via the HDMI socket on the back of the TV Safety First To ensure both your own safety and t...

Page 6: ...he menu press again to exit the menu CH CH BUTTON Used to scan up or down through the channels In menu mode used to select the desired sub menu item VOL VOL BUTTON Adjusts volume Also used to select m...

Page 7: ...Conditional Access Module smart Plus CI card to be inserted to access the functions in the card 8 Coaxial out Digital audio out coaxial output only for TV 9 mini AV in Connects to camcorder VCR DVD Pl...

Page 8: ...ects different DVD angle Press to display the channel list Displays your favourite sub title in DTV or DVD mode Selects the screen aspect mode Recording Menu Auto adjusts the picture on the TV in PC m...

Page 9: ...t This unit is VESA compliant and designed to be wall mounted with a VESA compliant 100x100mm mounting kit Mount this unit according to the instructions on the wall bracket not supplied b Lay a soft c...

Page 10: ...ice Replace all the batteries in the device at the same time Remove the batteries if the remote control is not to be used for an extended time period To avoid faults read the following instructions an...

Page 11: ...t for easy hook up When connecting the 75 ohm coaxial cable to the set connect the 75 ohm cable to the RF IN terminal For best results use a high gain TV aerial preferably roof or loft mounted To impr...

Page 12: ...NT Left Side View of TV SCART Cable GAMES CONSOLE VIDEO CAMERA HEADPHONES VCR mini AV Cable DVD PLAYER mini component Cable TV CABLE BOX Satellite antenna cable SATELLITE RECEIVER Mass Storage Device...

Page 13: ...mode due to no input signal being detected To avoid this happening you will need to configure the PC Proceed as follows 1 Click Start on the computer desktop screen 2 Select Control Panel 3 Click twic...

Page 14: ...RD Insert the CAM card into the DVB T or DVB S2 slot in the direction indicated by the arrow until it fits in place the card face label must face forwards COMMON INTERFACE CAM label Make sure the CAM...

Page 15: ...ulty please contact a qualified aerial installation engineer for assistance Do not adjust your TV set as it is not faulty Never agree to have work done by anyone who calls without an appointment and d...

Page 16: ...diagram below appears on your screen for 5 seconds The MUTE symbol appears in a corner of the screen when you press the MUTE button press the MUTE button again and the symbol disappears To restore so...

Page 17: ...EPG reminder timer is active when a USB device is present Programs may change without notice Always check schedules on the day of broadcast TimeShift available in DVB T mode Allows a program to be re...

Page 18: ...YELLOW button to pop up a Bookmark list press BLUE to pop up Playlists and press FB or FF to page up or page down in e Book mode Same as PLAY PAUSE button on the remote control press to resume playbac...

Page 19: ...colour and light between different parts of an image The higher the contrast the more marked the user perceived difference Sharpness Controls picture sharpness Higher settings sharpen the image more C...

Page 20: ...hed sound in User mode Treble Controls the relative intensity of higher pitched sound in User mode Balance Adjusts relative volume between left right soundtracks If balance is negative the sound on th...

Page 21: ...e lists Country Allows you to select the country where you want to search channels Auto Search Allows you to select channels automatically The search can be stopped directly by pressing the EXIT or ME...

Page 22: ...sh Greek Russian Polish Turkish Norwegian Welsh Gaelic Irish ATV Teletext Language West Greek East Arabic Cyrillic Russian Hebrew Farsi Clock Allows user to check or set the current system Date Time T...

Page 23: ...utton to delete and the YELLOW button to Add You can also press the GREEN button to delete all timers and the BLUE button to edit the timer The following parameters can be set Recorder Select Off for...

Page 24: ...th Clock Allows adjustment of the definition Blue Screen Allows display of snow effect or blue screen if there is no signal Unavailable with PC DVB T and Media sources Home Mode Allows you to customiz...

Page 25: ...teractive modes when the TV is in DTV mode or menu mode Selects different DVD angle Press to display the channel list Displays your preferred sub title in DTV or DVD mode Selects from among screen asp...

Page 26: ...up list will be displayed on the screen You can select one of these favourite groups and press the OK button to access the favourite channel list Program Guide The EPG Electronic Program Guide shows e...

Page 27: ...dio Channel List or Delete All functions The Edit Channel menu includes the following options TV Channel List Radio Channel List Press the corresponding buttons to display the FAV list Lock Skip Move...

Page 28: ...te All To clear the set satellite positions of the tuner Motor Setting To set the Transponder position and display Signal Intensity and Signal Quality Limit setup To set West Limit or East Limit or Di...

Page 29: ...n GMT Usage GMT Offset Summer Time Date and Time As regards GMT Usage the choice is By Region Off or User Define Date and Time are available when Off is selected GMT Offset and Summer Time are availab...

Page 30: ...are using a mass storage device after saving the update file on the USB storage device Dump data to USB You can select Start to dump Allcode SN HDCPKey maincode seecode Radioback bootup_logo cipluskey...

Page 31: ...V then the disc cannot be played If you try to play a non compatible disc a region violation notice will appear on the screen The region code for this player is region 2 refer to the symbols above ARE...

Page 32: ...elects from among screen aspect modes Loads ejects disc in DVD mode Mutes restores TV sound Displays current TV status info TV Channel input source etc Switches between different audio languages in TV...

Page 33: ...c or the FR button to fast reverse through the disc Each press of the FF button steps through the five available speeds These are x2 x4 x8 x16 and x32 normal playback speed Press the PLAY PAUSE button...

Page 34: ...vailable zoom levels until you reach the level you require When using the zoom function you can move around the picture using the Navigation buttons To cancel the zoom function press the ZOOM button r...

Page 35: ...dly until REPEAT OFF is displayed NOTE several different repeat modes are available depending on the disc type SHUFFLE RANDOM SINGLE CHAPTER TITLE ALL REPEAT ONE REPEAT FOLDER Repeat A B DVD CD Image...

Page 36: ...ack number 4 Press the DOWN button to select the second item number 5 Repeat the previous steps to enter the next item 6 Repeat for as many program numbers as required If necessary select NEXT to go t...

Page 37: ...playback while in step motion mode just press PLAY PAUSE NOTE During step motion the sound will be off MIXED MEDIA DISCS Discs containing a mixture of file types e g photo images music and video clips...

Page 38: ...VIEW REPEAT REPEAT A B General Setup Page NOTE the PAL format is generally used for TVs in Australia TV Display Allows you to select the most suitable aspect ratio for the DVD being played Choose betw...

Page 39: ...oundtrack when 5 1 channel sound is playing The stereo signal is obtained when 2 channel sound is playing Dual Mono You can select four different audio outputs Stereo L Mono R Mono and Mix Mono The au...

Page 40: ...ween them The available languages are English French Spanish Portuguese Italian German Dutch Greek Disc Menu There are 8 languages Press the UP DOWN buttons to toggle between them The available langua...

Page 41: ...black white Ensure the correct picture settings are selected Snowy interference on some or Check that the antenna is correctly connected all channels Check that the antenna is in good condition Contro...

Page 42: ...Pr miniCOMPOSITE VIDEO AUDIO L R EARPHONES RF ANTENNAx2 DVB T IEC type DVB S2 F type Coaxial Digital Audio Out CI plus slot x 2 IR Extender DVD slot Power requirements 12 V DC Standby consumption 0 5...

Page 43: ...RA Declares under its own responsibility that the following products TY2 19D TY2 22D which are the subject of this certificate conform to the following norms EN 55013 2001 A1 2003 A2 2006 EN 55020 200...

Page 44: ...1_08_2013...

Reviews: