background image

Service safety summary

Service safety summary

Only quali

fi

ed personnel should perform service procedures. Read this

Service safety summary

before performing any

service procedures.

Do not service alone.

Do not perform internal service or adjustments of this product unless another person capable of

rendering

fi

rst aid and resuscitation is present.

Disconnect power.

To avoid electric shock, switch off the instrument power, then disconnect the power cord from the

mains power.

Use care when servicing with power on.

Dangerous voltages or currents may exist in this product. Disconnect

power, remove battery (if applicable), and disconnect test leads before removing protective panels, soldering, or replacing
components.

To avoid electric shock, do not touch exposed connections.

RM3100 Rackmount Kit Instructions

iii

Summary of Contents for RM3100

Page 1: ...Kit for the AFG3000 and AFG3000C Series Arbitrary Function Generators ZZZ Instructions xx Register now Click the following link to protect your product www tektronix com register www tektronix com P075108800 075 1088 00 ...

Page 2: ...d and pending Information in this publication supersedes that in all previously published material Specifications and price change privileges reserved TEKTRONIX and TEK are registered trademarks of Tektronix Inc Contacting Tektronix Tektronix Inc 14150 SW Karl Braun Drive P O Box 500 Beaverton OR 97077 USA For product information sales service and technical support In North America call 1 800 833 ...

Page 3: ...s taxes and any other charges for products returned to any other locations This warranty shall not apply to any defect failure or damage caused by improper use or improper or inadequate maintenance and care Tektronix shall not be obligated to furnish service under this warranty a to repair damage resulting from attempts by personnel other than Tektronix representatives to install repair or service...

Page 4: ......

Page 5: ...Table of Contents Table of Contents Service safety summary iii Preface iv Kit parts 1 Instrument dimensions 2 Assembly instructions 3 RM3100 Rackmount Kit Instructions i ...

Page 6: ...Table of Contents ii RM3100 Rackmount Kit Instructions ...

Page 7: ...dering first aid and resuscitation is present Disconnect power To avoid electric shock switch off the instrument power then disconnect the power cord from the mains power Use care when servicing with power on Dangerous voltages or currents may exist in this product Disconnect power remove battery if applicable and disconnect test leads before removing protective panels soldering or replacing compo...

Page 8: ...lled allows you to mount a generator into an instrument rack WARNING These instructions are for qualified personnel only To avoid personal injury do not assemble or install this kit unless you are qualified to do so Before proceeding remove all cables from the instrument including the power cable iv RM3100 Rackmount Kit Instructions ...

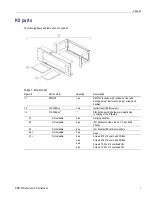
Page 9: ...t 1 3 016 1964 xx 1 Standard mounting hardware in plastic bag consisting of the following 2 1 Not saleable 2 ea Carrying handles 2 2 Not saleable 4 ea For handles Screws 8 32 x 1 2 pan head Phillips 2 3 Not saleable 4 ea For handles 8 split lock washers 2 4 2 Not saleable 5 ea Caps 3 1 1 Not saleable 4 ea 4 ea 4 ea 4 ea Screws M 5 x 16 oval head Phillips Screws M 6 x 16 oval head Phillips Screws 1...

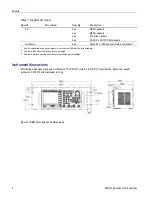
Page 10: ... appropriate screws and washers for your size rack there will be extra hardware 2 Use these caps when the D shape holes are plugged 3 Use these nuts and washers when the carrying handles are not attached Instrument dimensions All following dimensions are shown in millimeters The RM3100 conforms to EIA 310 D specification Rackmount weight without an AFG3000 model installed is 2 1 kg Figure 1 RM3100...

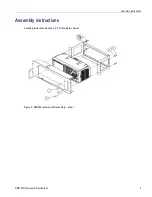
Page 11: ...Assembly instructions Assembly instructions Assembly instructions are shown in the following two figures Figure 2 RM3100 rackmount kit assembly step 1 RM3100 Rackmount Kit Instructions 3 ...

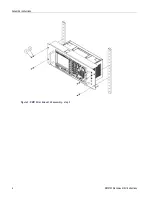
Page 12: ...Assembly instructions Figure 3 RM3100 rackmount kit assembly step 2 4 RM3100 Rackmount Kit Instructions ...
Reviews: