background image

Using Different Printer Language Modes

C

Printing Reference

C-9

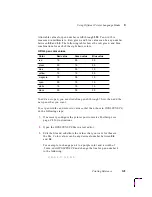
Allowable values for pen numbers are 0 through 255.  Pen width is 
measured in millimeters.  Red, green, and blue values can be any number 
between 0.0 and 1.0.  The following table shows the red, green, and blue 
combinations for each of the eight basic colors.

To add a new pen, you must redefine pens 0 through 7 first, then add the 
new pens that you want.  

To set pen widths and colors to values other than those in HPGLPENS.PS
do the following steps:

1.

If necessary, configure the printer port to receive PostScript; see 
page C-5 for instructions.

2.

Open the HPGLPENS.PS file in a text editor.

3.

Edit the file and substitute the values that you want for those in 
the file.  Color values can be any decimal number between 0.0 
and 1.0.  

For example, to change pen 4 to a purple color and a width of 
.5 mm, edit HPGLPENS.PS and change the line for pen number 4 
to the following:

4 0.5 1.0 0.0 0.5 

HP-GL pen color values

Color

Red value

Green value

Blue value

red

1.0

0.0

0.0

green

0.0

1.0

0.0

blue

0.0

0.0

1.0

yellow

1.0

1.0

0.0

magenta

1.0

0.0

1.0

cyan

0.0

1.0

1.0

white

1.0

1.0

1.0

black

0.0

0.0

0.0

Summary of Contents for PHASER 240

Page 1: ...User Manual Phaser 240 Color Printer First printing February 1995 070 9238 00 ...

Page 2: ...Tektronix Inc TekColor and ColorCoat are trademarks of Tektronix Inc Phaser is a trademark of Tektronix Inc for color printers and related products Adobe and PostScript and IntelliSellect are trademarks of Adobe Systems Incorporated which may be registered in certain jurisdictions Times Helvetica and Palatino are trademarks of Linotype Hell AG and or its subsidiaries UNIX is a trademark of AT T Be...

Page 3: ...e return of the product to Customer Customer shall be responsible for paying any associated taxes or duties This warranty shall not apply to any defect failure or damage caused by improper use or improper or inadequate maintenance and care Tektronix shall not be obligated to furnish service under this warranty a to repair damage resulting from attempts by personnel other than Tektronix representat...

Page 4: ... For example a panel may cover the hazardous area Also applies to a hazard to property including the product itself DANGER A personal injury hazard exists in the area where you see the sign Care of product Disconnect the power plug by pulling the plug not the cord Disconnect the power plug if the power cord or plug is frayed or otherwise damaged if you spill anything into the case if product is ex...

Page 5: ...er roll 2 8 Adding paper or transparencies 2 9 Installing options 2 13 Connecting the printer 2 14 Printer ports 2 14 LocalTalk connection 2 15 Parallel connection 2 17 Ethernet connection 2 18 Connecting the power and turning on the printer 2 19 Installing a driver on your computer 2 23 Phaser 240 drivers and utilities diskettes 2 23 PC users 2 24 Macintosh users 2 28 Workstation users 2 33 Setti...

Page 6: ...per and transparencies 3 9 Non perforated plain paper 3 10 Using two paper trays 3 11 Selecting driver features 3 12 Print modes 3 12 Color corrections 3 13 Fonts 3 14 Resident typefaces PostScript 3 14 Resident typefaces PCL5 3 15 Downloading fonts 3 15 Installing Macintosh screen fonts 3 16 Printer languages PostScript HP GL PCL5 3 17 Enabling and disabling automatic language switching 3 17 Prin...

Page 7: ...the paper pick rollers 4 6 Cleaning the printer every 5 000 prints 4 10 Cleaning the transfer roll sensor pad 4 10 Cleaning the drum 4 12 Cleaning the exit rollers 4 13 5 Supplies Always use Tektronix supplies 5 1 Ordering information 5 1 Supplies kits 5 1 Using plain paper 5 2 ColorCoat transfer roll 5 2 Use the correct paper tray for plain paper printing 5 3 Plain paper startup kit 5 3 Recommend...

Page 8: ...0 Startup page prints even though it is disabled 6 12 Printing the configuration page 6 13 Whom to call for help 6 14 7 Front and Rear Panels Front panel 7 1 Rear panel 7 3 Static Precautions 7 3 DIP switches inside rear panel door 7 4 A Technical Notes Printer ports A 1 Parallel port A 1 Specifications A 3 B Expanding Your Printing System Customizing your printer B 1 Upgrade kits B 2 Advantages o...

Page 9: ...User Manual ix C Moving Your Printer Changing the line voltage C 1 Repacking your printer C 2 D Regulatory Information Index ...

Page 10: ...x Phaser 240 Color Printer ...

Page 11: ...tional Lower Tray Assembly is available for the printer the optional Lower Tray Assembly provides dual tray printing capability Printing from two trays allows you to have paper and transparencies ready for printing at all times without switching trays You can also load the same media in both trays The Phaser 240 printer provides vivid color on common laser paper coated thermal transfer paper and t...

Page 12: ... of software applications since it incorporates Adobe s PostScript Level 2 software The printer also accepts HP GL Hewlett Packard Graphics Language files and monochrome PCL5 Printer Command Language files The Phaser 240 printer interfaces automatically switch between all of the three supported languages PostScript HP GL and PCL5 The Phaser 240 has 17 resident PostScript fonts upgradable to 39 fon...

Page 13: ...ter Putting all the pieces together unpacking the printer and accessories checking the inventory removing the packing material installing the optional Lower Tray Assembly loading the transfer roll loading the paper tray s setting the media switch for paper or transparencies and installing memory font or Ethernet options 2 Connecting the printer Connecting all necessary cables and turning on the pr...

Page 14: ...ple transfer roll 3 Power cord 4 TekColor Care envelope includes the registration card 5 Cleaning kit 6 Phaser 240 Color Printer User Manual 7 Supplies information sheet 8 Transparencies 9 Thermal transfer paper 10 Phaser 240 Drivers and Utilities Printing Reference 11 Tektronix Phaser 240 drivers and utilities diskettes ...

Page 15: ... 2 3 U s e r M a n u a l 3 5 6 4 8 9 10 11 2 T r a n s f e r R o l l C l e a n i n g K i t R e f e r e n c e M a n u a l 1 T r a n s p a r e n c y S a m p l e P a p e r S a m p l e T e k C o l o r C a r e 9238 01 7 S u p p l i e s ...

Page 16: ...er options 1 Lower Tray Assembly 2 Ethernet SIMM 3 Font SIMM adds 22 fonts for a total of 39 fonts 4 Memory add a single 4 8 or 16 Mbyte SIMM 5 Network Utilities for Phaser Color Printers manual and diskettes 9238 02 5 2 3 4 N e t w o r k M a n u a l 1 ...

Page 17: ...l media capable For example you might want to load paper in one tray and transparency in the other Note The printer weighs about 18 kg 40 lbs Observe standard precautions for lifting heavy objects Warning The printer is not permanently attached to the Lower Tray Assembly Take care to move the printer and Lower Tray Assembly together by using the slots on the sides of the Lower Tray Assembly Moving...

Page 18: ...the printer 4 To move the printer use the slots on either side of the Lower Tray Assembly Observe standard precautions for lifting heavy objects To move the printer more than a few feet it is easier to disconnect the Lower Tray Assembly and move it separately from the printer Note When using the printer with the optional Lower Tray Assembly installed make sure that the door covering the upper slot...

Page 19: ...terial from inside the printer 1 Remove the packing tape from the top and front covers 2 Press the button open the top cover 3 Remove the shipping material from the sides of the drum Keep all shipping material for storing or shipping the printer 9238 04 2 3 ...

Page 20: ... the transfer roll 1 Remove the transfer roll from the box Remove the shipping foam from the transfer roll Remove the foam clip from the full end of the roll 2 Hold the transfer roll so that the black band on the roll is on your left 3 With the black band on the roll to your left place the empty end of the roll in the slots at the front of the printer 4 Place the full end of the roll in the slots ...

Page 21: ...justable 1 If you are using a tray for perforated paper or transparencies set the selection switch on the tray 1 for paper or transparencies Trays for non perforated plain paper do not have this switch 2 Make sure that the metal plate is all the way down If necessary push the metal plate down until it clicks into place Do not attempt to change the position of the vertical tab 3 at the back of the ...

Page 22: ...perforated paper or transparencies with the perforations toward the front of the tray 5 Place paper or transparencies in the tray under the hooks Load transparencies with the film side up Load thermal transfer paper with the shiny side up not applicable for laser paper 9238 08 5 4 9238 09 ...

Page 23: ...Getting Set Up 2 User Manual 2 11 6 If your printer has a single paper tray push the paper tray into the slot 6 9238 10 ...

Page 24: ...2 Getting Set Up 2 12 Phaser 240 Color Printer 7 If your printer has a Lower Tray Assembly a Install a tray in the lower slot b Open the door to install a tray in the upper slot 9238 11 7a 7b 9238 12 ...

Page 25: ... printer before you make communication connections and power up the printer Follow the instructions included with each option to complete the installation If you ordered the optional 22 fonts for your printer and you are using a Macintosh computer you ll need to also install the screen fonts on the computer Refer to the Phaser 240 Drivers and Utilities Printing Reference for more information ...

Page 26: ...d on the rear panel An optional Ethernet interface SIMM must be installed to activate the connector The optional Ethernet interface provides Ethernet connectivity with EtherTalk Novell NetWare and TCP IP protocols All ports and network protocols are simultaneously active The printer accepts print jobs on a first come first served basis Note Always make connection to the printer s interface ports b...

Page 27: ...This illustration shows two commonly used types of LocalTalk connectors 1 Self terminating connector 2 Connector that requires an external terminator depending on your network configuration Note Depending on the type of LocalTalk cables you use and your network configuration you might need to use terminators at certain points in the installation Refer to the documentation for your LocalTalk connec...

Page 28: ...e printer s LocalTalk port 2 Connect the short cable of another LocalTalk connector to your computer s LocalTalk port 3 Connect a LocalTalk cable from the LocalTalk connector that you have just attached to your computer to the printer s LocalTalk connector For details on how to select the printer in the Chooser change the printer s name or set the printer s zone refer to the manual Phaser 240 Driv...

Page 29: ...inter s parallel port 2 If you have no other connections to make turn immediately to Connecting the power and turning on the printer on page 2 19 After you turn on the printer and install a driver on your computer you may disable timeouts on your computer s parallel port see Setting up PC ports DOS on page 2 34 9238 15 1 ...

Page 30: ...rnet SIMM that you must install before powering up the printer For information on installing the Ethernet SIMM refer to the documentation that accompanies the Ethernet option 1 Connect an Ethernet interface cable to the printer s Ethernet port Note For complete information on installing the Phaser 240 printer on Ethernet networks refer to the Network Utilities for Phaser Color Printers manual 9238...

Page 31: ...switch is set to match the AC line voltage for your location and that the power switch is in the off position before connecting the power cord If you move the printer to a location that uses a line voltage other than the printer s current setting refer to Changing the line voltage on page C 1 for information on changing the line voltage selection switch 1 Plug the power cord into the printer and i...

Page 32: ...ht briefly and immediately go out except POWER and READY which remain on for about 10 seconds Then the READY indicator blinks while the POWER indicator remains on and the self tests are run When both POWER and READY are on steady not blinking the self tests are complete When a standard transfer roll is more than 75 percent used up the front panel RIBBON indicator lights reminding you that it is ti...

Page 33: ...up During the first 40 60 seconds of the power up sequence the rear panel status indicator A goes on and off periodically After about 40 60 seconds the status indicator blinks continuously indicating that the printer is ready for normal operation 9238 19 A ...

Page 34: ...artup page is printing The startup page can be enabled and disabled by sending a utility file to the printer from the printer s utilities diskettes For information refer to the Phaser 240 Drivers and Utilities Printing Reference Note After the startup page prints a registration page prints if the printer has made between six and eight prints since it was built If you have not already registered yo...

Page 35: ...ies diskettes for PC and Macintosh The drivers and utilities let you select between printer media trays print quality modes color correction modes and other features For complete details on the contents of the Phaser 240 drivers and utilities diskettes and how to use them refer to the manual Phaser 240 Drivers and Utilities Printing Reference which is shipped with the diskettes ...

Page 36: ...tronix Windows 3 1 Driver and Printer Utilities diskette into your computer s disk drive 3 In the main window double click on the Control Panel 4 Double click the Printers icon the Printers dialog box appears a Click the Add button b In the List of Printers select Install Unlisted or Updated Printer c Click the Install button 5 Type in the name of the disk drive that the PC diskette is in for exam...

Page 37: ...r fonts any of the additional fonts selected within an application are printed in the Courier font c Click OK The driver software you need is automatically installed Note The printer s configuration page contains the information you need to set up the printer port For information on printing a configuration page see Printing the configuration page on page 6 13 7 Assign the printer to a port a Sele...

Page 38: ...u selected a parallel port go on to Step f If you clicked on the Network button the Printers Network Connections dialog box appears Fill in each item according to the printer s configuration page Refer to your Windows documentation for details or ask your network administrator for help f Click OK in the Connect dialog box and close the Printers dialog box ...

Page 39: ...er series printers are listed and choose one of those Otherwise use a generic color PostScript driver Refer to the Phaser 240 Drivers and Utilities Printing Reference for more information Note Generic PostScript printer drivers do not have information about this particular printer for example its page sizes or its image area size Using a standard Letter or A4 size media selection should produce ac...

Page 40: ... must disable QuickDraw GX before using this driver the Phaser 240 driver does not work with QuickDraw GX Use the Phaser 240 GX driver if you are using QuickDraw GX and System Software 7 5 The Phaser 240 GX driver works with QuickDraw GX applications and with non QuickDraw GX applications The Phaser 240 Drivers and Utilities Printing Reference provides detailed driver installation procedures and c...

Page 41: ...ssage click OK to automatically install the driver in the Extensions folder System 6 0 7 users the driver is installed in the System Folder 4 System 6 0 7 users LaserWriter 7 1 2 software is required to use the Tektronix driver with system 6 0 7 If you need this software do the following steps a Open the Old System Items folder on the Macintosh Driver and Printer Utilities diskette b Drag the Back...

Page 42: ...ters that are available on a network If the printer driver icon does not appear Restart your Macintosh and repeat the printer driver installation procedure also check the cable connections on your computer and printer 7 Click on your Phaser 240 printer in the list of printers on the right side of the Chooser 8 Close the Chooser by clicking its close box 9 Store the printer diskette in a safe place...

Page 43: ...e driver in the Extensions folder 5 Select Chooser from the Apple menu 6 Click the Phaser 240 GX printer driver icon on the left side of the Chooser A list appears with the printers you have connected to your Macintosh or printers that are available on a network If the printer driver icon does not appear Restart your Macintosh and repeat the printer driver installation procedure also check the cab...

Page 44: ...rinters on the right side of the Chooser 9 Click the Create button to create a desktop printer An icon of the printer appears on the desktop with the same name as the printer selected in the Chooser 10 Close the Chooser by clicking its close box 11 Store the printer diskette in a safe place ...

Page 45: ... files in the following ways Mount the PC diskette on your workstation Download utility files from the Tektronix Bulletin Board Service BBS Request utility files from the Tektronix Color Printer Information Server over the Internet Most workstations with 3 5 inch disk drives provide a device driver that allows you to mount a PC floppy diskette Refer to the Phaser 240 Drivers and Utilities Printing...

Page 46: ... ensures that large files will print even if data transmission is slow The DOS MODE command is used to disable timeouts on your computer s parallel port Type this command at the DOS prompt if LPT1 is not available use LPT2 MODE LPT1 P See your DOS documentation for details on the MODE command You may want to add the MODE command to your AUTOEXEC BAT file so that it takes effect every time you turn...

Page 47: ... you can still keep it from printing by removing the paper tray s at power up Put the paper tray s back in after the READY light stops blinking What next Once you have set up all the hardware and connectors installed any options installed the software on your computer and turned on the power you are ready to print Chapter 3 Printing contains useful information on printing features such as color co...

Page 48: ...2 Getting Set Up 2 36 Phaser 240 Color Printer ...

Page 49: ...st installed a Tektronix driver for your computer Tektronix printer drivers contain page size information and selections specifically for the type of media or tray being used with your printer For information on installing the drivers see Installing a driver on your computer on page 2 23 For detailed information on the drivers refer to the Phaser 240 Drivers and Utilities Printing Reference If you...

Page 50: ...y be selected on the list 3 Use the Setup dialog box to select the paper size paper source Upper tray Lower tray or Auto Select and other printing options 4 Click on the Options button to display the Options dialog box a Click on the Printer Features button to display the Tektronix Printer Features dialog box b Use the Tektronix Printer Features dialog box to select TekColor color corrections and ...

Page 51: ... printer or a generic color PostScript driver Note Generic PostScript printer drivers do not have information about your Phaser 240 printer for example its page sizes and its image area size Using a standard Letter or A4 size media selection should produce acceptable results a Select the appropriate port an LPT port for parallel or one of the network connections b Set the page margins in your appl...

Page 52: ...rint a file use the Page Setup and Print commands from the File menu within your application a In the Page Setup dialog box select the desired paper size from the pop up menu so that the application uses the correct margins for the printer To see the choices use the pop up menu to the right of the standard Paper sizes b In the Print dialog box click the TekColor button to open the TekColor Options...

Page 53: ...e desktop printer you want to use then use the Print dialog box select Print from the File menu For non QuickDraw GX applications You can print to the default desktop printer from the Print dialog box select Print from the File menu To change the default desktop printer select highlight the desktop printer you want to use then select Set Default Printer from the Printing menu Refer to the Phaser 2...

Page 54: ...te Tektronix offers a similar solution for DEC OpenVMS V AX and DEC OpenVMS AXP Phaser Print works with the workstation s native spooling system to print PostScript files and raster files in these formats Sun Raster Format SRF xwd and SGI RGB If you ordered the TCP IP Ethernet option for your printer you received a demonstration copy of Phaser Print on a compact disk CD If you did not receive a de...

Page 55: ...1 Driver and Printer Utilities diskette PC format can be used for Unix workstations These files let you set up your spooling system to select between media trays print quality modes color correction modes and other features Most workstations with 3 5 inch disk drives provide a device driver that allows you to mount a PC floppy diskette If you don t have the means of transferring utility files to c...

Page 56: ...applications such as QuarkXPress and PageMaker by contacting HAL or EuroHAL the Tektronix automated information systems HAL and EuroHAL fax you information immediately on applications and other topics To receive a HAL FAX catalog call toll free in the U S 1 800 835 6100 or dial direct 503 682 7450 For a EuroHAL catalog use the telephone numbers provided in Whom to call for help on page 6 14 For mo...

Page 57: ...er 240 driver to get the largest image areas With Tektronix perforated paper or transparencies you can print the largest area and tear off the excess at the perforation This gives full A or A 4 Letter size images within ISO margins This illustration shows the largest image areas for perforated paper and transparencies All margins are 5 mm 0 2 in The bottom margin is 5 mm 0 2 in after the perforate...

Page 58: ...0 2 in except the bottom margin 21 mm for A4 size 0 83 in for A size Note The standard trays supplied with the printer are for Tektronix perforated paper and transparencies they are not adjustable for plain paper Trays for plain paper must be ordered separately 1 American A size LETTER 2 Metric A4 size A4 210 x 297 mm 8 5 x 11 in 1 9238 21 200 mm 271 mm 10 in 8 1 in 2 ...

Page 59: ...ttes If you select Auto Select by one of these methods the printer will pick paper from the tray that contains the selected paper size When that tray is empty the printer will automatically pick from the other tray if it also contains the selected media size Note Paper tray selections made in the driver take priority over selections made by sending utility files to the printer In all cases you can...

Page 60: ...nd Utilities Printing Reference for complete details Standard mode is the default It provides high quality 300 x 300 dpi prints with the fastest print time Enhanced mode provides improved 300 x 300 dpi prints print time is increased by 10 seconds over Standard mode High Resolution mode provides exceptionally high quality 600 x 300 dpi prints In High Resolution mode image processing time is about 3...

Page 61: ... Drivers and Utilities Printing Reference If you are using TekColor Dynamic Correction in the Phaser 240 drivers the settings you choose in the drivers override any color correction set by DIP Switches inside the printer s rear panel door Refer to Chapter 7 Front and Rear Panels for more information on DIP Switches Note The print driver help window provides a short description of each color correc...

Page 62: ...t The Phaser 240 supports 17 fonts in its standard configuration An additional 22 fonts can be added by installing font upgrade kit 4681F1F 1 Printer s resident typefaces 2 Additional 22 resident typefaces available with a font SIMM provided in upgrade kit 4681F1F 9238 22 1 2 ...

Page 63: ...d outline fonts from your computer to the printer Downloading fonts saves print time if you plan to print several documents or a large document using those fonts When you download a font it is stored in the printer s memory You can download as many outline fonts as the printer s memory allows Adding more memory expands the number of fonts that can be downloaded to the printer The printer accepts T...

Page 64: ...reen fonts corresponding to the printer s fonts If these screen fonts are not already installed on your system you must install them if you want to see the printer s resident typefaces on the Macintosh screen For information on how to install these screen fonts see the Phaser 240 Drivers and Utilities Printing Reference ...

Page 65: ...t to receive a particular language only the port will only accept jobs of that type The printer reports an error if another language is sent to that port For more information see the Phaser 240 Drivers and Utilities Printing Reference The default language setting for all ports is PostScript Enabling and disabling automatic language switching To enable or disable automatic language selection on a p...

Page 66: ...tal print time depends on the image complexity the type of port used and the printer s paper marking speed The paper marking speed is the time it takes the printer to put the colored wax on the paper once it has received the processed image Of these three elements only the printer s paper marking speed is predictable the others can vary greatly depending on your system configuration and the type o...

Page 67: ... in Recommended paper types on page 5 4 Perform the regular cleaning described in this chapter Importance of cleaning By performing regular cleaning you can ensure that your printer produces the highest quality prints Regular cleaning also helps prevent paper jams smudged prints skewed images and misregistration If you clean the printer at intervals listed under the next topic When to clean you wi...

Page 68: ...lers Paper pick rollers Clean these printer parts every 5 000 prints or as needed to prevent smudging on prints Transfer roll sensor pad Drum Exit rollers A preventive check by a Tektronix field service representative is recommended every 10 000 prints or every year The startup page and the configuration page report the number of prints made since the printer was shipped from Tektronix ...

Page 69: ...e printer you must supply isopropyl alcohol available at pharmacies shipping regulations prohibit supplying alcohol or presoaked cleaning materials with the printer In general you should use the purest isopropyl alcohol available to you 99 pure is best and 90 also works well Caution Do not use rubbing alcohol because it can contain water and oils that leave undesirable residue on the printer parts...

Page 70: ... head and the paper feed rollers The printer must be turned on to clean the paper pick rollers Cleaning the thermal head and transfer roll guide 1 Press the button to open the top cover Dampen a lint free cleaning wipe with isopropyl alcohol 2 Wipe the full width of the thermal head several times Remove any dust dirt and wax 3 Wipe the full width of the transfer roll guide several times Close the ...

Page 71: ...atches in this area could cause paper jams 1 Slide out the front cover and remove it Dampen a lint free cleaning wipe with isopropyl alcohol 2 Wipe the paper feed rollers Be sure to clean all three rollers It is not necessary to move the rollers as you clean them clean only the exposed surface of the rollers 3 Slide the front cover back into place 9238 24 2 1 ...

Page 72: ...tray s and remove the paper or transparencies from one of the trays When removing paper or transparencies do not push the paper tray s metal plate down If the metal plate is down put the paper tray into the slot and pull it out this returns the metal plate to the up position 3 If you are using an A4 size metric paper tray break off the tabs on the sides of the cleaning tray The allows the cleaning...

Page 73: ...e cleaning tray into the paper tray As you slide the cleaning tray into position press down the paper tray s metal plate slightly When the cleaning tray is properly installed the paper tray s metal plate presses up against the cleaning tray holding it in place 7 Make sure that the flanges on the front of the cleaning tray overlap the front of the metal plate 9238 26 4 7 5 6 ...

Page 74: ...y 10 The JAM indicator blinks indicating that the rollers have been cleaned a If your printer has a single paper tray the procedure is complete Slide out the paper tray remove the cleaning tray and replace the paper or transparencies Slide the paper tray back into the slot If paper picking problems occur repeat this cleaning procedure b If your printer has a Lower Tray Assembly pull out the paper ...

Page 75: ...eave the lower slot empty for now 3 Press the TEST button on the back of the printer for 3 seconds Again the printer attempts to load paper bringing the paper pick rollers in contact with the alcohol dampened pad in the cleaning tray 4 The JAM indicator blinks indicating that the rollers have been cleaned 5 Pull out the paper tray Remove the cleaning tray from the paper tray and replace the paper ...

Page 76: ...nter every 5 000 prints Perform the next three procedures every 5 000 prints Note Turn off the printer before performing the next three cleaning procedures Cleaning the transfer roll sensor pad 1 Press the button to open the top cover 2 Remove the transfer roll 2 1 9238 29 ...

Page 77: ...Your Printer 4 User Manual 4 11 3 Dampen a lint free cleaning wipe with isopropyl alcohol Wipe the transfer roll sensor 4 Leave the transfer roll out and the top cover open Go on to the next procedure 9238 30 3 3 ...

Page 78: ... open and the transfer roll removed 2 Dampen a lint free cleaning wipe with isopropyl alcohol Wipe the drum Move the drum toward the front of the printer to access the entire surface of the drum as you clean 3 When the alcohol on the drum is dry put the transfer roll back into the printer and close the top cover 9238 31 2 ...

Page 79: ...e front cover and remove it 2 Dampen a lint free cleaning wipe with isopropyl alcohol Wipe the exit feed rollers Be sure to clean all three rollers It is not necessary to move the rollers as you clean clean only the exposed surface of the rollers 3 Replace the front cover 2 9238 32 1 ...

Page 80: ...4 Caring for Your Printer 4 14 Phaser 240 Color Printer ...

Page 81: ...ce 5 1 Chapter 5 Selecting Media and Image Options This chapter explains how to do the following tasks Selecting media size Selecting media trays Selecting print quality Selecting image orientation Selecting media type ...

Page 82: ...ant to print on The drivers support both U S and metric media sizes The default is Letter 8 5 x 11 inches Refer to your Phaser 240 Color Printer User Manual for information on loading the media trays Phaser 240 special paper sizes Paper sizes Dimensions Image area Letter 8 5 x 11 ins 8 1 x 9 96 ins Letter Perf 8 5 x 12 3 ins 8 1 x 10 61 ins A4 210 x 297 mm 200 x 271 mm A4 Perf 210 x 313 mm 200 x 2...

Page 83: ... Printing Reference 5 3 1 Letter size media 2 A4 size media 1 Letter Perf size media 2 A4 Perf size media 210 x 297 mm 8 5 x 11 in 1 9243 03 200 mm 271 mm 10 in 8 1 in 2 1 9243 02 2 210 x 313 mm 8 5 x 12 3 in 200 mm 287 mm 8 1 in 10 6 in ...

Page 84: ...er sizes use the Tektronix page sizes in the pop up menu to print the maximum image area Refer to the table on page 5 2 for image area information Refer to your Apple documentation for details on the other LaserWriter driver features in this dialog box Some applications override the Tektronix page sizes with their own extensions to this dialog box These application specific page sizes use page siz...

Page 85: ... on the paper sizes listed in its own Page Setup dialog box In some Windows applications you can select printer page sizes in a Print Setup dialog box accessed from the File menu If you use a Print Setup dialog box to select the Phaser 240 from your application some page sizes may not be visible in the list If the Phaser 240 page size you want to use is not visible in the list see Selecting page s...

Page 86: ...media from the upper tray until the tray is empty When the tray is empty printing stops until the tray is refilled Use this selection if you use different media in each tray Lower Tray Paper or transparency film is automatically loaded from the lower tray The printer picks media from the lower tray until the tray is empty When the tray is empty printing stops until the tray is refilled Use this se...

Page 87: ...The Paper Source options are in the Setup dialog box See page 3 11 for instructions Upper Tray Lower Tray Auto Select Downloadable utility files Macintosh All Macintosh users Use the LaserWriter Utility to download these files to the printer See page 2 14 for instructions Use Upper Tray Use Lower Tray Use Any Tray QuickDraw GX users Use Tektronix Phaser 240 GX driver to download these files to the...

Page 88: ...e default print quality mode Enhanced This mode produces higher quality prints than Standard mode The Enhanced mode prints at a resolution of 300 x 300 dpi High Resolution This mode produces the best quality prints but at the expense of processing and print time The High Resolution mode prints a page at a resolution of 600 x 300 dpi This mode requires a minimum memory upgrade of 8 Mbytes for a min...

Page 89: ... Quality options are in the Tektronix Printer Features dialog box See page 3 11 for instructions Standard Enhanced High Resolution Downloadable utility files Macintosh All Macintosh users Use the LaserWriter Utility to download these files to the printer See page 2 14 for instructions Standard Quality Enhanced Quality High Resolution QuickDraw GX users Use Tektronix Phaser 240 GX driver to downloa...

Page 90: ...to your Phaser 240 Color Printer User Manual for more information on image placement and paper loading Select the orientation option you want for your prints Portrait Places your image vertically on the media Landscape Places your image horizontally on the media Phaser 240 Macintosh driver LaserWriter 7 1 2 based The Orientation option is in the Page Setup dialog box Phaser 240 GX Macintosh driver...

Page 91: ...Selecting Media and Image Options 5 Printing Reference 5 11 Tektronix driver for Windows 3 1 The Orientation option is in the Setup dialog box ...

Page 92: ...election switch that you must set for paper or transparencies As you hold the tray for insertion into the printer locate the media switch on the tray s right side 1 Set the switch to match the type of media in the tray push up for transparencies or push down for paper Note The optional Letter and A4 trays have no switch they are set for paper only TRANSPARENCY PAPER 1 9243 01 ...

Page 93: ...ices Vivid Color for typical business and office printing Simulate Display for engineering and scientific imaging applications Simulate Press for graphic arts use Color corrections can be made in two ways By selecting driver options from Macintosh and Windows applications using the Tektronix printer drivers By using downloadable utility files Note TekColor color corrections do not affect colors sp...

Page 94: ...aries with the type and amount of light for example fluorescent lighting versus sunlight General guidelines Keep color choices simple and consistent Select colors that look good together and that reinforce your message Check your application for standard palettes to get you started Use a color scheme of five or six shades and in a series of images use the colors in a consistent manner throughout t...

Page 95: ...schemes use split complements for more subtle effects Avoid blue red and yellow purple combinations Use full strength warm colors sparingly for emphasis Use a cool dark background color that won t compete with the foreground Use foreground colors that stand out clearly against the background Research shows that blue is the most preferred background color followed by black gray brown red green and ...

Page 96: ...e color more effectively The TekColor color correction options are available for a finer degree of control over color Since no single color correction option can address all uses refer to the following table for the description that best fits your printing situation and try the suggested color correction Printing objective or problem Color correction to use Where to find details Brightest most vib...

Page 97: ...on is not available in this format Options Tektronix driver settings Downloadable utility files None turn off all color corrections Vivid Color print the brightest colors and a truer blue Simulate Display simulate display screen colors Simulate Press closely match printing press colors Monochrome print in gray scale Use Printer Setting use the current color correction setting in the printer s memo...

Page 98: ...tronix Phaser 240 driver for Windows 3 1 The Color Correction options are in the Tektronix Printer Features dialog box See page 3 11 for instructions Downloadable utility files Macintosh All Macintosh users Use the LaserWriter Utility to download these files to the printer See page 2 14 for instructions No Color Correction Vivid Color Simulate Display Simulate Press Monochrome Raw CMYK Raw RGB Qui...

Page 99: ...nstallation instructions Macintosh Phaser 240 GX driver for QuickDraw GX and System 7 5 see page A 2 for installation instructions Phaser 240 driver for Windows 3 1 see page 3 3 for installation instructions A color correction setting made in the driver always overrides a downloaded utility file setting for prints made from the driver However the driver s Use Printer Setting option allows you to u...

Page 100: ...lity file to take effect the printer s switches must be in the following positions before a utility file is downloaded to the printer Switches 1 2 and 4 down Switch 3 up If you have to adjust the switches The printer s switches are located inside the rear panel door Refer to the Phaser 240 Color Printer User Manual for instructions on locating the printer s switches Other characteristics of printe...

Page 101: ...ttings for either Tektronix or non Tektronix drivers Application color corrections Some applications perform color corrections to improve screen to printer color matching The color correction options in the Tektronix drivers or utility files adjust colors in the printer after the application has performed its color corrections If the application uses CIE Commission Internationale de l Eclairage co...

Page 102: ... the cyan blue purple magenta range in the image are also adjusted to compensate for the adjusted blue Colors in the red orange yellow green range are not affected This selection is good for making presentation graphics such as overhead transparencies and for bright looking colors that don t need to match the screen s colors or printing press colors Vivid Color adjusts CMYK colors using a method t...

Page 103: ...efine colors as RGB red green blue HLS hue lightness saturation or HSB hue saturation brightness Closely match printing press colors Use the Simulate Press option if you are previewing work for a four color job to be printed on a printing press This option simulates a four color commercial printing press not solid spot colors such as PANTONE Colors Note If you are selecting Phaser 240 specific PAN...

Page 104: ...age masters for photocopying in black and white Using the printer s current color setting The Use Printer Setting option is available only in the Tektronix Macintosh and Windows drivers This option sends no color correction information to the printer It uses the current setting in the printer to process colors for printing The printer s setting can be one of the color correction utility files sent...

Page 105: ...s to CMYK colors Use this file if your application specifies colors as CMYK cyan magenta yellow and black This file lets you control the CMYK output of the printer s colors without any TekColor color corrections Raw RGB Colors RAWRGB PS Converts all colors CMY CMYK grays to RGB colors Use this file if your application specifies colors as RGB red green and blue This file lets you control the CMY ou...

Page 106: ...re located in the compressed Phaser 240 Samplers sea archive file on the Macintosh Driver and Printer Utilities diskette refer to page 2 13 for decompressing instructions The PC files are located in the SAMPLERS directory on the Windows 3 1 Driver and Printer Utilities diskette Color sampler chart files Color sampler chart Number of printed pages Macintosh file name PC file name Print a sample of ...

Page 107: ...er charts are made up of areas of color with each color s components listed below it Each color sampler chart is several pages long they are printed in panels that can be connected to form a wall chart or placed in a binder for easy reference Illustration ...

Page 108: ...rs from within an application Make a selection from each column in the following table and write the combination of options on the printed chart for future reference For example if you are printing from an application with the driver s Vivid Color and Enhanced options selected then print the color chart with the Vivid Color VIVDCOLR PS and Enhanced Quality ENHANCED PS utility files downloaded to t...

Page 109: ...ate the LaserWriter Utility in the folder on your hard disk containing decompressed utility files b Double click the LaserWriter Utility icon to start the application c Choose Download PostScript File from the Utilities menu d Select the color correction file from the list then click Open e At the prompt Save PostScript output as you are asked for a file name for saving printer output Use either t...

Page 110: ... the LaserWriter Utility icon to start the application c Choose Download PostScript File from the Utilities menu d Select the color sampler chart file from the list then click Open e At the prompt Save PostScript output as you are asked for a file name for saving printer output Use either the default name given in the edit box or type a new name Click Save to send the file to the printer f If no o...

Page 111: ...ith downloaded utility files to print the chart Any other driver selections can cause the colors to print differently Remember to load the same type of paper and transfer roll you used when printing the chart If you are not using a Tektronix driver Print your document with the same downloaded utility files for color correction and print quality that you used to print the chart Remember to load the...

Page 112: ...s Use the DOS COPY command described on page 3 19 to send a color correction utility file to the printer Or use the Copy command in Windows File Manager described on page 3 20 to send a color correction utility file to the printer Workstation users Send a color correction file to the printer as you would any PostScript file 4 Select a print quality mode from the following table then repeat Step 2 ...

Page 113: ...ne of the following methods If you are printing from a Tektronix driver Print your document using the Tektronix printer driver with the same color correction and print quality options selected in the driver that you used with a downloaded utility file to print the chart Any other driver selections can cause the colors to print differently Remember to load the same type of paper and transfer roll i...

Page 114: ...rection and print quality information required for printing the chart To match colors from within an application to the sampler chart you must use the following options Color correction None Select color corrections in a Tektronix Phaser 240 driver or with downloadable utility files see page 6 5 for more information Print quality High Resolution You can use Enhanced quality if your printer doesn t...

Page 115: ...r 4 To print the chart following these steps a Locate the LaserWriter Utility in the folder on your hard disk containing decompressed files Double click the LaserWriter Utility icon to start the application b Select Download PostScript File from the Utilities menu c Select the PANTONE Tek Phaser 240 file and click Open d At the prompt Save PostScript output as you are asked for a file name for sav...

Page 116: ...ons will cause the PANTONE Colors to print differently Use thermal transfer coated paper and a thermal wax transfer roll in the printer If you are not using a Tektronix driver Print your document with the No Color Correction color correction utility file and the High Resolution print quality mode utility file downloaded to the printer Refer to page 2 14 for instructions on downloading files to the...

Page 117: ...al wax transfer roll in the printer Refer to the Phaser 240 Color Printer User Manual for instructions on loading media 3 Print the PANTONE Color chart using one of the following methods PC users Use the DOS COPY command described on page 3 19 to send the color chart file to the printer Or use the Copy command in Windows File Manager described on page 3 20 to send the color chart file to the print...

Page 118: ...ns will cause the PANTONE Colors to print differently Use thermal transfer coated paper and a thermal wax transfer roll in the printer If you are not using a Tektronix driver Print your document with the NOCORECT PS color correction utility file and the HIGHRES PS print quality mode utility file downloaded to the printer Refer to page 3 19 and page 3 20 for instructions on downloading files to the...

Page 119: ... explains how to use fonts and print a font sampler in Macintosh and PC environments For general information on fonts request a document catalog from HAL or EuroHAL the Tektronix automated fax systems Refer to page 8 2 for instructions on using these systems ...

Page 120: ...lvetica Helvetica Bold Helvetica Oblique Helvetica Bold Oblique Helvetica Narrow Helvetica Narrow Bold Helvetica Narrow Oblique Helvetica Narrow Bold Oblique Times Roman Times Bold Times Italic Times Bold Italic Symbol Σ ψ µ β ο λ New Century Schoolbook New Century Schoolbook Bold New Century Schoolbook Italic New Century Schoolbook Bold Italic ITC Bookman Light ITC Bookman Light Italic ITC Bookma...

Page 121: ...e Phaser Screen Fonts sea archive file on the Macintosh Driver and Printer Utilities diskette contains screen fonts for the printer s fonts You need to decompress and install the screen fonts on your computer if you want to see the printer s resident typefaces on the Macintosh screen If you select a font the printer doesn t have the Macintosh creates a representative font for printing ...

Page 122: ...ecompressed fonts to reside Use either the default folder name listed in the edit box or type in the name you want for the folder Then click Save 6 At the Installation was successful dialog box click Quit The decompressed fonts are saved in the folder you specified Installing the decompressed fonts If you are using System Software 6 0 7 Use the Font DA Mover located on your Apple system software d...

Page 123: ... in the Chooser 3 Locate the LaserWriter Utility in the folder on your hard disk containing decompressed utility files 4 Double click the LaserWriter Utility icon to start the application 5 Choose Download PostScript File from the Utilities menu 6 Select the Font Sampler file from the list then click Open 7 At the prompt Save PostScript output as you are asked for a file name for saving printer ou...

Page 124: ...ory You can download as many outline fonts as the printer s memory allows 1 Follow the instructions on page 2 13 to decompress the Phaser 240 Utilities sea archive file on the Macintosh Driver and Printer Utilities diskette to your computer s hard disk 2 Select the appropriate printer in the Chooser 3 Locate the LaserWriter Utility file in the folder on your hard disk containing decompressed utili...

Page 125: ...nt downloader supplied with your font package to download the desired font to the printer Edit your WIN INI file so the Tektronix Windows driver automatically downloads the fonts you need as part of a print job Refer to your Microsoft Windows documentation for details on this procedure Some font packages automatically update the PostScript port entries in your WIN INI file when you reinstall the f...

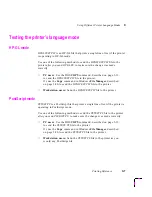
Page 126: ...e Downloading fonts to the printer from a PC The fonts resident in your printer are stored as outlines and are always available for printing The PostScript interpreter in the printer can also accept and store additional fonts known as downloadable fonts If you want to print PostScript outline fonts that are not built into the printer you can transfer or download outline fonts from your computer to...

Page 127: ...ents terminal settings protocol modem how to connect to our BBS and how to download files request a document catalog from HAL or EuroHAL the Tektronix automated fax systems Refer to page 8 2 for instructions on using these systems Reaching the Customer Support staff If your problem is still not resolved after trying the suggestions in this chapter call the Tektronix Customer Support Hotline in the...

Page 128: ...log listing the numbers of available documents You may want to replace your catalog periodically since the system is often updated 1 Before you call write down the area code and telephone number for your fax machine HAL will ask you to key this number through the keypad on your voice telephone If you are calling from outside the United States or Canada you ll need to know the international access ...

Page 129: ...s not have these keys or has a dial you will need to buy a tone dialer from your local telephone or electronics shop This small box is held to the phone and will send the standard tones that you need to talk to EuroHAL 1 To use EuroHAL call one of the numbers listed in the following table Country Number Austria 00 44 1628 478 347 Belgium 00 44 1628 478 347 Denmark 00 44 1628 478 347 Finland 990 44...

Page 130: ...code first as shown in the following table Country Country code Your area code and fax number Press when finished Austria 00 43 area code fax number Belgium 00 32 area code fax number Denmark 00 45 area code fax number Finland 00 358 area code fax number France 00 33 area code fax number Germany 00 49 area code fax number Holland 00 31 area code fax number Italy 00 39 area code fax number Norway 0...

Page 131: ...Server From this server you can retrieve driver and utility files and color printer information In the following mail requests substitute the library of your choice for library name and the file of your choice for filename Send your requests for files to the following electronic mail address color_printer_info TEKTRONIX TEK COM Electronic mail requests To Type this command Receive the list of info...

Page 132: ...eText for system 7 1 and later installed on your hard disk to read this file If you don t have a copy already installed copy TeachText or SimpleText from the same Apple system software diskettes you last used to upgrade your computer Customer services technical support ordering and service 1 800 835 6100 HAL fax library 1 800 835 6100 503 682 7450 Bulletin Board Service BBS 503 685 4504 Internet W...

Page 133: ...tion s version number to the printer s firmware version number You can check the printer s firmware version number by printing a copy of the printer s startup page Refer to page B 2 for instructions on printing the startup page If you have upgraded your printer s firmware version you may need a newer printer description file You should always use the most current printer description file To determ...

Page 134: ...EtherTalk Sending the same file more than once may cause different errors or offending commands each time or the file may print without an error Files from some applications may print while files from other applications may not Documents saved to PostScript files and sent to the printer with a downloading utility may generate errors To upgrade your software 1 Insert the diskette labeled AppleTalk ...

Page 135: ...or your computer type Macintosh users Note If you are using System Software 7 5 and QuickDraw GX you can also download this printer utility from the Tektronix Phaser 240 GX printer driver refer to page A 11 for instructions 1 Follow the instructions on page 2 13 to decompress the Phaser 240 Utilities sea archive file on the Macintosh Driver and Printer Utilities diskette to your computer s hard di...

Page 136: ...ntinue PC and workstation users 1 Locate the TEKEHAND PS file in the PHSR240 directory on the Windows 3 1 Driver and Printer Utilities diskette 2 Copy the file to your hard disk or use it from the diskette 3 Use one of the following methods to send the file to the printer PC users Use the DOS COPY command described on page 3 19 to send the TEKEHAND PS file to the printer Or use the Copy command in...

Page 137: ... some suggestions All users When you use any color correction option other than None your printer can take longer to process bitmapped images Select color corrections from the Tektronix drivers or with downloadable utility files see page 6 5 for instructions The Standard option prints faster than the Enhanced and High Resolution options Select these print quality modes from the Tektronix drivers o...

Page 138: ...r in the Printers dialog box Make sure the Use PostScript Level 2 Features check box in the Advanced Options dialog box is turned on From your application choose the Tektronix Phaser 240 as your printer Try printing the document again UNIX workstation users Workstation users can use the Phaser Print software to increase printer performance when printing bitmapped images Refer to page 4 2 for detai...

Page 139: ... it off Close the Chooser and try printing again If you are having trouble printing from the Finder in System 7 1 for example if the Phaser 240 driver dialog boxes are not opening it may be because the Finder doesn t have enough allocated memory Reinstall the Tektronix driver to automatically allocate enough memory for printing from the Finder Windows users Make sure your printer is connected to t...

Page 140: ...m the Main window double click the Print Manager icon 2 From the Options menu in the Print Manager select Network Settings 3 In the Network Options dialog box uncheck the Print Net Jobs Direct box 4 Click OK If you can t print from Windows to an LPT port If your printer is connected through an LPT parallel port and your document doesn t print try the following 1 Double click the Printers icon in t...

Page 141: ...nd 4 inside the printer s rear panel door in the down position Then put Switch 4 up After the configuration page prints place Switch 4 down 2 If the printer port you are using has the wrong language set for the type of application you are using send one of the following utility files to the printer To print PostScript files use the PSCRIPT PS file to set up a port to receive PostScript see page C ...

Page 142: ...ialog box 4 Increase the Transmission Retry to 850 seconds by typing in the new number 5 Click OK From DOS Note To use this procedure the printer must be connected directly to your computer not on a network 1 At the DOS prompt issue the DOS MODE command by typing the following MODE LPT1 P 2 Start Windows 3 Open the Control Panel from the Main menu 4 Double click the Printers icon to open the Print...

Page 143: ...ese utility files change the printer s color correction setting Refer to page 8 21 for details on how these settings affect prints made from the driver Printing PANTONE Colors If Phaser 240 specific PANTONE Colors are not printing as expected make sure you are printing without any color corrections and with the appropriate print quality mode paper and transfer roll Refer to Before printing the PAN...

Page 144: ...river and Printer Utilities diskette to your computer s hard disk 2 Select the appropriate printer in the Chooser 3 Locate the LaserWriter Utility in the folder on your hard disk containing decompressed utility files 4 Double click the LaserWriter Utility icon to start the application 5 Choose Download PostScript File from the Utilities menu 6 Select the Setscreen Patch file from the list then cli...

Page 145: ...to the printer PC users Use the DOS COPY command described on page 3 19 to send the SETSCRN PS file to the printer Or use the Copy command in Windows File Manager described on page 3 20 to send the SETSCRN PS file to the printer Workstation users Send the SETSCRN PS file to the printer as you would any PostScript file ...

Page 146: ...he Printers dialog box select the Phaser 240 in the list of printers 3 Click the Setup button 4 In the Setup dialog box select the page size you want and click OK 5 Return to your application If you open the Print Setup dialog box again from within your application the page size selection may be blank The page size you just selected in the driver is still selected it is just not visible in the lis...

Page 147: ...ver with any TekColor color correction option except Use Printer Setting the driver selection overrides the following selections for prints made from the driver A color correction utility file if one has been downloaded to the printer The position of the printer s switches located inside the rear panel door Switch 3 down turns off all color corrections Switch 3 up is Vivid Color the factory defaul...

Page 148: ...printer s switches located inside the rear panel door Switch 3 down turns off all color corrections Switch 3 up is Vivid Color the factory default color correction if no utility file has been downloaded LaserWriter Utility does not work The LaserWriter Utility cannot be used if the printer is connected to a print server See your system administrator to temporarily remove the printer from the print...

Page 149: ...lity and downloaded fonts This file restarts the printer as soon as all the jobs in its queue are finished The printer remains unavailable while it initializes Use the utility files for your computer type Macintosh users Note Do not use the Restart Printer command in the LaserWriter Utility s Utilities menu Follow this procedure to reset the printer using the LaserWriter Utility to download the Re...

Page 150: ...utput as you are asked for a file name for saving printer output Use either the default name given in the edit box or type in a new name Click Save to send the file to the printer 8 If no output is returned by the printer the LaserWriter Utility displays a dialog box Click OK in the box to continue PC and workstation users 1 Locate the RESET PS file in the PHSR240 directory on the Windows 3 1 Driv...

Page 151: ... you select Letter size paper you must also have a Letter size tray in the printer in either the upper or lower positions The lower tray is the default If you use a driver that doesn t allow you to select the upper or lower tray or if you do not tell the printer which tray to pick media from through the driver or with a utility file it picks from the lower tray When this tray runs out of media the...

Page 152: ... Auto Select in a Tektronix driver or send the Use Any Tray ANYTRAY PS file to the printer and make sure both trays contain the same media type and size If the trays contain two different types or sizes of media the printer will not automatically switch from one tray to the other Refer to the Phaser 240 Color Printer User Manual for more information on paper trays ...

Page 153: ...QuickDraw GX doesn t work with non QuickDraw GX printer drivers If you want to print from non QuickDraw GX applications with the Tektronix Phaser 240 driver based on the LaserWriter 7 1 2 printer driver described in Chapter 2 you must disable QuickDraw GX see page A 21 for instructions System requirements The Tektronix Phaser 240 GX printer driver requires the following hardware and software An Ap...

Page 154: ...s diskette into the disk drive 3 When the diskette appears on the desktop it should be open showing the icons inside 4 Drag the Phaser 240 GX driver icon from the diskette to the closed System Folder icon on your Macintosh hard disk At the alert message click OK to automatically install the driver in the Extensions folder 5 Store the printer diskette in a safe place Note Before you can print you n...

Page 155: ...de of the Chooser A list appears with the printers available on your network If the printer driver icon does not appear Restart your Macintosh and repeat the printer driver installation procedure also check the cable connections on your computer and printer 3 In the Connect via field s pop up menu select your printer s communication method The AppleTalk option is the standard network connection Th...

Page 156: ...Chooser any desktop printers referring to that printer will not work and must be removed to the Trash and recreated See page 2 17 for instructions on using the LaserWriter Utility to rename the printer 6 Click the Create button to create a desktop printer An icon of the printer appears on the desktop with the same name as the printer selected in the Chooser 7 Close the Chooser by clicking its clos...

Page 157: ...tion below a desktop printer has been created of a Phaser 240 with the Vivid Color color correction and the Paper media type selections 1 Create a desktop printer according to instructions on page A 3 2 Select highlight a desktop printer icon The Printing menu appears in the menu bar at the top of the Macintosh screen 3 Use the Printer Driver Defaults command in the Printing menu to select options...

Page 158: ...p printer icon The application corresponding to the document opens prints the document and then quits If you are using non GX aware applications Print to the default desktop printer with the Print command from the File menu Drag a document onto a desktop printer icon The application corresponding to the document opens the Print dialog box and waits for you to click Print After printing the documen...

Page 159: ...ented by Apple see the Macintosh Guide on line document for details The last group of commands in this menu are printer specific Control printing Use the Start Print Queue and Stop Print Queue commands in the Printing menu to control the print queues on individual desktop printers 1 Select highlight a desktop printer icon 2 From the Printing menu select the appropriate command ...

Page 160: ...heck mark appears next to the command and a bold outline appears around the desktop printer icon Controlling input trays If you select the Input Trays command in the Printing menu the following message appears Please use the Printer Driver Defaults command to specify media options for this printer Click OK to continue then use the Printer Driver Defaults command in the Printing menu to select medi...

Page 161: ...rd party printing extensions you want enabled for the currently selected desktop printer For example Print Time and Paper Match are part of the QuickDraw GX software and are always available By default all printing extensions are enabled 1 Select highlight a desktop printer icon 2 Select Extension Setup from the Printing menu 3 Make selections as desired ...

Page 162: ... tray selections and print quality mode options Note The printer defaults dialog box is also available through the Print command in the File menu for QuickDraw GX aware applications Phaser 240 Defaults Options Where to find details Color Correction None Vivid Color Simulate Display Simulate Press Monochrome Use Printer Setting See page 6 5 Tray Selection Upper Tray Lower Tray AutoSelect See page 5...

Page 163: ... desktop printer This command cannot be used on a shared printer except by the Macintosh hosting the shared printer the command is not visible in the menu 1 Select highlight a desktop printer icon 2 Select Printer Utilities from the Printing menu 3 In the Utility pop up menu select the utility you want downloaded to the printer then click OK 4 If you see an alert message click OK or Cancel ...

Page 164: ...er Print RGB Sampler See page 6 14 Print Fonts Sampler See page 7 5 Disable Startup Page Enable Startup Page See page B 2 Download Tek Error Handler Download Setscreen Patch See page 8 9 See page 8 18 Reset Printer See page 8 23 Use Lower Tray Use Upper Tray Use Any Tray See page 5 6 Use Standard Quality Use Enhanced Quality Use High Resolution Quality See page 5 8 Enable No Color Corrections Enab...

Page 165: ...files to the selected desktop printer This command cannot be used on a shared printer except by the Macintosh hosting the shared printer the command is not visible in the menu 1 Select highlight a desktop printer icon 2 Select Send PostScript File from the Printing menu 3 Select the PostScript file you want to download 4 Click Open to send the file to the printer ...

Page 166: ...nt computers must have a copy of the same printer driver Setting up a shared printer 1 Create a desktop printer according to the instructions on page A 3 2 Highlight the desktop printer icon you want to share 3 Select Sharing from the File menu 4 Click the check box to turn on Share this printer 5 Click the close box 6 At the alert message click Save 7 The desktop printer s icon changes to reflect...

Page 167: ...omputer do the following 1 Open the Chooser from the Apple menu 2 Click the Phaser 240 GX printer driver icon on the left side of the Chooser 3 In the Connect via field s pop up menu select Servers 4 The list of printers in the Chooser changes to show only shared printers Click on the shared printer you want to use 5 Close the Chooser ...

Page 168: ...ons with the Phaser 240 GX driver the Page Setup and Print dialog boxes look different from the standard LaserWriter 7 1 2 dialog boxes described in Chapter 2 Using the Page Setup command When you select Page Setup from the File menu the following dialog box appears When you click the More Choices button the dialog box expands to show the following options ...

Page 169: ...ple s QuickDraw GX documentation for instructions on installing printing extensions refer to page A 9 to use the Extensions Setup command in the Printing menu to enable installed printing extensions Paper Type This is a list of page sizes available for the selected printer Refer to page 5 2 for page size details Orientation This is a standard driver option Refer to page 5 10 for image orientation ...

Page 170: ...t dialog box options Row of icons The scrollable icon list on the left side of the dialog box lists printing extensions that are available to the printer driver When selected the General icon displays the normal Print options Select another icon to see a new set of options Print Time and Paper Match are part of the QuickDraw GX software and are always available The rest of the options in this dial...

Page 171: ... for details The default settings in this dialog box reflect the defaults for the selected desktop printer With most applications you can change the printing options and save those options with each document Using the Paper Match printing extension This dialog box lets you specify paper trays A paper tray selection in the Paper Match printing extension overrides the tray selection choice in the Te...

Page 172: ...These dialog boxes reflect the selections made in the default desktop printer You cannot change these printer settings from an application but you can change them by selecting highlighting the default desktop printer and using the Printer Driver Defaults command in the Printing menu You can also change the default desktop printer before you change printing selections see page A 8 for instructions ...

Page 173: ...printer driver based on the LaserWriter 7 1 2 driver described in Chapter 2 1 Open the Extensions folder inside the System Folder 2 Drag the QuickDraw GX extension onto the desktop 3 Select Restart from the Special menu Any desktop printers created before you disabled QuickDraw GX will have an X drawn through the icons These desktop printers remain unavailable for use until QuickDraw GX is re enab...

Page 174: ...end a print to a desktop printer you can monitor the status of the print job in the Printer Status dialog box There are two ways to open the Printer Status dialog box Select highlight the appropriate desktop printer icon then select Open from the File menu Double click the appropriate desktop printer icon ...

Page 175: ... Reference B 1 Appendix B Modifying Printer Operations This appendix explains how to modify printer operation by Enabling and disabling the startup page Printing a configuration page Changing the EtherTalk zone ...

Page 176: ...le the startup page Use the files for your computer type Macintosh users 1 Follow the instructions on page 2 13 to decompress the Phaser 240 Utilities sea archive file on the Macintosh Driver and Printer Utilities diskette to your computer s hard disk 2 Select the appropriate printer in the Chooser 3 Locate the LaserWriter Utility in the folder on your hard disk containing decompressed utility fil...

Page 177: ...skette 3 Use one of the following methods to send the desired file to the printer PC users Use the DOS COPY command described on page 3 19 to send a file to the printer Or use the Copy command in Windows File Manager described on page 3 20 to send a file to the printer Workstation users Send a file to the printer as you would any PostScript file Printing a startup page Follow these steps to print ...

Page 178: ...es sea archive file on the Macintosh Driver and Printer Utilities diskette to your computer s hard disk 2 Select the appropriate printer in the Chooser 3 Locate the LaserWriter Utility in the folder on your hard disk containing decompressed utility files 4 Double click the LaserWriter Utility icon to start the application 5 Choose Download PostScript File from the Utilities menu 6 Select the Confi...

Page 179: ...ver and Printer Utilities diskette 2 Copy the file to your hard disk or use the file from the diskette 3 Use one of the following methods to send the file to the printer PC users Use the DOS COPY command described on page 3 19 to send the PRNTCNFG PS file to the printer Or use the Copy command in Windows File Manager described on page 3 20 to send the PRNTCNFG PS file to the printer Workstation us...

Page 180: ... from the slower LocalTalk connection Use the files for your computer type Macintosh users With devices grouped into zones you can use the Chooser to see all the printers in any zone To designate the EtherTalk zone use the Set EtherTalk Zone utility file You will have to edit this file You must have a copy of TeachText or SimpleText for System Software 7 1 and higher installed on your hard disk to...

Page 181: ... file and quit the application 5 Select the appropriate printer in the Chooser 6 Locate the LaserWriter Utility in the folder on your hard disk containing decompressed utility files 7 Double click the LaserWriter Utility icon to start the application 8 Choose Download PostScript File from the Utilities menu 9 Select the Set EtherTalk Zone file from the list then click Open 10 At the prompt Save Po...

Page 182: ... hard disk 4 View the ETHRZONE PS file in a text editor and replace the name within the parentheses My Zone Name with the name of the EtherTalk zone that your printer is in 5 Save the file and quit 6 Use one of the following methods to send the file to the printer PC users Use the DOS COPY command described on page 3 19 to send the ETHRZONE PS file to the printer Or use the Copy command in Windows...

Page 183: ...who want to use PostScript HP GL Hewlett Packard Graphics Language or monochrome PCL5 Printer Command Language printer languages It explains how to perform the following tasks Setting PostScript and HP GL timeouts Changing the printer s language mode Testing the printer s language mode Setting default HP GL pen colors ...

Page 184: ... it must print In PostScript mode if the value is exceeded a timeout error is generated In HP GL mode if the timeout value is too small an image may be split across two pages if the value is too large multiple page prints may be combined on one page Note The CONFIG PS file affects printer operation If the printer is shared on a network using this file may affect the prints requested from other use...

Page 185: ...high value or to 0 zero In the following example the timeouts are set to their default values 3 dict begin Password def JobTimeOut 0 def WaitTimeOut 40 def currentdict end setsystemparams 1 dict begin currentpagedevice ManualFeedTimeout known ManualFeedTimeout 60 def if currentdict end setpagedevice 5 Use one of the following methods to send the file to the printer PC users Use the DOS COPY comman...

Page 186: ...The ports such as parallel or LocalTalk can each be configured differently You can change the default language on any port so whenever the printer is turned on it expects to receive PostScript HP GL or PCL5 data on a specific port If automatic language selection is enabled on a particular port it becomes the default on that port allowing you to change back and forth between PostScript HP GL and PC...

Page 187: ...on page 3 20 to send the PSCRIPT PS file to the printer Workstation users Send the PSCRIPT PS file to the printer as you would any PostScript file Printing HP GL files The HPGL PS file changes a port to accept only HP GL data After you copy this file to a port the printer expects HP GL files on that port The port s language change is persistent across print jobs and across printer power cycles Use...

Page 188: ... on that port The port s language change is persistent across print jobs and across printer power cycles Use one of the following methods to send the file to the printer PC users Use the DOS COPY command described on page 3 19 to send the AIS PS file to the printer Or use the Copy command in Windows File Manager described on page 3 20 to send the AIS PS file to the printer Workstation users Send t...

Page 189: ...nager described on page 3 20 to send the HPGLTEST PLT file to the printer Workstation users Send the HPGLTEST PLT file to the printer PostScript mode PSTEST PS is a PostScript file that prints a single line of text if the printer is operating in PostScript mode Use one of the following methods to send the PSTEST PS file to the printer after you send PSCRIPT PS to make sure the change was made corr...

Page 190: ...til the next printer reset Note HP GL pen settings cannot be made persistent across power cycles pen settings revert to the default when the printer is turned off In HPGLPENS PS pen number pen width red value green value and blue value are listed in parentheses after ColorSetup as shown below ColorSetup pen_number width red_value green_value blue_value In the example below all pen widths are set t...

Page 191: ...PGLPENS PS do the following steps 1 If necessary configure the printer port to receive PostScript see page C 5 for instructions 2 Open the HPGLPENS PS file in a text editor 3 Edit the file and substitute the values that you want for those in the file Color values can be any decimal number between 0 0 and 1 0 For example to change pen 4 to a purple color and a width of 5 mm edit HPGLPENS PS and cha...

Page 192: ...ile to the printer PC users Use the DOS COPY command described on page 3 19 to send the HPGLPENS PS file to the printer Or use the Copy command in Windows File Manager described on page 3 20 to send the HPGLPENS PS file to the printer Workstation users Send the HPGLPENS PS file to the printer as you would any PostScript file ...

Page 193: ... blue color adjust 6 10 Bulletin Board Service BBS 8 1 C change printer s name 2 17 3 22 CIE colors 6 1 CMYK Sampler Macintosh utility file 6 14 CMYK PS PC utility file 6 14 color charts CMYK 6 14 HSB 6 14 PANTONE 6 22 printing from a Macintosh 6 17 6 23 printing from a PC 6 20 6 25 printing from QuickDraw GX printer driver A 12 RGB 6 14 color corrections from an application 6 9 Macintosh printer ...

Page 194: ...w GX creating A 3 default desktop printer A 8 printing from A 6 A 20 renaming A 5 selecting unique features for A 5 shared desktop printers A 14 A 15 diskettes contents 1 4 locating 1 4 mounting instructions 4 6 display colors simulating 6 11 DISPLAY PS PC utility file 6 6 DOS COPY command using 3 19 MODE command using 3 18 printing from 3 18 downloading fonts from a Macintosh 7 6 from a PC 7 8 do...

Page 195: ...ter driver A 12 fonts decompressing Macintosh 7 4 downloading from a Macintosh 7 6 downloading from Windows 7 8 installing Macintosh 7 4 FONTS PS PC utility file 7 8 G gray scale printing in 6 12 GX printer driver see QuickDraw GX printer driver H HAL Highly Automated Library 8 2 halftone screens printer 8 18 high resolution print quality 5 8 High Resolution Macintosh utility file 5 8 HIGHRES PS P...

Page 196: ... 6 Macintosh screen fonts decompressing 7 4 Macintosh utility files 2 14 CMYK Sampler 6 14 Configuration Page B 4 decompressing 2 13 Enhanced Quality 5 8 Font Sampler 7 5 High Resolution 5 8 HSB Sampler 6 14 LaserWriter Utility 2 14 locating the software 1 2 Monochrome 6 6 No Color Correction 6 6 PANTONE Tek Phaser 240 6 23 printer description files 2 19 Raw CMYK 6 6 Raw RGB 6 6 Reset Printer 8 23...

Page 197: ...6 NT Windows NT PostScript printer driver updating 3 14 O orientation image 5 10 P Page Setup dialog box Macintosh printer driver 2 5 QuickDraw GX printer driver A 16 page sizes 2 5 3 9 5 2 A 17 PANT240 PS PC utility file 6 23 Pantone Colors printing 8 17 PANTONE printer files using Adobe Illustrator Macintosh 2 25 PC 3 29 Aldus FreeHand Macintosh 2 26 2 27 PC 3 30 Aldus PageMaker Macintosh 2 28 P...

Page 198: ... 14 PCL5 language C 4 PDF files using Macintosh 2 24 Windows 3 28 PDX files using Macintosh 2 21 Windows 3 26 Pen colors HP GL C 8 Phaser 240 LaserWriter 7 1 2 based printer driver see Macintosh printer driver Phaser Print software workstations 4 2 portrait orientation 5 10 ports see communication ports PostScript error handlers 8 9 language C 4 Level 2 1 2 printing errors 8 7 random errors 8 8 ti...

Page 199: ...A 9 Input Trays command A 8 Printer Driver Defaults command A 10 Printer Utilities command A 11 Send PostScript File command A 13 Set Default Printer command A 8 Start Print Queue command A 7 Stop Print Queue command A 7 printing on a network 8 21 printing press color correction 6 11 printing problems 8 13 PRNTCNFG PS PC utility file B 4 PRNTNAME PS PC utility file 3 22 PSCRIPT PS PC utility file ...

Page 200: ...kDraw GX printer driver A 12 RGB Sampler Macintosh utility file 6 14 RGB PS PC utility file 6 14 S screen fonts Macintosh 7 4 sea compressed archive files Macintosh 1 4 Set EtherTalk Zone Macintosh utility file B 6 SETNOSPG PS PC utility file B 2 Setscreen Patch Macintosh utility file 8 18 Setscreen Patch using from a Macintosh 8 18 from a PC 8 18 from the QuickDraw GX printer driver A 12 SETSTPG ...

Page 201: ...s printer driver 3 7 Transmission Retry Windows 3 7 trays paper selecting 5 6 Macintosh printer driver 2 6 Macintosh utility files 5 6 PC utility files 5 6 QuickDraw GX printer driver A 10 A 12 troubleshooting problems 8 25 Windows printer driver 3 9 troubleshooting 8 2 U UNIX shell scripts addctrld 4 5 delctrld 4 5 upper paper tray selecting 5 6 UPPRTRAY PS PC utility file 5 6 Use Any Tray Macint...

Page 202: ...er updating 3 14 using 3 14 Windows printer driver configuring 3 5 fonts 7 7 installing 3 3 installing on a network 3 12 locating the software 1 2 on line help 3 2 Options dialog box 3 10 paper sizes 5 5 problems with setting page sizes 5 5 8 20 Setup dialog box 3 9 system requirements 3 1 timeouts 3 7 8 16 using 3 9 using fonts 7 7 workstations Control D characters 4 4 diskette mounting instructi...

Reviews: