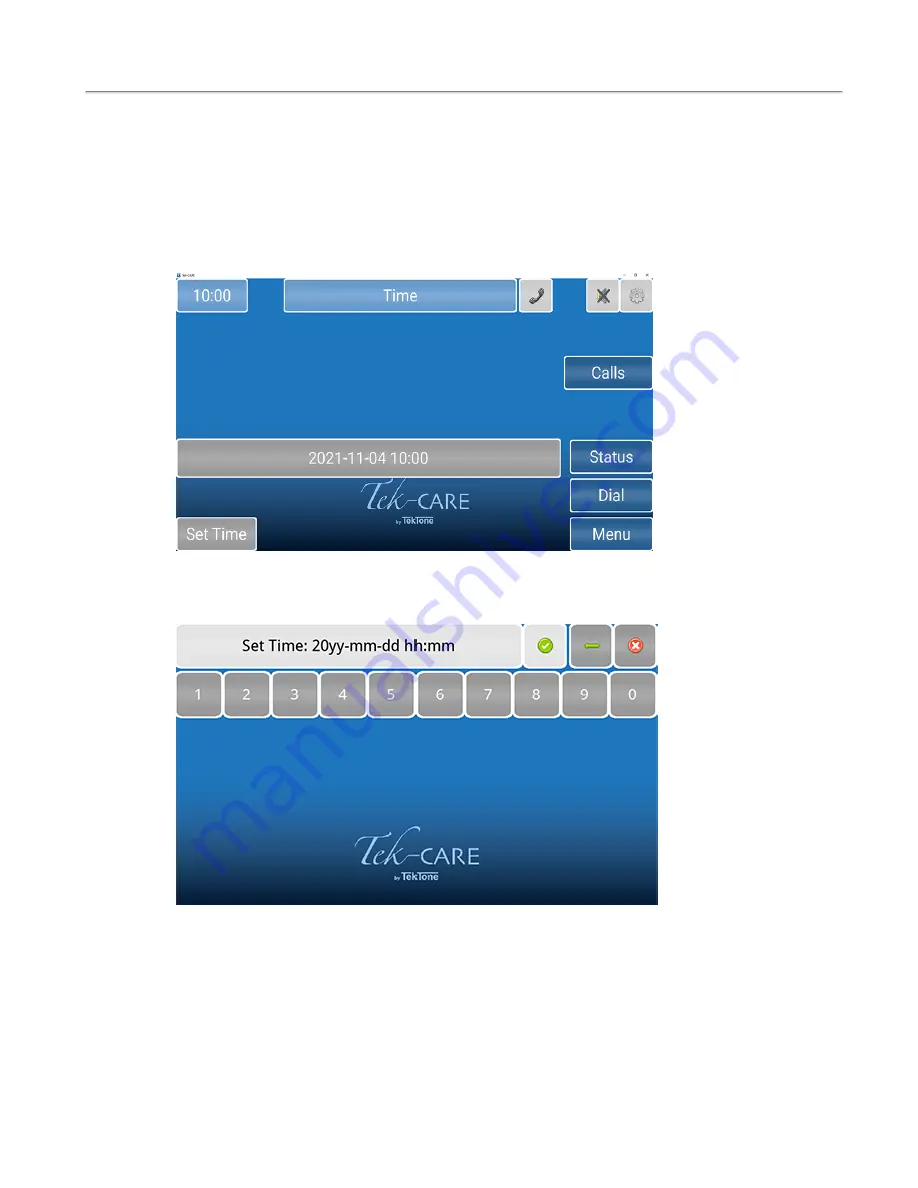
background image

Time Screen

Changing the Time

To change the system time, touch the clock in the upper left corner of the screen. The current system time
and date will appear as shown below.

To change the system time or date, touch

Set Time

in the lower left corner of the screen. On the next win-

dow that appears, enter the date and time in YYYY-MM-DD HH:MM 24-hour format.

Select

Apply

(Green check mark) once the time is set.

Copyright

©

TekTone Sound and Signal Mfg., Inc. All Rights Reserved

IL1068 Tek-CARE Master Station User Guide

|

9

Calls Screen

Summary of Contents for NC404TS Tek-CARE

Page 1: ...Phone 828 524 9967 Toll Free 800 327 8466 Sales Option 2 Tech Support Option 3 324 Industrial Park Rd Franklin NC 28734 tektone tektone com Fax 828 524 9968 IL1068 Rev 2 12 2021 Tek CARE Master Stati...

Page 2: ...ssword Protection 8 Tone Silence 8 Fault 8 Time Screen 9 Changing the Time 9 Settings Screen 10 Changing the Volume 10 Status Screen 13 Dial Screen 14 Menu Screen 17 Using the NC404L Sidecar Master 18...

Page 3: ...one Sound Signal Mfg Inc assumes no responsibility or liability for any errors or inaccuracies that may appear in this documentation TekTone the TekTone logo Tek ALERT Tek BRIDGE Tek CALL Tek CARE Tek...

Page 4: ...nterfaces that closely match each other This user guide will point out any button differences on individual screens The NC403TS Tek CARE Monitor is a purpose built tone visual touchscreen monitor to d...

Page 5: ...thout the handset can be used as a tone visual master or an audio capable master using the push to talk function The NC402TS master station is completely self contained including a built in 10 4 color...

Page 6: ...n may appear List View The List view is the default view that will show all of the calls in a list format The NC415AV shows three active calls on the screen and a scroll arrow will appear at the botto...

Page 7: ...ap view When a call is placed from a station the top portion of the icon will change color depending on the type of call being placed blue for code blue shown below These icons can also be used to dir...

Page 8: ...uch the key at the top left corner of the screen Enter the password on the keyboard screen and press the key next to the password Once the password is entered correctly the background of the key will...

Page 9: ...own below To change the system time or date touch Set Time in the lower left corner of the screen On the next win dow that appears enter the date and time in YYYY MM DD HH MM 24 hour format Select App...

Page 10: ...the Volume To change the Tone Volume or Voice Volume for the handset select Low Medium or High The NC403TS Monitor will only display the Tone Volume Tone Volume and Voice Volume are both set to Mediu...

Page 11: ...the annunciation settings on that mas ter or monitor This is not a global change On the Call Filter page select which calls should be annunciated on the master station Use the check boxes and the All...

Page 12: ...h will indicate to the staff and personnel in the room of the station that an audio session is about to start Connection will show the IP address and Device ID that was originally entered when the mas...

Page 13: ...tus is annunciating the Status button on the right side of the screen turns red to notify staff Active statuses may be viewed by touching the Status button Touch the background or the Calls button to...

Page 14: ...rent levels of aid such as housekeeping or a nurse is needed Touch any of the levels of care to send out a request letting assigned staff know how to help the patient To clear an L1 through Attend eit...

Page 15: ...ables simultaneous audio to and from the sta tion like a telephone talk and listen simultaneously Half Duplex only allows audio to work from one station at a time like a radio push to talk release to...

Page 16: ...ules should be selected for that station To create additional rounding schedules please contact the facility technician for more information Touch Check In to see what days and times the patient has t...

Page 17: ...master station is watching Either pick up the handset or hold down the TALK button next to the handset to communicate with the selected group It is recommended to contact the facility s technician fo...

Page 18: ...g up the handset or press ing the TALK button will connect to that station placing a call Press the TALK button to speak and release the button to listen If more than one call is active on the system...

Page 19: ...nitor selected zones PRIORITY Cycle priority for selected station ZONE Select zone from list VOLUME Access master station volume dialog TONE SILENCE Disable audible call annunciation MENU Access drop...

Page 20: ...displays up to 4 incoming calls simultaneously and allows staff to select or scroll to any active call using navigational keys on the keypad Staff may answer calls via the loudspeaker controlled by t...

Page 21: ...n Menu Scroll through with the up and down arrows and press Enter to get to the different menu options Below is the tree view navigation chart of different options under the Main Menu Press Menu to ge...

Page 22: ...keyboard and press Alpha again to go back to using numbers Press Enter Use the arrows to scroll through each sec tion and press Enter to get to the right page Below is the tree view navigation chart o...

Page 23: ...e name Press the letter on the right side of the keyboard and press Alpha again to go back to using numbers Press Enter Use the arrows to scroll through each section and press Enter to get to the righ...

Page 24: ...Cycles between the different screens RESET Resets an audio connection or clears a selection TALK Establishes an audio connection MONITOR Monitor audio in selected zones ATTEND Display staff at select...

Reviews: