5
mm
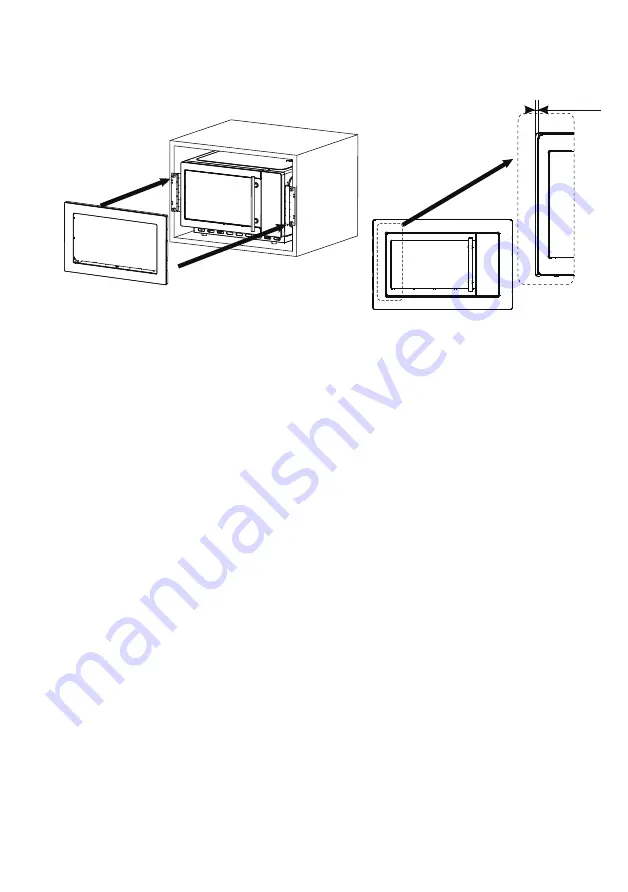
Installation
Warning
:
Wh
en
installing the product, please
maintain
the width
of Gap
A
at
more than 5mm,
to ensure easy and
unrestricted opening of the door
.
10
Page 1: ...STRUCTION MANUAL BIM20DBL BIM20DSS ead these instructions carefully before using your microwave oven and keep If you follow the instructions your will provide you with many years of good service Cod 0090300219 THESE INSTRUCTIONS ...
Page 2: ...crowave Rated Output Power Microwave Oven Capacity Turntable Diameter External Dimensions 2 BIM20DBL BIM20DSS 240V 50Hz 1300W 800W 20L 270mm 595x336x384mm ADDENDUM If the apparatus is not maintained in a good state of cleanliness its surface could become degraded This may affect the lifespan of the appliance and lead to a risk of danger to the user Specifications The appliance is not intended to b...
Page 3: ...ld be removed 7 Read and follow the specific PRECAU TIONS TO AVOID POSSIBLE EXPOSURE TO EXCESSIVE MICROWAVE ENERGY 8 When heating food in plastic or paper containers keep an eye on the oven due to the possibility of ignition 9 If smoke is observed switch off or unplug the appliance and keep the door closed in order to stifle any flames 10 Do not overcook food 11 Do not use the oven cavity for stor...
Page 4: ... their safety 25 Children should be supervised to ensure that they do not play with the appliance This appliance can be used by children aged 8 years and above and by persons with reduced physical sensory or mental capabilities or lack of experience and knowledge if they have been given supervision or instruction concerning use of the appliance in a safe way and understand the hazards involved Chi...
Page 5: ...g over a longer cable 2 If a long cable or extension cable is used 1 The marked electrical rating of the cable or extension cable should be the same as the electrical rating of the appliance 2 The extension cable must be earthed 3 A long cable should be placed so that it will not drape over the surface where it might be pulled on by children or tripped over unintentionally This appliance must be e...
Page 6: ... with supervision for a short term cooking only Use as a cover to prevent splattering or a wrap for steaming Microwave safe only Follow the manufacturer s instructions Should be labeled Microwave Safe Some plastic containers soften as the food inside gets hot Boiling bags and tightly closed plastic bags should be slit pierced or vented as directed by package Microwave safe only Use to cover food d...
Page 7: ...e carton and oven cavity Your oven comes with the following accessories 1 1 Glass Plate Turntable Ring Assembly Instruction Manual 1 Metal shields the food from microwave energy Metal trim may cause arcing May cause a fire in the oven Plastic foam may melt or contaminate the liquid inside when exposed to high temperature Wood will dry out when used in the microwave oven and may split or crack May ...
Page 8: ...stalled and connecting cable must only be replaced by a qualified electrician If the plug is no longer accessible following installation an all pole disconnecting device must be present on the installation side with a contact gap of at least 3mm 7 Adapters multi way strips and extension leads must not be used Overloading can result in a fire risk Turntable Ring Assembly a Never place the glass pla...
Page 9: ...9 Air out Air in 600mm 360mm 850mm Min 550mm 20mm Back panel open 45mm Step 1 Step 2 Step 3 Step 4 Installation Drawing 560mm ...
Page 10: ...5mm Installation Warning When installing the product please maintain the width of Gap A at more than 5mm to ensure easy and unrestricted opening of the door A A 10 ...
Page 11: ...hoose 80 microwave power 5 Press Clock to finish clock setting will flash and the time will Note 1 If the clock is not set it w not function when 2 During the process of setting if you press the oven will go back to the previous status automatically 11 2 Microwave Cooking Press the LED will display P100 Press to choose the power you want and P100 P80 P50 P30 or P10 will display for each to start c...
Page 12: ...m 100 to 2000 g 3 Press to start defrosting 1 2 In microwave cooking or defrost mode each press of will increase 30 seconds of cooking time microwave power then press to start cooking 3 5 Timed Defrost 4 Defrost Defrost Defrost 3 From start mode turn Quick Start Press START 30sec to start cooking with 100 power each additional press will increase cooking time by 30 seconds up to a maximum of 95 mi...
Page 13: ... Display A 2 Pizza A 3 Soup A 4 Meat A 5 Pasta A 6 Vegetable Potato A 8 Reheat 200 g 475 g 200 g 400 g 200 g 400 g 600 g 200 g 400 g 600 g 50 g 100 g 150 g 200 g 250 g 500 g 750 g A 1 Cake 200 g 475 g 200 g 400 g 200 g 400 g 600 g 200 g 400 g 600 g 50 g 100 g 150 g 200 g 400 g 600 g 250 g 500 g 750 g 600 g 400 g A 7 200 g 200 g 400 g 400 g 600 g 600 g 3 Press START 30sec to start cooking E If you ...
Page 14: ...ress Clock Microwave the current power will be displayed 3 seconds 9 Child Lock Function Lock In waiting state press child lock e and the locked indicator will display if the beep denoting that the lock is released Troubleshooting It is forbidden to run the unit without any food inside It is very dangerous START 30sec STOP Cancel for 2 seconds there will be a long beep time has been set otherwise ...
Page 15: ...ollected and treated f at any time in future you need to dispose of this product please do NOT dispose of with household waste Please send this product to WEEE collecting points where available Contact your local authority for details not able not correctly not working properly closed properly Problem v2 ...