Teknion HWBFBD Installation Manual Download Page 17

Section:
Description:

Page No:

Date: 

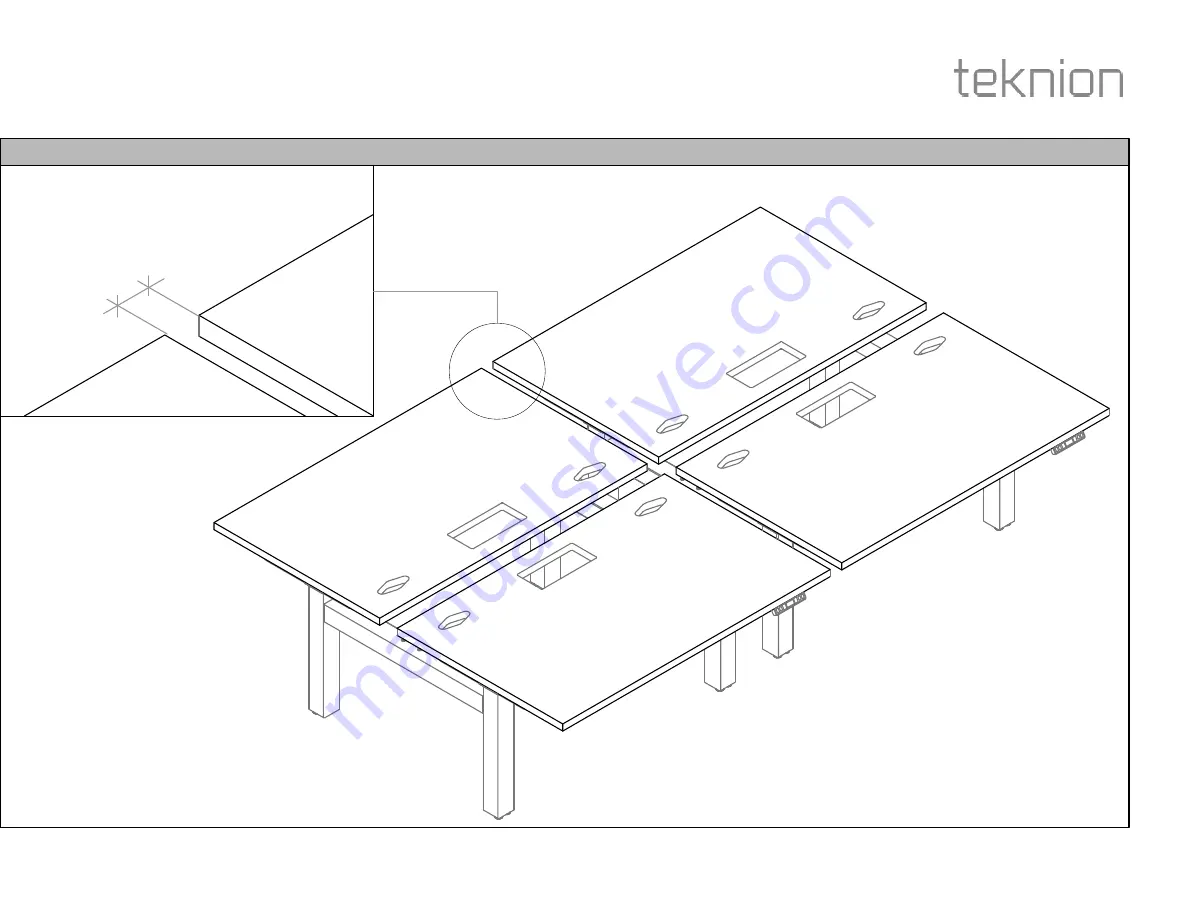
LINKING ASSEMBLYS: ALIGN WORKSURFACES

Feb 2022

17 of 21

HABH_112

FRAME DOUBLE-SIDED HAB

HEIGHT ADJUSTABLE BENCH

height-adjustable bench 

Installation Guides

STEP 20: Bring over 2nd Assembly and Align Worksurfaces so that they are 2" apart.

2"

Summary of Contents for HWBFBD

Page 1: ...unded Corners HWBWJD Double Sided Frame HWBFYD Double Sided Base Link HWBFBD and No Spine Screen Cover Plate HWBFTV Section Description Page No Date Rev No 0 FRAME DOUBLE SIDED HAB HEIGHT ADJUSTABLE BENCH Feb 2022 1 of 21 HABH_112 height adjustable bench Installation Guides A1 B2 B1 C1 C10 D1 E F1 F2 G ...

Page 2: ...1 4852 x4 C2 Keypad hiSpace Table D06 4276 x2 C4 Right Angle Connector Cable 1m Lg D06 4277 x4 C5 Cable Clamp B02 0558 x20 C6 5x25mm Wood Screw E01 1415 x4 C7 3x20mm Wood Screw E01 1416 x6 C3 Control Box w Anti Collision D06 4275 x2 C8 3 5x15mm Wood Screw E01 1417 x20 C9 3m Power Cord D06 4136 x2 C10 Cam Handle N09 9814 x4 D Frame Connecting Kit DS X01 4011 X D1 Frame Connecting Tube Assm DS N01 4...

Page 3: ...he ground with pilot holes facing up and align with eachother as shown Section Description Page No Date PLACE AND ALIGN WORKSURFACES ATTACH LEG MOUNT BRACKETS HABH_112 3 of 21 Feb 2022 FRAME DOUBLE SIDED HAB HEIGHT ADJUSTABLE BENCH height adjustable bench Installation Guides A1 B1 B4 NOTE Do not over tighten NOTE Worksurfaces upside down ...

Page 4: ...NT BARS Feb 2022 4 of 21 HABH_112 FRAME DOUBLE SIDED HAB HEIGHT ADJUSTABLE BENCH height adjustable bench Installation Guides STEP 3 Attach the Reinforcement Bars to the Worksurfaces and secure in place with provided screws B2 B4 NOTE Do not over tighten ...

Page 5: ...les Brackets should face towards the back of each Worksurface Section Description Page No Date ATTACH LEGS TO BRACKET SECURE LEGS 1 HABH_112 5 of 21 Feb 2022 FRAME DOUBLE SIDED HAB HEIGHT ADJUSTABLE BENCH height adjustable bench Installation Guides NOTE Make sure brackets are facing towards each other as shown here C1 ...

Page 6: ... 6 Install Cam Handles into Brackets and turn towards Leg to lock Section Description Page No Date SECURE LEGS TO BRACKET 2 SECURE LEGS TO BRACKET 3 HABH_112 6 of 21 Feb 2022 FRAME DOUBLE SIDED HAB HEIGHT ADJUSTABLE BENCH height adjustable bench Installation Guides C10 ...

Page 7: ...age No Date ATTACH LEVELERS TO LEGS Feb 2022 7 of 21 HABH_112 FRAME DOUBLE SIDED HAB HEIGHT ADJUSTABLE BENCH height adjustable bench Installation Guides STEP 8 Attach Levelers to Legs as shown Fasten by rotating clockwise E ...

Page 8: ...rackets on the Leg Assembly Section Description Page No Date ATTACH CONNECTING TUBES INSERT ALIGNMENT KIT HABH_112 8 of 21 Feb 2022 FRAME DOUBLE SIDED HAB HEIGHT ADJUSTABLE BENCH height adjustable bench Installation Guides NOTE Connecting Tubes should have holes facing each other as shown D1 B3 ...

Page 9: ...nce between Worksurfaces Section Description Page No Date ALIGN BOTH WORKSURFACES SECURE FRAME CONNECTING TUBES HABH_112 9 of 21 Feb 2022 FRAME DOUBLE SIDED HAB HEIGHT ADJUSTABLE BENCH height adjustable bench Installation Guides 3 3 NOTE Make sure the distance between Worksurfaces is equal on both ends D2 ...

Page 10: ...HABH_112 FRAME DOUBLE SIDED HAB HEIGHT ADJUSTABLE BENCH height adjustable bench Installation Guides STEP 13 Ensure the Space between Worksurfaces X remains equal throughout and that the sides of both worksurfaces Y direction line up Loosen up screws for adjustment if necessary X Y ...

Page 11: ...allation Guides STEP 14 Attach the Control Box to each Worksurface and secure using provided screws If Felt Cover Cable Organizer is specified refer to guide HABH_317 before installing the Control Box C3 NOTE Do not over tighten C6 NOTE If Felt Cover Cable Organizer is specified refer to guide HABH_317 before installing the Control Box ...

Page 12: ... No Date ATTACH CONNECTOR Feb 2022 12 of 21 HABH_112 FRAME DOUBLE SIDED HAB HEIGHT ADJUSTABLE BENCH height adjustable bench Installation Guides STEP 15 Attach Control Boxes to Legs using the Connector Cables as shown C1 C4 C4 ...

Page 13: ...HT ADJUSTABLE BENCH height adjustable bench Installation Guides STEP 16 Secure one Keypad to Worksurface and connect it to the appropriate Control Box using attached cable Attach Power Cords to each Control box C2 C7 NOTE Do not over tighten C9 C2 NOTE Only Install one Switch to avoid damage when flipping the assembly ...

Page 14: ...CURE LOOSE WIRE Feb 2022 14 of 21 HABH_112 FRAME DOUBLE SIDED HAB HEIGHT ADJUSTABLE BENCH height adjustable bench Installation Guides STEP 17 Secure loose wire neatly to the Worksurfaces using Cable Clamps C8 NOTE Do not over tighten C5 ...

Page 15: ...Date FLIP OVER TABLE Feb 2022 15 of 21 HABH_112 FRAME DOUBLE SIDED HAB HEIGHT ADJUSTABLE BENCH height adjustable bench Installation Guides STEP 18 Flip over the Table NOTE Please make sure to have at least two people for this step ...

Page 16: ...No Date INSTALL REMAINING SWITCH Feb 2022 16 of 21 HABH_112 FRAME DOUBLE SIDED HAB HEIGHT ADJUSTABLE BENCH height adjustable bench Installation Guides STEP 19 Please refer to Step 16 and Step 17 to install the remaining switch ...

Page 17: ...INKING ASSEMBLYS ALIGN WORKSURFACES Feb 2022 17 of 21 HABH_112 FRAME DOUBLE SIDED HAB HEIGHT ADJUSTABLE BENCH height adjustable bench Installation Guides STEP 20 Bring over 2nd Assembly and Align Worksurfaces so that they are 2 apart 2 ...

Page 18: ... HAB HEIGHT ADJUSTABLE BENCH height adjustable bench Installation Guides STEP 21 Ensure Bench is level Rotate Levelers as needed to adjust height This step will be repeated after Base Link is installed NOTE If the difference in floor elevation between frames is 1 1 8 they cannot be linked Level ...

Page 19: ...Frame Connecting Tubes and Secure using provided screws Section Description Page No Date ATTACH BASE LINK ATTACH BASE LINK COVER HABH_112 19 of 21 Feb 2022 FRAME DOUBLE SIDED HAB HEIGHT ADJUSTABLE BENCH height adjustable bench Installation Guides NOTE Worksurfaces are hidden for the sake of illustration F3 F1 F2 ...

Page 20: ...E SIDED HAB HEIGHT ADJUSTABLE BENCH height adjustable bench Installation Guides STEP 24 Repeat Step 21 to ensure entire Bench is level for both Width and Depth Laser Level NOTE It is recommended to use a laser level tool to check final alignment NOTE The unit must be levelled at the exact location of use ...

Page 21: ...f 21 HABH_112 FRAME DOUBLE SIDED HAB HEIGHT ADJUSTABLE BENCH height adjustable bench Installation Guides STEP 25 Attach Post Cap to the bench as shown Note No Spine Screen Cover Plate is used only if no screen is used It is used to cover inserts Work Surface is hidden for Illustration purpose G ...

Reviews: