background image

 å

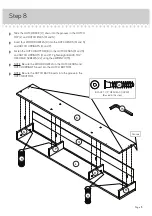
Slide the HUTCH BACK (Q) down into the grooves in the HUTCH
TOP (L) and HUTCH ENDS (M and N).

 å

Insert four WOOD DOWELS (9) into the HUTCH ENDS (M and N)
and HUTCH UPRIGHTS (O and P).

 å

Fasten the HUTCH BOTTOM (K) to the HUTCH ENDS (M and N)
and HUTCH UPRIGHTS (O and P). Tighten eight BLACK 1-1/2" 
HEX HEAD SCREWS (22) using the L-WRENCH (15).

 å

NOTE: Be sure the WOOD DOWELS in the HUTCH ENDS and
HUTCH UPRIGHTS insert into the HUTCH BOTTOM.

 å

NOTE: Be sure the HUTCH BACK inserts into the groove in the
HUTCH BOTTOM.

Step 8

Page 13

M

N

P

O

K

Q

Groove

9

BLACK 1-1/2" HEX HEAD SCREW

(8 used in this step)

15

9

L

22

Summary of Contents for Mahattan View 5423446

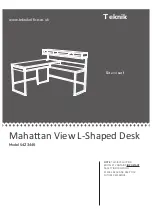
Page 1: ...www teknikoffice co uk Mahattan View L Shaped Desk Model 5423446 NOTE THIS INSTRUCTION BOOKLET CONTAINS IMPORTANT SAFETY INFORMATION PLEASE READ AND KEEP FOR FUTURE REFERENCE Sit and surf Teknik ...

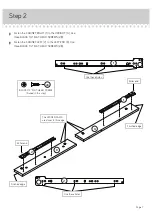
Page 2: ...bly Tools Required 3 4 5 6 27 28 31 32 35 36 38 39 Part Identification Hardware Identification Assembly Steps Français Español Safety Warranty No 2 Phillips Screwdriver Tip Shown Actual Size Skip the power trip This time Page 2 ...

Page 3: ...RIGHT END 1 J RETURN BACK 1 K HUTCH BOTTOM 1 L HUTCH TOP 1 M LEFT HUTCH END 1 N RIGHT HUTCH END 1 O LEFT HUTCH UPRIGHT 1 P RIGHT HUTCH UPRIGHT 1 Q HUTCH BACK 1 R DRAWER FRONT 1 S LEFT DRAWER SIDE 1 T RIGHT DRAWER SIDE 1 U DRAWER BACK 1 V DRAWER BOTTOM 1 W DRAWER BRACE 2 X RIGHT RETURN FRAME 1 Y LEFT RETURN FRAME 1 Z DESK FRAME 1 AA LOWER RETURN MOLDING 1 BB UPPER RETURN MOLDING 2 CC HUTCH MOLDING ...

Page 4: ...h your unit Page 4 SMALL HIDDEN CAM 8 7 WOOD DOWEL 22 9 L WRENCH 1 15 LARGE HIDDEN CAM 19 5 LARGE CAM SCREW 19 6 SMALL CAM SCREW 8 8 METAL PIN 2 10 MAGNETIC CATCH 1 11 GROMMET 3 12 CABINET RIGHT 1 1 CABINET LEFT 1 2 DRAWER RIGHT 1 3 DRAWER LEFT 1 4 APPLIQUE CARD 6 13 GROMMET WITH CAP 1 14 ...

Page 5: ...HEX HEAD SCREW 2 20 BLACK 1 1 2 HEX HEAD SCREW 19 22 BLACK 1 2 FLAT HEAD SCREW 12 28 BLACK 9 16 FLAT HEAD SCREW 3 27 BLACK 1 TAPERED MACHINE SCREW 5 26 BLACK 1 3 8 HEX HEAD SCREW 5 23 BLACK 1 9 16 HEX HEAD SCREW 10 21 BLACK 1 3 8 FLAT HEAD SCREW 8 24 BLACK 1 3 8 TAPERED MACHINE SCREW 2 25 BLACK 7 16 HEX HEAD SCREW 20 29 ...

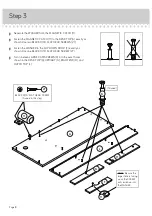
Page 6: ...ineteen LARGE HIDDEN CAMS 5 into the LEFT END D REAR PANEL E UPRIGHT G RIGHT END H HUTCH ENDS M and N HUTCH UPRIGHTS O and P and DIVIDER EE Page 6 Arrow 5 5 Arrow Arrow The arrow in the HIDDEN CAM must point toward the hole in the edge of the board Hole Arrow 5 19 used D E G H M N P EE O Some assembly and snacks required ...

Page 7: ...T HEAD SCREWS 28 å Fasten the CABINET LEFT 2 to the LEFT END D Use three BLACK 1 2 FLAT HEAD SCREWS 28 G D BLACK 1 2 FLAT HEAD SCREW 6 used in this step 28 Roller end Use these holes Use these holes 1 1 2 2 Roller end Finished edge Finished edge The HIDDEN CAMS are closer to this edge ...

Page 8: ...sten the WASHER to the FLIP DOWN DOOR F exactly as shown Use one BLACK 9 16 FLAT HEAD SCREW 27 å Turn nineteen LARGE CAM SCREWS 6 into the exact holes shown in the DESK TOP A UPRIGHT G RIGHT END H and HUTCH TOP L 6 19 used 11 11 BLACK 9 16 FLAT HEAD SCREW 3 used in this step 27 A NOTE Be sure the larger hole is facing up so the SCREW will seat down into the WASHER L H G F ...

Page 9: ...EN CAMS å NOTE Be sure the WOOD DOWELS in the UPRIGHT and RIGHT END insert into the DIVIDER å Insert six WOOD DOWELS 9 into the DESK TOP A å Fasten the ENDS D and H and UPRIGHT G to the DESK TOP A Tighten six HIDDEN CAMS å NOTE Be sure the WOOD DOWELS in the DESK TOP insert into the ENDS and UPRIGHT 9 9 EE H G D Surface with HIDDEN CAMS 9 A H G 1 2 ...

Page 10: ...Position the REAR PANEL E and FLIP DOWN DOOR F exactly as shown å Insert the METAL PIN in the other end of the FLIP DOWN DOOR F into the RIGHT END H keeping the REAR PANEL E connected to the FLIP DOWN DOOR F å Fasten the REAR PANEL E to the DESK TOP A Tighten three HIDDEN CAMS å NOTE Be sure the WOOD DOWELS in the DESK TOP insert into the REAR PANEL 10 Washer Surface with HIDDEN CAMS 9 F E F E A H...

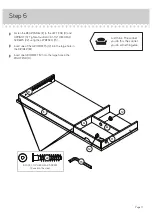
Page 11: ...sing the L WRENCH 15 å Insert one of the GROMMETS 12 into the large hole in the DIVIDER EE å Insert one GROMMET 12 into the large hole in the RIGHT END H Step 6 Page 11 15 D G E BLACK 1 1 2 HEX HEAD SCREW 4 used in this step 22 EE 12 Just think The sooner you do this the sooner you do something else 12 H ...

Page 12: ...P L Fasten the HUTCH ENDS M and N and HUTCH UPRIGHTS O and P to the HUTCH TOP L Tighten eight HIDDEN CAMS å NOTE Be sure the WOOD DOWELS in the HUTCH TOP insert into the HUTCH ENDS and HUTCH UPRIGHTS M L 9 9 Finished edge Finished edge Groove Groove Groove N P O ...

Page 13: ...BOTTOM K to the HUTCH ENDS M and N and HUTCH UPRIGHTS O and P Tighten eight BLACK 1 1 2 HEX HEAD SCREWS 22 using the L WRENCH 15 å NOTE Be sure the WOOD DOWELS in the HUTCH ENDS and HUTCH UPRIGHTS insert into the HUTCH BOTTOM å NOTE Be sure the HUTCH BACK inserts into the groove in the HUTCH BOTTOM Step 8 Page 13 M N P O K Q Groove 9 BLACK 1 1 2 HEX HEAD SCREW 8 used in this step 15 9 L 22 ...

Page 14: ... the MOLDINGS AA and BB onto the LEFT RETURN FRAME Y å Fasten the MOLDINGS AA and BB to the LEFT RETURN FRAME Y Tighten six BLACK 7 16 HEX HEAD SCREWS 29 using the L WRENCH 15 Y AA BB BB 15 BLACK 7 16 HEX HEAD SCREW 6 used in this step 29 Surface with more holes Surface with holes ...

Page 15: ...EWS in this step å Slide the RIGHT RETURN FRAME X into the MOLDINGS AA and BB å Fasten the RIGHT RETURN FRAME X to the MOLDINGS AA and BB Tighten six BLACK 7 16 HEX HEAD SCREWS 29 using the L WRENCH 15 X AA BB BB BLACK 7 16 HEX HEAD SCREW 6 used in this step 29 ...

Page 16: ...Tighten four BLACK 7 16 HEX HEAD SCREWS 29 using the L WRENCH 15 å NOTE Position the HUTCH MOLDING CC exactly as shown å Completely tighten all of the SCREWS in the frame X Y CC 15 BLACK 7 16 HEX HEAD SCREW 4 used in this step 29 Now might be a good time to refresh your drink ...

Page 17: ...K to the RETURN FRAMES X and Y and HUTCH MOLDING CC Tighten five BLACK 1 3 8 HEX HEAD SCREWS 23 using the L WRENCH 15 å NOTE Start each SCREW a few turns before tightening any of them K 15 X Y CC BLACK 1 3 8 HEX HEAD SCREW 5 used in this step 23 ...

Page 18: ...S X and Y and UPPER RETURN MOLDINGS BB Tighten ten BLACK 1 9 16 HEX HEAD SCREWS 21 using the L WRENCH 15 å NOTE Start each SCREW a few turns before tightening any of them X Y BB BB B 15 These holes must be here BLACK 1 9 16 HEX HEAD SCREW 10 used in this step 21 ...

Page 19: ... BLACK 1 1 2 HEX HEAD SCREWS 22 using the L WRENCH 15 å NOTE Start each SCREW a few turns before tightening any of them å NOTE Be sure the WOOD DOWELS in the RETURN BACK insert into the RETURN TOP å Insert one GROMMET 12 into the large hole in the RETURN BACK J Surface with fewer holes 9 J B 12 15 BLACK 1 1 2 HEX HEAD SCREW 4 used in this step The holes are closer to this edge 22 ...

Page 20: ...two BLACK 7 16 HEX HEAD SCREWS 29 using the L WRENCH 15 å Fasten the LOWER DESK MOLDING DD to the LEFT RETURN FRAME Y Tighten two BLACK 7 16 HEX HEAD SCREWS 29 using the L WRENCH 15 Page 20 15 Y DD DD Z J BLACK 7 16 HEX HEAD SCREW 4 used in this step 29 Surface with holes ...

Page 21: ...he WOOD DOWELS in the RETURN TOP å Fasten the UPRIGHT G to the RETURN TOP B Tighten two BLACK 1 7 8 HEX HEAD SCREWS 20 using the L WRENCH 15 å Fasten the DESK TOP A to the DESK FRAME Z Tighten two BLACK 1 3 8 TAPERED MACHINE SCREWS 25 using the L WRENCH 15 15 BLACK 1 7 8 HEX HEAD SCREW 2 used for the UPRIGHT 20 B A 9 G BLACK 1 3 8 TAPERED MACHINE SCREW 2 used for the DESK FRAME 25 Z ...

Page 22: ... 2 HEX HEAD SCREWS 22 using the L WRENCH 15 å Fasten the RETURN BACK J to the RIGHT END H Tighten two BLACK 1 TAPERED MACHINE SCREWS 26 using the L WRENCH 15 Page 22 15 J A H BLACK 1 TAPERED MACHINE SCREW 2 used in this step 26 BLACK 1 1 2 HEX HEAD SCREW 3 used in this step 22 ...

Page 23: ... the LEFT END D Tighten three BLACK 1 TAPERED MACHINE SCREWS 26 using the L WRENCH 15 Step 18 Page 23 15 D C BLACK 1 TAPERED MACHINE SCREW 3 used in this step 26 The holes are closer to this edge Almost time to celebrate With a nap ...

Page 24: ...L CAM SCREWS 8 into the DRAWER FRONT R å Push eight SMALL HIDDEN CAMS 7 into the DRAWER SIDES S and T and DRAWER BRACES W 8 The arrow in the HIDDEN CAM must point toward the hole in the edge of the board 8 used Arrow 7 8 used R W T S W ...

Page 25: ...ve of the DRAWER BACK U 1 2 3 å Fasten the DRAWER SIDES S and T and DRAWER BRACES W to the DRAWER FRONT R Tighten eight HIDDEN CAMS å Slide the DRAWER BOTTOM V into the grooves in the DRAWER SIDES S and T and DRAWER FRONT R Groove Be sure the DRAWER BOTTOM inserts into the DRAWER FRONT groove Be sure the DRAWER BOTTOM inserts into the DRAWER BACK groove Surface with HIDDEN CAMS W T S W R T S R V W...

Page 26: ...RAWER SIDE T Use three BLACK 1 2 FLAT HEAD SCREWS 28 å Fasten the DRAWER LEFT 4 to the LEFT DRAWER SIDE S Use three BLACK 1 2 FLAT HEAD SCREWS 28 BLACK 1 2 FLAT HEAD SCREW 6 used in this step 28 S T 4 3 Roller end Roller end Use these holes Use these holes 3 4 ...

Page 27: ...ift the front of the drawer up and slide it into the unit å Peel APPLIQUES from the APPLIQUE CARD 13 and stick them onto each visible HIDDEN CAM SCREW head å NOTE Please read the back pages of the instruction booklet for important safety information Step 22 Page 27 å This completes assembly Clean with a damp cloth Wipe dry To cover HIDDEN CAMS To cover screws 15 lbs 25 lbs total 50 lbs 60 lbs 13 1...

Page 28: ...y moving furniture that is not designed and equipped with casters Furniture can tip over or break if improperly moved Physical injury Furniture can be very heavy Breakage of tops particularly with double pedestal furniture drawers at both ends Unload shelves and drawers from top to bottom before moving the unit Do not push furniture especially on a carpeted floor Have a friend help you lift the ite...

Reviews: