
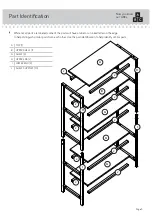


Step 1
å
Assemble your unit on a carpeted fl oor or on the empty carton to avoid scratching your unit or the fl oor.
å
NOTE: You should start each SCREW a few turns before completely tightening any of them.
å
Insert the LOWER END (I) into the UPPER END (H).
å
Then, fasten the UPPER END (H) to the LOWER END (I). Use four 1/2" ALLEN SCREWS (3) and the ALLEN WRENCH (8).
å
Repeat this step for the other ENDS (H and I).
H
I
1/2" ALLEN SCREW
(8 used in this step)
3
H
I
8
Page 5