Instructions for assembly
GB
27
Clips
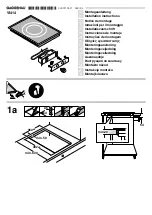
• Drive the clips into the worktop cut-out at
the intervals indicated. It is not necessary
to adjust the height due to the horizontal
stop.
• Important! The horizontal drive of the clips
must be flush with the worktop (avoid the
risk of fractures)
• Position the hob according to the
illustration on the left side (a), align it (b)
and insert the clips (c).
• Screws may be used to fasten the clips.
Important!
There is a risk of breakage if the hob is
canted or subjected to stress during
installation!
Minimum distance to adjacent walls
Cut-out dimension
Outer dimensions of the hob
Cable routing in rear wall
Installation height
Bracket
• Insert the hob and align it.
• From the bottom, insert the brackets with
screws in the holes provided for fastening
the brackets, align the brackets and screw
them tight.
• Tighten the screws with a hand screw
driver only; do not use a battery-operated
screw driver.
• In the case of thin worktops make sure
that the brackets are correctly positioned.
Important!
There is a risk of breakage if the hob is
canted or subjected to stress during
installation!
Minimum distance to adjacent walls
Cut-out dimension
Outer dimensions of the hob
Cable routing in rear wall
Installation height


