background image

EN

13

6

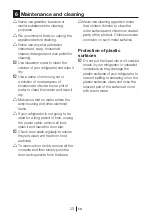
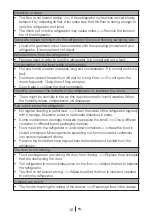
  Maintenance and cleaning

A

 Never use gasoline, benzene or 

similar substances for cleaning 
purposes.

B

 We recommend that you unplug the 

appliance before cleaning.

B

 Never use any sharp abrasive 

instrument, soap, household 
cleaner, detergent and wax polish for 
cleaning.

C

 Use lukewarm water to clean the 

cabinet of your refrigerator and wipe it 
dry.

C

 Use a damp cloth wrung out in 

a solution of one teaspoon of 
bicarbonate of soda to one pint of 
water to clean the interior and wipe it 
dry.

B

 Make sure that no water enters the 

lamp housing and other electrical 
items.

B

 If your refrigerator is not going to be 

used for a long period of time, unplug 
the power cable, remove all food, 
clean it and leave the door ajar.

C

 Check door seals regularly to ensure 

they are clean and free from food 
particles.

A

 To remove door racks, remove all the 

contents and then simply push the 
door rack upwards from the base.

A

Never use cleaning agents or water 

that contain chlorine to clean the 
outer surfaces and chromium coated 
parts of the product. Chlorine causes 
corrosion on such metal surfaces.

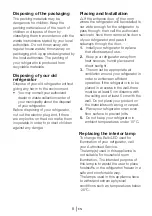
Protection of plastic 

surfaces 

C

  Do not put the liquid oils or oil-cooked 

meals in your refrigerator in unsealed 
containers as they damage the 
plastic surfaces of your refrigerator. In 
case of spilling or smearing oil on the 
plastic surfaces, clean and rinse the 
relevant part of the surface at once 
with warm water.

Summary of Contents for CI3 342

Page 1: ...CI3 342 RU Руководство по эксплуатации ...

Page 2: ...emember that this user manual is also applicable for several other models Differences between models will be identified in the manual Explanation of symbols Throughout this user manual the following symbols are used CImportant information or useful tips AWarning against dangerous conditions for life and property BWarning against electric voltage 1 EN This product is supplied with the selective sor...

Page 3: ...n to when the relocation of the refrigerator Before you start the refrigerator lectrical connection Disposing of the packaging 8 Disposing of your old refrigerator 8 Placing and Installation 8 Replacing the interior lamp 8 e ersin the doors CONTENTS 4 Preparation 10 6 Maintenance and cleaning 13 Protection of plastic surfaces 1 7 Troubleshooting 14 5 Using your refrigerator 11 Control Panel 1 Defr...

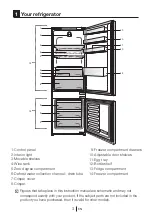
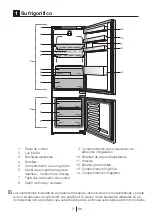
Page 4: ... then it is valid for other models 1 Your refrigerator 9 Freezer compartment dra ers 10 Adjustable door shelves 11 Egg tray 12 Bottle shelf 13 Fridge compartment 14 Freezer compartment 1 Control panel 2 Interior light 3 Movable shelves 4 Wine rack 5 Zero degree compartment 6 Defrost water collection channel drain tube 7 Crisper cover 8 Crisper C 2 9 9 3 4 9 3 10 6 1 13 14 11 8 7 10 5 10 12 ...

Page 5: ...o not put bottled and canned liquid beverages in the freezer compartment Otherwise these may burst Do not touch frozen food by hand they may stick to your hand Unplug your refrigerator before cleaning or defrosting Vapor and vaporized cleaning materials should never be used in cleaning and defrosting processes of your refrigerator In such cases the vapor may get in contact with the electrical part...

Page 6: ...ications is located on the left wall inside the refrigerator Never connect your refrigerator to electricity saving systems they may damage the refrigerator If there is a blue light on the refrigerator do not look at the blue light with optical tools For manually controlled refrigerators wait for at least 5 minutes to start the refrigerator after power failure This operation manual should be handed...

Page 7: ...ich the unit is placed Ignore this warning if your product s cooling system contains R134a Type of gas used in the product is stated in the type label which is on the left wall inside the refrigerator Never throw the product in fire for disposal HCA warning If your product s cooling system contains R600a This gas is flammable Therefore pay attention to not damaging the cooling system and piping du...

Page 8: ... cleaning section 3 Connect the plug of the refrigerator to the wall socket When the fridge door is opened fridge internal lamp will turn on Electrical connection Connect your product to a grounded socket which is being protected by a fuse with the appropriate capacity Important The connection must be in compliance with national regulations The power plug must be easily accessible after installati...

Page 9: ...of your refrigerator is produced from recyclable materials Disposing of your old refrigerator Dispose of your old refrigerator without giving any harm to the environment You may consult your authorized dealer or waste collection center of your municipality about the disposal of your refrigerator Before disposing of your refrigerator cut out the electric plug and if there are any locks on the door ...

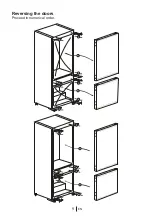
Page 10: ...e ersing t e doors Proceed in numerical order 9 EN 1 4 3 6 2 5 7 8 9 10 16 18 19 20 14 15 17 12 13 11 ...

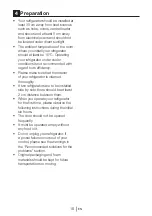
Page 11: ... make sure that the interior of your refrigerator is cleaned thoroughly If two refrigerators are to be installed side by side there should be at least 2 cm distance between them When you operate your refrigerator for the first time please observe the following instructions during the initial six hours The door should not be opened frequently It must be operated empty without any food in it Do not ...

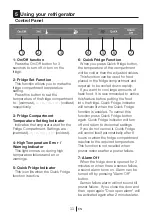
Page 12: ...his function can be used for food placed in the fridge compartment and required to be cooled down rapidly If you want to cool large amounts of fresh food it is recommended to active this feature before putting the food into the fridge Quick Fridge indicator will remain lit when the Quick Fridge function is enabled To cancel this function press Quick Fridge button again Quick Fridge indicator will ...

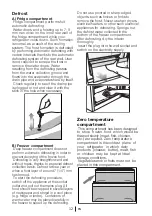
Page 13: ...he defrost water collected in the bottom of the freezer compartment After defrosting dry the interior thoroughly Insert the plug into the wall socket and switch on the electricity supply B Freezer compartment Deep free er compartment does not perform automatic defrostin in order to pre ent decayin of the fro en food Defrosting is very straightforward and without mess thanks to a special defrost co...

Page 14: ...not going to be used for a long period of time unplug the power cable remove all food clean it and leave the door ajar C Check door seals regularly to ensure they are clean and free from food particles A To remove door racks remove all the contents and then simply push the door rack upwards from the base ANever use cleaning agents or water that contain chlorine to clean the outer surfaces and chro...

Page 15: ...th liquid content in open containers Door of the refrigerator is left ajar Close the door of the refrigerator Thermostat is set to a very cold level Set the thermostat to a suitable level Compressor is not running Protective thermic of the compressor will blow out during sudden power failures or plug out plug ins as the refrigerant pressure in the cooling system of the refrigerator has not been ba...

Page 16: ...efrigerator to run for a longer period of time in order to maintain the current temperature Freezer temperature is very low while the fridge temperature is sufficient The freezer temperature is adjusted to a very low value Adjust the freezer temperature to a warmer degree and check Fridge temperature is very low while the freezer temperature is sufficient The fridge temperature is adjusted to a ve...

Page 17: ...of the refrigerator or between the doors There might be humidity in the air this is quite normal in humid weather When the humidity is less condensation will disappear Bad odour inside the refrigerator No regular cleaning is performed Clean the inside of the refrigerator regularly with a sponge lukewarm water or carbonate dissolved in water Some containers or package materials may cause the smell ...

Page 18: ...arato en a en cuenta ue este manual tambi n podría ser álido para otros modelos Símbolos y sus descripciones l presente manual de instrucciones emplea los si uientes símbolos C nformaci n importante o consejos tiles sobre el funcionamiento A d ertencia sobre situaciones peli rosas para la ida y la propiedad B d ertencia acerca de la tensi n el ctrica 1 ES Este producto incorpora el símbolo de reco...

Page 19: ... hora de transportar el fri orífico ntes de usar el fri orífico one iones el ctricas liminaci n del embalaje liminaci n de su iejo fri orífico 8 olocaci n e instalaci n 8 ustituci n de la bombilla interior 8 n ersi n de las puertas 4 Preparación 10 5 Uso del frigorífico 11 anel de control Deshielo 6 Mantenimiento y limpieza 13 rotecci n de las superficies de plástico 7 Sugerencias para la solución...

Page 20: ...lero ompartimento de cero rados anal de reco ida del a ua de deshielo onducto de drenaje apa del contenedor de erdura 8 aj n de frutas y erduras ompartimentos de conser aci n de alimentos con elados stantes de la puerta ajustables ue era stante para botellas ompartimento fri orífico ompartimento con elador C as ilustraciones incluidas en el presente manual de instrucciones son es uemáticas y puede...

Page 21: ...rían adherirse a ella Desenchufe su fri orífico antes de proceder a su limpie a o deshielo o utilice nunca materiales de limpie a ue usen apor para limpiar o descon elar el fri orífico l apor podría entrar en contacto con los elementos el ctricos y causar cortocircuitos o descar as el ctricas o utilice nunca elementos del fri orífico tales como la puerta como medio de sujeci n o como escal n o uti...

Page 22: ...os pticos n los fri oríficos de control manual si se produce un corte del fluido el ctrico espere al menos minutos antes de ol er a ponerlo en marcha uando entre ue este aparato a un nue o propietario ase rese de entre ar tambi n este manual de instrucciones en a cuidado de no da ar el cable de alimentaci n al transportar el fri orífico Doblar el cable podría causar un incendio unca deposite objet...

Page 23: ...l aparato al fue o Advertencia sobre la seguridad de la salud Si el sistema de refrigeración de su aparato contiene R600a ste as es inflamable or lo tanto procure no da ar el sistema de enfriamiento ni sus conductos durante el uso o el transporte del aparato n caso de da os manten a el aparato alejado de fuentes potenciales de i nici n ue puedan pro ocar ue ste sufra un incendio y entile la estanc...

Page 24: ... del fri orífico la lu interior del compartimento fri orífico se enciende e oye un ruido cada e ue el compresor se pone en funcionamiento l lí uido y los ases contenidos en el sistema de refri eraci n pueden tambi n enerar ruidos incluso aun ue el compresor no est funcionando lo cual es normal s posible ue las aristas delanteras del aparato se noten calientes al tacto cosa ue es perfectamente norm...

Page 25: ... posici n directa a la lu solar 3 ara ue el fri orífico funcione con la má ima eficacia debe instalarse en una ona ue dispon a de una entilaci n adecuada i el fri orífico a a instalarse en un hueco de la pared debe dejarse un mínimo de cm de separaci n con el techo y de cm con las paredes i el suelo está cubierto con una alfombra deberá ele ar el fri orífico cm del suelo 4 olo ue el fri orífico so...

Page 26: ...Inversión de las puertas roceder en orden num rico 9 1 4 3 6 2 5 7 8 9 10 16 18 19 20 14 15 17 12 13 11 ...

Page 27: ...ede er reducida su eficacia se rese de limpiar meticulosamente el interior del fri orífico n caso de ue aya a instalar dos fri oríficos uno al lado del otro debe dejar una separaci n no inferior a cm entre ellos l utili ar el fri orífico por primera e si a las si uientes instrucciones referentes a las primeras seis horas o abra la puerta con frecuencia o deposite alimentos en el interior o desench...

Page 28: ... el compartimento fri orífico i desea enfriar randes cantidades de alimentos frescos se recomienda acti ar esta funci n antes de depositar los alimentos en el fri orífico l indicador de refri eraci n rápida permanecerá encendido mientras la funci n de refri eraci n rápida est acti a ara cancelar esta funci n pulse nue amente el bot n de refri eraci n rápida l indicador de refri eraci n rápida se a...

Page 29: ...el a ua de deshielo depositada en la parte inferior del compartimento del con elador na e finali ado el deshielo secar completamente el interior nserte el enchufe en la toma de corriente y encender el interruptor l compartimento del con elador no reali a nin n desescarche automático para e itar cual uier efecto sobre los alimentos con elados El deshielo es muy sencillo y no presenta complicaciones...

Page 30: ...ri orífico durante un periodo prolon ado desench felo retire todos los alimentos límpielo y deje la puerta entreabierta C ompruebe re ularmente los cierres herm ticos de la puerta para ase urarse de ue est n limpios y sin restos de alimentos C ara e traer las bandejas de la puerta retire todo su contenido y a continuaci n simplemente empuje la bandeja hacia arriba desde su base C unca use a entes ...

Page 31: ...n a el termostato a una temperatura más baja Deje la puerta abierta durante menos tiempo o ábrala con menor frecuencia ubra los alimentos almacenados en recipientes abiertos con un material adecuado nju ue el a ua condensada con un pa o seco y compruebe si la condensaci n persiste l compresor no funciona l dispositi o t rmico protector del compresor saltará en caso de un corte s bito de ener ía o ...

Page 32: ...peratura del con elador es muy baja mientras ue la del fri orífico es correcta a temperatura del con elador está ajustada a un alor muy bajo juste la temperatura del con elador a un alor más ele ado y compruebe a temperatura del fri orífico es muy baja mientras ue la del con elador es correcta a temperatura del compartimento fri orífico está ajustada a un alor muy bajo juste la temperatura del fri...

Page 33: ... ería as puertas están entreabiertas se rese de ue las puertas est n completamente cerradas s posible ue las puertas se hayan estado abriendo con frecuencia o ue se hayan dejado abiertas durante un periodo prolon ado bra las puertas con menor frecuencia ay humedad en el e terior del fri orífico o entre las puertas uede ue haya humedad ambiental sto es perfectamente normal en climas h medos uando e...

Page 34: ... bser e ue este manual tamb m pode ser álido para outros modelos Os símbolos e as suas descrições ste manual de instru es cont m os se uintes símbolos C nforma es importantes ou dicas teis de utili a o A iso sobre as condi es de risco para a ida e a propriedade B iso sobre a olta em el ctrica PT Este produto ostenta o símbolo de classificação selectiva para resíduos de equipamentos eléctricos e el...

Page 35: ... no amente o seu fri orífico ntes de funcionar o seu fri orífico limina o da embala em limina o do seu fri orífico elho 8 oloca o e instala o 8 ubstitui o da l mpada interior 8 n erter as portas CONTEÚDO 4 Preparação 10 5 Utilizar o seu frigorífico 11 ainel de controlo Descon ela o 6 Manutenção e limpeza 13 rotec o das superfícies plásticas 7 Soluções recomendadas para os problemas 14 ompartimento...

Page 36: ...as de inho ompartimento ero raus anal de recolha da á ua da descon ela o tubo de drena em ampa do recipiente para e etais 8 ecipiente para e etais ompartimentos para alimentos con elados rateleiras da porta ajustá eis abuleiro para o os rateleira para arrafas ompartimento do refri erador ompartimento do con elador C s uras ue aparecem neste manual de instru es s o es uemáticas e podem n o 2 9 9 3 ...

Page 37: ...s de limpe a e descon ela o do seu fri orífico unca use as partes do seu fri orífico tal como a porta como meios de apoio ou de rau o utili e dispositi os el ctricos dentro do fri orífico o danifi ue as partes por onde circula a refri era o com ferramentas perfurantes ou cortantes refri erante ue pode e plodir uando os canais de ás do e aporador as e tens es do tubo ou os re estimentos da superfíc...

Page 38: ...a o de erá ser apori ado directamente nas partes interiores ou interiores do produto de ido a ra es de se uran a ara e itar risco de inc ndio e e plos o n o apori e subst ncias ue contenham ases inflamá eis tais como ás propano etc pr imo ao fri orífico o colo ue recipientes ue contenham á ua sobre o topo do fri orífico isto ue tal poderá resultar em cho ue el ctrico ou inc ndio o sobrecarre ue o ...

Page 39: ...parede es uerda no interior do fri orífico unca elimine o seu produto no fo o o dei e as portas do seu fri orífico abertas durante muito tempo o colo ue alimentos ou bebidas uentes no seu fri orífico o sobrecarre ue o seu fri orífico para ue a circula o do ar no interior n o seja dificultada o instale o seu fri orífico sob a lu solar directa ou pr imo de aparelhos ue emitem calor tais como fornos ...

Page 40: ...o fri orífico tomada el ctrica lu interior acender se á uando a porta do fri orífico for aberta 4 u irá um ruído uando o compressor come ar a trabalhar lí uido e os ases no interior do sistema de refri era o tamb m podem fa er al um ruído mesmo ue o compressor n o esteja a funcionar o ue perfeitamente normal 5 s arestas da frente do fri orífico podem ficar uentes sto normal stas arestas s o projec...

Page 41: ...ontes de calor lu ares h midos e lu solar directa 3 De e e istir uma circula o de ar ade uada olta do seu fri orífico para ue obtenha um funcionamento eficiente e o fri orífico for colocado numa reentr ncia da parede de e ha er uma dist ncia mínima de cm do tecto e pelo menos cm da parede e o piso for coberto por alcatifa o seu produto de e ter uma ele a o de cm do ch o 4 olo ue o seu fri orífico ...

Page 42: ...PT Inverter as portas roceda em ordem num rica 1 4 3 6 2 5 7 8 9 10 16 18 19 20 14 15 17 12 13 11 ...

Page 43: ... se de ue o interior do seu fri orífico esteja completamente limpo e forem instalados dois fri oríficos lado a lado de erá e istir uma dist ncia mínima de cm entre eles uando utili ar o seu fri orífico pela primeira e por fa or obser e as se uintes instru es durante as seis horas iniciais porta n o de erá ser aberta fre uentemente De e come ar a funcionar a io sem alimentos no interior o retire a ...

Page 44: ... ajustados PT sta fun o pode ser usada para alimentos colocados no compartimento do fri orífico e ue precisem de arrefecer rapidamente e uiser arrefecer randes uantidades de alimentos frescos recomendado ue acti e esta fun o antes de colocar os alimentos no fri orífico indicador de uic rid e permanecerá aceso en uanto a fun o efri era o rápida esti er acti ada ara cancelar esta fun o prima no amen...

Page 45: ...u outros aparelhos eléctricos om a ajuda de uma esponja limpe a água depositada na parte inferior do compartimento do con elador p s a descongelação seque completamente o interior nsira a ficha na tomada de parede e li ue interrupto B Compartimento do congelad compartimento de on ela o profunda n o reali a a descon ela o automática para e itar a deteriora o dos alimentos con elados descon ela o um...

Page 46: ...urante um lon o período de tempo remo a o cabo de alimenta o retire todos os alimentos limpe o e dei e a porta entreaberta C erifi ue re ularmente as borrachas edantes da porta para se asse urar ue elas est o limpas e sem restos de alimentos A ara remo er os suportes da porta retire todo o seu conte do e em se uida basta empurrar cuidadosamente o seu suporte para cima a partir da base A unca utili...

Page 47: ...rta omute o term stato para um rau mais frio Diminua o n mero de e es de abertura da porta ou utili e menos fre uentemente ubra os alimentos uardados em recipientes abertos com um material apropriado impe a condensa o usando um pano seco e erifi ue se persistir compressor n o está a funcionar protec o t rmica do compressor dei ará de funcionar durante falhas el ctricas repentinas ou na e trac o co...

Page 48: ...uito bai a en uanto ue a temperatura do refri erador suficiente temperatura do con elador está ajustada para uma temperatura muito bai a juste a temperatura do con elador para um rau mais uente e erifi ue temperatura do refri erador está muito bai a en uanto ue a temperatura do con elador suficiente temperatura do refri erador pode ter sido ajustada para uma temperatura muito bai a juste a tempera...

Page 49: ...em estar a ser abertas fre uentemente ou foram dei adas entreabertas por lon o tempo abra as menos fre uentemente á ocorr ncia de humidade no e terior do fri orífico ou entre as portas oderá e istir humidade no ar isto bastante normal no tempo h mido uando a humidade for menor a condensa o irá desaparecer aus odores dentro do fri orífico interior do fri orífico de e ser limpo impe o interior do fr...

Page 50: ...ch die weiteren Dokumente die mit Ihrem Produkt geliefert wurden Bitte beachten Sie dass diese Anleitung eventuell auch für andere Geräte eingesetzt werden kann Symbole und ihre Bedeutung In dieser Anleitung finden Sie die folgenden Symbole C Wichtige Informationen oder nützliche Tipps A Warnung vor Verletzungen oder Sachschäden B Warnung vor elektrischem Strom Dieses rodu t ist mit dem sele ti en...

Page 51: ...en 3 Installation 8 Wenn Sie den Kühlschrank versetzen möchten 8 Vor dem Einschalten 8 le trischer nschluss 8 Verpackungsmaterialien entsorgen Altgeräte entsorgen Aufstellung und Installation Austausch der Innenbeleuchtung 4 Vorbereitung 11 5 Nutzung des Kühlschranks 12 Bedienfeld 1 Abtauen 1 ach 3 6 Wartung und Reinigung 14 Schutz der Kunststoffflächen 14 7 Empfehlungen zur Problemlösung 15 DE Tü...

Page 52: ...ktes zählen gelten sie für andere Modelle 1 Ihr Kühlschrank 9 10 11 12 13 14 Gefrierfach Adjustierende Türfächer Eierhalter laschenabla e Kühlbereich Tiefkühlbereich 1 Bedienungskonsole 2 Lampengehäuse 3 Bewegbare Regale 4 Weinregal 5 0 C Bereich 6 Tauwassersammelkanal Abflussrohr 7 Hintere Abdeckung 8 Gemüsefächer DE 2 9 9 3 4 9 3 10 6 1 13 14 11 8 7 10 5 10 12 ...

Page 53: ...niemals Dampf oder Sprühreiniger zum Reinigen und Abtauen Ihres Kühlschranks Die Dämpfe oder Nebel können in Kontakt mit stromführenden Teilen geraten und Kurzschlüsse oder Stromschläge auslösen Missbrauchen Sie niemals Teile Ihres Kühlschranks z B Tür als Befestigungen oder Kletterhilfen Nutzen Sie keine elektrischen Geräte innerhalb des Kühlschranks Achten Sie darauf den Kühlkreislauf keinesfall...

Page 54: ...Sie einen beschädigten Kühlschrank nicht in Betrieb Wenden Sie sich bei jeglichen Zweifeln an einen Kundendienstmitarbeiter Die elektrische Sicherheit des Gerätes ist nur dann gewährleistet wenn das hausinterne Erdungssystem den zutreffenden Normen entspricht Setzen Sie das Gerät keinem Regen Schnee direktem Sonnenlicht oder Wind aus dies kann die elektrische Sicherheit gefährden Wenden Sie sich z...

Page 55: ...oder Schließen der Kühlschranktür herunterfallen Materialien wie beispielsweise Impfstoffe wärmeempfindliche Arznei wissenschaftliche Proben usw sollten nicht im Kühlschrank aufbewahrt werden da sie bei exakt festgelegten Temperaturen gelagert werden müssen Trennen Sie den Kühlschrank vom Stromnetz wenn er längere Zeit nicht benutzt wird Ein mögliches Problem im Netzkabel kann einen Brand auslösen...

Page 56: ...aren Halten Sie die Kühlschranktüren nur möglichst kurz geöffnet Geben Sie keine warmen Speisen oder Getränke in den Kühlschrank Überladen Sie den Kühlschrank nicht die Luft muss frei zirkulieren können Stellen Sie den Kühlschrank nicht im direkten Sonnenlicht oder in der Nähe von Wärmequellen wie Öfen Spülmaschinen oder Heizkörpern auf Halten Sie den Kühlschrank mindestens 30 cm von Wärmequellen ...

Page 57: ...igung beschrieben 3 Schließen Sie den Netzstecker des Kühlschranks an eine Steckdose an Beim Öffnen der Tür leuchtet die Innenbeleuchtung auf 4 Beim Anspringen des Kompressors sind Geräusche zu hören Die Flüssigkeiten und Gase im Kühlsystem können auch leichte Geräusche erzeugen wenn der Kompressor nicht läuft Dies ist völlig normal 5 Die Vorderkanten des Kühlgerätes können sich warm anfühlen Dies...

Page 58: ...sich an den autorisierten Kundendienst lassen die Kühlschranktüren demontieren und befördern das Gerät seitlich durch die Tür 1 Stellen Sie Ihren Kühlschrank an einer gut erreichbaren Stelle auf 2 Platzieren Sie den Kühlschrank nicht in der Nähe von Wärmequellen oder dort wo er Feuchtigkeit oder direktem Sonnenlicht ausgesetzt ist 3 Damit das Gerät richtig arbeiten kann müssen Sie ausreichend Plat...

Page 59: ...DE 1 Türanschlag umkehren Gehen Sie der Reihe nach vor 1 4 3 6 2 5 7 8 9 10 16 18 19 20 14 15 17 12 13 11 ...

Page 60: ...Ihres Kühlschrank Gefrierschranks gründlich gereinigt wird Falls zwei Kühlschränke nebeneinander platziert werden sollen achten Sie darauf dass sie mindestens 2 cm voneinander entfernt aufgestellt werden Wenn Sie den Kühlschrank Gefrierschrank zum ersten Mal in Betrieb nehmen halten Sie sich bitte an die folgenden Anweisungen für die ersten sechs Betriebsstunden Die Kühlschrank Gefrierschranktür s...

Page 61: ...tel die im hlbereich aufbe ahrt erden schnell herunter u hlen Wenn Sie große Mengen Lebensmittel kühlen möchten sollten Sie diese Funktion vor dem Einlagern der Lebensmittel einschalten Die Schnellkühlanzeige leuchtet bei aktiver Schnellkühlfunktion Zum Abbrechen dieser Funktion drücken Sie die Schnellkühltaste noch einmal Die Schnellkühlanzeige erlischt die normalen Einstellungen werden wiederher...

Page 62: ... roc nen ie nach eendi un des btauens die nnenseiten ut ab tec en ie den et stec er ieder in die tec dose schalten ie die trom ufuhr ieder ein DE 1 B Tiefkühlbereich Der ief hlbereich irdnicht automatisch ab etaut daesansonsten schnell um erderben efrorener ebensmittel ommen nnte Dan einer spe iellen au asser ammelschale ist das btauen einfach und nicht mit erunreini un en erbunden auen ie eimal j...

Page 63: ...ingt B Wenn Ihr Kühlgerät längere Zeit nicht benutzt wird ziehen Sie den Netzstecker nehmen alle Lebensmittel heraus reinigen das Gerät und lassen die Türe geöffnet C Kontrollieren Sie die Türdichtungen regelmäßig um sicherzustellen dass diese sauber und frei von Speiseresten sind C Zum Entfernen einer Türablage räumen Sie sämtliche Gegenständen aus der Ablage und schieben diese dann nach oben her...

Page 64: ...ere Thermostateinstellung wählen Türen kürzer geöffnet halten oder seltener öffnen Offene Behälter abdecken oder mit einem geeigneten Material einwickeln Kondensation mit einem trockenen Tuch entfernen und überprüfen ob diese erneut auftritt Der Kompressor läuft nicht Eine Schutzschaltung stoppt den Kompressor bei kurzzeitigen Unterbrechungen der Stromversorgung und wenn das Gerät zu oft und schne...

Page 65: ...e die Dichtun esch di te oder defekte Dichtungen führen dazu dass der Kühlschrank länger arbeiten muss um die Temperatur halten zu können Die Temperatur im Tiefkühlbereich ist sehr niedrig während die Termperatur im Kühlbereich normal ist Die ief hltemperatur ist sehr niedri ein estellt tellen ie die efrierfachtemperatur rmer ein und pr fen ie Die Temperatur im Kühlbereich ist sehr niedrig während...

Page 66: ...tt schlie en ren urden h ufi e ffnet oder l n ere eit nicht richti eschlossen eni er h ufi öffnen euchti eit sammelt sich an der u enseite des hlschran s oder an den ren entuell herrscht hohe uftfeuchti eit dies ist je nach etterla e lli normal Die Kondensation verschwindet sobald die Feuchtigkeit abnimmt Unangenehmer Geruch im Kühlschrankinnenraum Das nnere des hlschran s muss ereini t erden eini...

Page 67: ...c yta ta e inne do umenty dostarc one ra lod Instrukcja ta może odnosić się także do innych modeli Symbole i ich znaczenie Niniejsza instrukcja obsługi zawiera następujące symbole C Ważne informacje lub przydatne wskazówki użytkowania A Ostrzeżenie przed zagrożeniem życia i mienia B Ostrzeżenie przed porażeniem elektrycznym Wyrób ten nosi symbol selektywnego sortowania odpadów urządzeń elektryczny...

Page 68: ...y przestrzegać następujących wskazówek r ed uruchomieniem ch od iar i o c enia ele tryc ne Usuwanie opakowania 8 Utylizacja starej chłodziarki 8 Ustawienie i instalacja 8 Wymiana żarówki oświetlenia wewnętrznego 8 4 Przygotowanie 10 r e adanie dr i 5 Korzystanie z lodówki 11 anelstero ania 1 Rozmrażanie 1 6 Konserwacja i czyszczenie 13 Zabezpieczenia powierzchni plastykowych 1 7 Zalecane rozwi zan...

Page 69: ... e ar y a omory do pr echo y ania y no ci mro onej sta iane p i dr iach omora na jaj a a na butel i omora ch od iar i omora amra alni a 1 C Rysunki w niniejszej instrukcji to tylko schematy i nie muszą ściśle odpowiadać as emu modelo i lod i e li pe nych c ci nie ma as ej lod ce to nac y e odnos si do innych modeli PL 3 2 9 9 3 4 9 3 10 6 1 13 14 11 8 7 10 5 10 12 ...

Page 70: ... ani innym osobom napra ia ch od iar i ie jed cie lod ani lodu bezpośrednio po wyjęciu ich z zamrażalnika Może to spowodować odmrożenia w ustach ie adajcie do amra alni a napojów w puszkach ani w butelkach Mogą wybuchnąć ie doty ajcie palcami mro onej żywności bo może do nich przylgnąć Do c ys c enia i ro mra ania lod i nie wolno stosować pary ani środków czyszczących w tej postaci W takich przypa...

Page 71: ... a ro enie tra cie instalo ania ch od iar i ni dy nie olno c a tyc i nia d o cianie o e to a ra a mierci lub po a nym ura em h od iar a ta s u y y c nie do pr echo y ania y no ci ie nale y jej u y a adnym innym celu ty iet a danymi technic nymi ch od iar i umies c ona jest po le ej stronie jej n tr u ie pr y c aj tej ch od iar i do systemu oszczędzania energii ponieważ może to ją uszkodzić e li ch...

Page 72: ... ody pitnej Bezpiecze stwo dzieci e li dr ic i amy ane s na luc należy go chronić przez dostępem dzieci ale y ape ni opie d ieciom aby nie bawiły się lodówką Ostrze enie HCA Je li ch odziarka ta wyposa ona jest w system ch odniczy zawieraj cy R600a a ten jest at opalny ale y zatem uważać aby w trakcie jego użytkowania i transportu nie uszkodzić systemu i przewodów chłodzenia W razie uszkodzenia na...

Page 73: ...ziarki należy sprawdzić Włączyć wtyczkę chłodziarki w nia d o cianie o ot arciu drzwiczek chłodziarki zapali się światło we wnętrzu jej komory chłodzenia o uruchomieniu spr ar i us ys ycie jej s um yny i a y a arte systemie chłodzenia także mogą powodować szumy nawet jeśli nie działa sprężarka i jest to zupełnie normalne r ednie ra d ie lod i mo się nieco nagrzewać Jest to całkiem normalne Te obsz...

Page 74: ...chłodziarka są zbyt wąskie aby chłodziarka mogła przez nie przejść należy wezwać autoryzowany serwis który zdejmie z niej drzwiczki i przeniesie ją bokiem przez drzwi Chłodziarkę należy zainstalować w miejscu w którym łatwo będzie ją używać Chłodziarka musi stać z dala od źródeł ciepła miejsc wilgotnych i bezpośrednio nasłonecznionych Aby uzyskać wydajną pracę chłodziarki należy zapewnić odpowiedn...

Page 75: ...9 PL Przek adanie drzwi ost puj olejno ci odnej numeracj 1 4 3 6 2 5 7 8 9 10 16 18 19 20 14 15 17 12 13 11 ...

Page 76: ...chłodziarki zostało dokładnie oczyszczone C Jeśli zainstalowane maja być dwie chłodziarki obok siebie należy zachować co najmniej 2 cm odstęp między nimi C r y pier s ym uruchomieniu chłodziarki prosimy przez pierwsze sześć godzin przestrzegać następujących instrukcji Nie należy zbyt często otwierać drzwiczek Należy uruchomić ja pustą bez żadnej żywności we wnętrzu Nie należy wyłączać wtyczki chło...

Page 77: ...enia żywności w komorze chłodzenia eś i ma być schłodzona znaczna i ość świeżej żywności za eca si uruchomienie tej unkcji rzed włożeniem żywności do od wki ska nik szybkiego chłodzenia b dzie si a ić rzez cały czas gdy unkcja ta ozostaje wł czona Aby wył czyć t unkcj na eży onownie nacisn ć rzycisk szybkiego chłodzenia uick Fridge ska nik szybkiego chłodzenia uick Fridge zgaśnie i ustawienia tem ...

Page 78: ...nia sp y a ro iem bierania ody i dalej rur cie o do paro ni a s d sama odparo uje pra d ajcie re ularnie c y rur a cie o a nie at a a si i ra ie potr eby pr ety ajcie j dr iem B Zamra arka omor e ebo ie o amra ania nie ma automatyc ne o ro mra ania aby apobiec psuciu si amro onej y no ci D i i specjalnemu biorni o i ody ro mra anie jest bard o proste i at e o mra aj amra ar d a ra y ro u lub je li...

Page 79: ...yć nieużywana przez dłuższy okres czasu należy ją wyłączyć i całkowicie opróżnić z żywności oczyścić i pozostawić z uchylonymi drzwiczkami C Regularnie sprawdzać czy uszczelki w drzwiczkach są czyste i nie osadzają się na nich cząstki żywności A Aby wyjąć półki z drzwiczek opróżnić je z zawartości a potem po prostu nacisnąć od podstawy ku górze A Do czyszczenia powierzchni zewnętrznych i chromowan...

Page 80: ...yny ot artych pojemni ach o osta ienie uchylonych dr ic e r e c y termostat na niższą temperaturę t iera dr ic i na r cej albo r ad iej a ry a y no pr echo y an ot artych pojemni ach odpo iednim materiałem yciera s ropliny such cierec i spra d a c y nadal si utr ymuj Sprężarka nie działa abe piec enie termic ne spr ar i ad iaa tra cie na e o ani u asilania lub załącza się i wyłącza ponieważ nie wy...

Page 81: ...że chłodziarka pracuje przez dłuższy czas aby utrzymać bieżącą temperaturę Temperatura zamrażalnika jest bardzo niska a temperatura chłodzenia jest wystarczająca hod iar a jest nasta iona na bard o nis temperatur amra ania asta i chłodziarkę na wyższą temperaturę zamrażania i sprawdzić Temperatura chłodzenia jest bardzo niska a temperatura zamrażania jest wystarczająca hod iar a nasta iona jest na...

Page 82: ...ia Dr ic i mo by uchylone upe nij si e s ca o icie am ni te byt c sto ot ierano dr ic i lub na du ej po osta iano je uchylone nale y je rzadziej otwierać Na zewnątrz chłodziarki lub pomiędzy drzwiczkami pojawia się wilgoć y mo e po ietr u jest il o to ca iem normalne pr y il otnej po od ie dy il o po ietr u ust pi s ropliny ni n Nieprzyjemna woń wewnątrz chłodziarki r eba oc y ci n tr e chod iar i...

Page 83: ...пользоваться им прочтите это руководство Соблюдайте инструкции в особенности правила техники безопасности Храните это руководство в легкодоступном месте так как оно может понадобиться вам в будущем Ознакомьтесь со всеми остальными документами которые прилагаются к прибору Учтите что данное руководство по эксплуатации может применяться и для других моделей В данном руководстве по эксплуатации испол...

Page 84: ...авила транспортировки холодильника 7 Подготовка к эксплуатации 7 Утилизация упаковки 8 Утилизация старого холодильника 8 Размещение и установка 8 Замена лампочки внутреннего освещения 8 Перевешивание дверей 9 4 10 5 11 Панель управления 11 Размораживание 12 Камера нулевой температуры 12 6 13 Защита пластмассовых поверхностей 13 7 14 Общие правила техники безопасности 4 Подключение к электросети 7 ...

Page 85: ...на дверце 11 Лоток для яиц 12 Полка для бутылок 13 Холодильное отделение 14 Морозильное отделение C Цифры приведенные в данном руководстве по эксплуатации являются схематическими и могут не полностью соответствовать вашему изделию Некоторые компоненты которые не входят в состав приобретенного вами изделия используются в других моделях Kласс энергетической эффективности A Kласс защиты 1 Cтепень защ...

Page 86: ... в бутылках и банках в морозильное отделение Они могут лопнуть Не дотрагивайтесь до замороженных продуктов они могут примерзнуть к рукам Отключайте холодильник от сети перед чисткой или размораживанием Ни в коем случае не используйте для чистки и размораживания холодильника пар или аэрозольные чистящие средства В этом случае пар может попасть на электрические компоненты что приведет к короткому за...

Page 87: ...и поскольку это может привести к его поломке При наличии в холодильнике синей подсветки не смотрите на нее через оптические устройства При отключении от сети электропитания холодильника с ручным управлением подождите не менее 5 минут прежде чем подключать его снова В случае продажи изделия эту инструкцию по эксплуатации следует передать новому владельцу При транспортировке холодильника избегайте п...

Page 88: ... оставляйте дверцу холодильника открытой на длительное время Не кладите в холодильник горячие продукты или напитки Не перегружайте холодильник чтобы не нарушать циркуляцию воздуха Не устанавливайте холодильник в местах где на него попадают прямые солнечные лучи или поблизости от источников тепла таких как плита посудомоечная машина или радиатор отопления Следите за тем чтобы контейнеры с продуктам...

Page 89: ... холодильника в соответствии с рекомендациями приведенными в разделе Обслуживание и чистка 3 Подключите холодильник к электрической сети При открытии двери холодильника включается лампочка внутреннего освещения 4 При запуске компрессора будет слышен шум Жидкость и газы находящиеся внутри герметичной системы охлаждения также могут создавать шум независимо от того работает компрессор или нет что явл...

Page 90: ...ивайте холодильник в удобном для использования месте 2 Холодильник следует устанавливать в местах защищенных от прямых солнечных лучей вдали от источников тепла и повышенной влажности 3 Для более эффективной работы необходимо обеспечить хорошую вентиляцию вокруг холодильника Если холодильник устанавливается в нише минимальное расстояние до потолка и стен должно быть не менее 5 см При установке на ...

Page 91: ...9 RU Выполните описанные действия в указанной последовательности 1 4 3 6 2 5 7 8 9 10 16 18 19 20 14 15 17 12 13 11 ...

Page 92: ... эффективностью в таких условиях C Содержите внутреннее пространство холодильника в чистоте C Если два холодильника устанавливаются рядом то между ними должно быть расстояние не менее 2 см C При первом включении холодильника просим соблюдать следующие инструкции во время первых шести часов работы Не открывайте дверцу слишком часто Не загружайте в холодильник продукты Не отключайте холодильник от э...

Page 93: ...енные в холодильное отделение Чтобы охладить большое количество свежих продуктов активируйте эту функцию до того как поместите продукты в холодильное отделение Индикатор быстрого охлаждения будет светиться пока включена функция быстрого охлаждения Для отмены данной функции снова нажмите кнопку быстрого охлаждения Индикатор быстрого охлаждения выключится а температура вернется к нормальному значени...

Page 94: ...электронагреватели и другие подобные электроприборы Талую воду накопившуюся в нижней части морозильного отделения промокните губкой После размораживания вытрите насухо внутреннюю поверхность Вставьте вилку шнура питания в розетку и включите электропитание втоматическое размораживание морозильной камеры не предусмотрено так как это может привести к порче замороженных продуктов Размораживание выполн...

Page 95: ...айте попадания воды в отсек с лампочкой а также на другие электрические компоненты B Если холодильник не будет использоваться длительное время отключите шнур питания от электрической сети выньте все продукты выполните чистку и оставьте дверцу приоткрытой C Регулярно проверяйте не испачкан ли уплотнитель дверцы частицами пищи C Чтобы снять полки на дверце полностью разгрузите их а затем просто прип...

Page 96: ... открытой посуде Дверца неплотно закрыта Переключите термостат на более низкую температуру Сократите периоды когда дверца остается открытой или открывайте ее реже Накройте подходящим материалом продукты в открытой посуде Вытрите конденсат сухой тканью и проверьте не образуется ли он снова Не работает компрессор Термозащита компрессора может сработать при неожиданных отключениях энергоснабжения либ...

Page 97: ...пературу Температура в морозильном отделении слишком низкая а температура в холодильном отделении достаточная Задан очень низкий уровень температуры в морозильном отделении Установите в морозильном отделении более высокую температуру и проверьте результат Температура холодильного отделения очень низкая а температура в морозильном отделении достаточная Возможно температура холодильного отделения от...

Page 98: ...является неисправностью Возможно дверцы холодильника приоткрыты Убедитесь что они полностью закрыты Возможно дверцы часто открываются либо были приоткрыты в течение длительного времени Открывайте их реже Появление влаги снаружи холодильника или между дверцами Возможно в воздух много влаги Это вполне нормально при влажной погоде Когда влажность уменьшится конденсация исчезнет Неприятный запах внутр...

Page 99: ...nfo bft by Наименование импортёра в Казахстане TOO Альфа Сток Адрес импортёра в Казахстане 050009 г Алматы пр Абая д 155 оф 24 тел 7 727 320 11 20 Дата производства указана на наклейке с серийным номером Обозначения для месяца производства 5 указаны в таблице Янв Февр Март Апр Май Июнь Июль Авг Сент Окт Ноя Дек 1 2 3 4 5 6 7 8 9 A B C Обозначения дня производства 6 указаны в таблице День 1 1 День ...

Page 100: ...σκευή σας με γρήγορο και ασφαλή τρόπο Διαβάστε το εγχειρίδιο πριν την εγκατάσταση και τη χρήση του προϊόντος σας Ακολουθείτε τις οδηγίες και ιδιαίτερα αυτές που αφορούν την ασφάλεια Φυλάξτε το εγχειρίδιο σε εύκολα προσπελάσιμο μέρος γιατί μπορεί να το χρειαστείτε αργότερα Επιπλέον διαβάστε και την υπόλοιπη τεκμηρίωση που συνοδεύει το προϊόν σας Έχετε υπόψη σας ότι το παρόν εγχειρίδιο μπορεί να ισχ...

Page 101: ...χτούν κατά τη μεταφορά του προϊόντος 7 Πριν θέσετε σε λειτουργία το ψυγείο σας 7 Διάθεση των υλικών συσκευασίας 8 Διάθεση του παλιού σας ψυγείου 8 Τοποθέτηση και εγκατάσταση 8 Αντικατάσταση της εσωτερικής λάμπας 8 Αντιστροφή της φοράς ανοίγματος των πορτών 9 4 10 5 11 Πίνακας ελέγχου 11 Απόψυξη 12 Χώρος θερμοκρασίας μηδέν βαθμών 12 6 13 Προστασία των πλαστικών επιφανειών 13 7 14 Γενικές οδηγίες ασ...

Page 102: ...νονται ακριβώς στο προϊόν σας Αν ορισμένα τμήματα δεν περιλαμβάνονται στο προϊόν που έχετε προμηθευτεί τότε ισχύουν για άλλα μοντέλα 1 Πίνακας ελέγχου 2 Εσωτερικός φωτισμός 3 Κινητά ράφια 4 Υποδοχές μπουκαλιών κρασιού 5 Χώρος 0 C 6 Κανάλι συλλογής νερού απόψυξης Σωλήνας αποστράγγισης 7 Κάλυμμα συρταριών λαχανικών 8 Συρτάρι λαχανικών 9 Χώρος κατάψυξης 2 9 9 3 4 9 3 10 6 1 13 14 11 8 7 10 5 10 12 ...

Page 103: ... χ ρι σας Αποσυνδ ετε το υ είο απ τ ν πρί α πριν τον κα αρισ τ ν απ υ εν πρ πει να χρ σι οποιείτε ποτ ατ και ατ οποι να κα αριστικά υλικά στις διαδικασίες κα αρισ ο και απ υ ς του υ είου σας ε τ τοιες περιπτώσεις ο ατ ς πορεί να λ ει σε επα ε τα λεκτρικά ε αρτ ατα και να ίνει αιτία ραχυκυκλώ ατος λεκτροπλ ίας οτ χρ σι οποιείτε ε αρτ ατα του υ είου σας π ς π ρτα ς σο στ ρι ς ς σκαλοπάτι χρ σι οποιε...

Page 104: ...πλε ς ν κοιτά ετε το πλε ς σ οπτικών διατά ε ν ια υ εία ε αυτ ατο σ στ α ελ χου ετά απ διακοπ ρε ατος περι νετε τουλάχιστον λεπτά πριν σετε πάλι το υ είο σε λειτουρ ία ε περίπτ σ ετα ί ασ ς το παρ ν ε χειρίδιο χρ σ ς α πρ πει να παραδο εί στον καινο ριο ιδιοκτ τ του προ ντος Απο ετε τ ν πρ κλ σ ιάς στο καλώδιο ρε ατος ταν ετα ρετε το υ είο Αν το καλώδιο τσακίσει πορεί να προκλ εί πυρκα ιά οτ ν τοπ...

Page 105: ...σ και τ ετα ορά τ ς συσκευ ς ε περίπτ σ ιάς κρατ στε τ συσκευ σας ακριά απ ενδεχ ενες π ς τιάς οι οποίες πορο ν να κάνουν το προ ν να πιάσει τιά και αερίστε το χώρο στον οποίο είναι τοπο ετ ν ονάδα 134a τ πος αερίου που χρ σι οποιείται στο προ ν ανα ρεται στ ν πινακίδα στοιχεί ν οποία ρίσκεται πάν στο αριστερ τοίχ α στο εσ τερικ του υ είου ε κα ία περίπτ σ ν πετά ετε το προ ν σε τιά ν α νετε τις π...

Page 106: ...ό του ψυγείου όπως συνιστάται στην ενότητα Συντήρηση και καθαρισμός 3 Συνδέστε το ψυγείο στην πρίζα στον τοίχο Όταν ανοιχτεί η πόρτα το εσωτερικό φως στο χώρο συντήρησης θα ανάψει 4 Θα ακούσετε ένα θόρυβο καθώς ξεκινά η λειτουργία του συμπιεστή Το υγρό και τα αέρια που βρίσκονται στο κλειστό κύκλωμα ψύξης μπορεί επίσης να προκαλέσουν θόρυβο ακόμα και όταν ο συμπιεστής δεν λειτουργεί πράγμα που είν...

Page 107: ...σει μέσα από την πόρτα με το πλάι 1 Εγκαταστήστε το ψυγείο σε θέση που προσφέρει ευκολία στη χρήση 2 Κρατήστε το ψυγείο σας μακριά από πηγές θερμότητας μέρη με υγρασία και από απ ευθείας ηλιακό φως 3 Πρέπει να υπάρχει επαρκής κυκλοφορία αέρα γύρω από το ψυγείο σας για να επιτυγχάνεται αποδοτική λειτουργία Αν το ψυγείο πρέπει να τοποθετηθεί σε εσοχή στον τοίχο θα πρέπει να υπάρχει ελάχιστη απόσταση...

Page 108: ...9 EL Προχωρήστε σύμφωνα με την σειρά των αριθμών 1 4 3 6 2 5 7 8 9 10 16 18 19 20 14 15 17 12 13 11 ...

Page 109: ...όδοσής του C Παρακαλούμε να φροντίζετε να διατηρείτε το εσωτερικό του ψυγείου σας σχολαστικά καθαρό C Αν πρέπει να εγκατασταθούν δύο ψυγεία το ένα δίπλα στο άλλο θα πρέπει να υπάρχει μεταξύ τους απόσταση τουλάχιστον 2 εκ C Όταν θέσετε το ψυγείο σε λειτουργία για πρώτη φορά παρακαλούμε τηρείτε τις ακόλουθες οδηγίες κατά τις αρχικές έξι ώρες Η πόρτα δεν θα πρέπει να ανοίγει συχνά Το ψυγείο θα πρέπει...

Page 110: ...γία ενεργοποίησης απενεργοποίησης On Off 2 Λειτουργία Ρύθμισης Συντήρησης 3 Ένδειξη ρύθμισης θερμοκρασίας θαλάμου Συντήρησης 4 Ένδειξη Προειδοποίησης Υψηλής θερμοκρασίας Σφάλματος 5 Ένδειξη Ταχείας Ψύξης 6 Λειτουργία Ταχείας Ψύξης 7 Απεν Ειδοποίησης ...

Page 111: ...ουπίστε με ένα σφουγγάρι το νερό απόψυξης που συλλέγεται στο κάτω μέρος του χώρου κατάψυξης Μετά την απόψυξη στεγνώστε καλά το εσωτερικό του χώρου Συνδέστε στην πρίζα το φις και ενεργοποιήστε την παροχή ρεύματος Ο χώρος βαθιάς κατάψυξης δεν εκτελεί αυτόματη απόψυξη ώστε να αποφευχθεί η αλλοίωση των τροφίμων Η απόψυξη γίνεται με πολύ απλό τρόπο και χωρίς να δημιουργείται ακαταστασία χάρη στην ειδικ...

Page 112: ...τα να μην εισέλθει νερό στο περίβλημα της λάμπας και σε άλλα ηλεκτρικά εξαρτήματα B Εάν το ψυγείο σας δεν πρόκειται να χρησιμοποιηθεί για μεγάλη χρονική περίοδο αποσυνδέστε το καλώδιο ρεύματος από την πρίζα αφαιρέστε όλα τα τρόφιμα καθαρίστε το και αφήστε την πόρτα μισάνοιχτη C Ελέγχετε τακτικά τις στεγανοποιήσεις στις πόρτες για να βεβαιωθείτε ότι είναι καθαρές και απαλλαγμένες από σωματίδια τροφ...

Page 113: ... μισάνοιχτη Ρύθμιση του θερμοστάτη σε χαμηλότερη θερμοκρασία Μείωση του χρόνου που μένει ανοικτή η πόρτα ή λιγότερο συχνή χρήση της Κάλυψη με κατάλληλο υλικό του φαγητού που φυλάσσεται σε ανοικτά δοχεία Σκουπίστε τη συμπυκνωμένη υγρασία με στεγνό πανί και ελέγξτε αν επιμένει Ο συμπιεστής δεν λειτουργεί Το προστατευτικό θερμικό του συμπιεστή θα ενεργοποιηθεί σε περίπτωση ξαφνικών διακοπών ρεύματος ...

Page 114: ...ίηση της πόρτας μπορεί να προκληθεί λειτουργία του ψυγείου για μεγαλύτερες περιόδους για να διατηρείται η τρέχουσα θερμοκρασία Η θερμοκρασία της κατάψυξης είναι πολύ χαμηλή ενώ η θερμοκρασία της συντήρησης είναι επαρκής Η θερμοκρασία του χώρου κατάψυξης έχει ρυθμιστεί σε πολύ χαμηλό επίπεδο Ρυθμίστε τη θερμοκρασία του χώρου κατάψυξης σε υψηλότερο επίπεδο και ελέγξτε Η θερμοκρασία της συντήρησης εί...

Page 115: ... ένδειξη δυσλειτουργίας Οι πόρτες μπορεί να έχουν παραμείνει μισάνοικτες Βεβαιωθείτε ότι οι πόρτες είναι τελείως κλειστές Ίσως να ανοίγονταν συχνά οι πόρτες ή να παρέμειναν μισάνοιχτες για μεγάλο χρονικό διάστημα Ανοίγετέ τις λιγότερο συχνά Εμφανίζεται υγρασία στο εξωτερικό του ψυγείου ή ανάμεσα στις πόρτες Ίσως να υπάρχει υγρασία στον αέρα Αυτό είναι πολύ φυσιολογικό όταν ο καιρός είναι υγρός Ότα...

Page 116: ...otre produit avec rapidité et sécurité Lisez le manuel avant d installer et de faire fonctionner votre produit Respectez les instructions notamment celles relatives à la sécurité Conservez ce manuel dans un endroit facilement accessible car vous pouvez en avoir besoin ultérieurement En plus lisez également les autres documents fournis avec votre produit Veuillez noter que ce manuel peut également ...

Page 117: ...nouveau votre produit 7 Avant de faire fonctionner votre réfrigérateur 7 Mise au rebut de l emballage 8 Mise au rebut de votre ancien réfrigérateur 8 Disposition et Installation 8 Remplacement de l ampoule intérieure 8 Table des matières Réversibilité des portes 9 11 Touches de Contrôle 11 Décongélation 12 6 Entretien et nettoyage 13 Protection des surfaces en plastique 13 14 Branchement électriqu...

Page 118: ...ayettes en verre 4 Clayette support bouteille 5 Compartiment 0 C 6 Convoyeur d eau de dégivrage et tube d évacuation 7 Couvercle du bac à légumes C Les illustrations présentées dans cette notice d utilisation sont schématiques 8 Tiroir à fruit et légumes 9 Compartiments de congélation 10 Balconnets ajustables 11 Compartiment à œufs 12 Balconnet à bouteilles 13 Compartiment réfrigérateur 14 Compart...

Page 119: ...és d un compartiment congélateur ne placez pas de boissons en bouteille ou en cannette dans le compartiment de congélation Cela peut entraîner leur éclatement Ne touchez pas des produits congelés avec les mains ils pourraient se coller à celles ci Débranchez votre réfrigérateur avant de le nettoyer ou de le dégivrer La vapeur et des matériaux de nettoyage pulvérisés ne doivent jamais être utilisés...

Page 120: ...s techniques est située sur le mur gauche à l intérieur du réfrigérateur Ne branchez jamais votre réfrigérateur à des systèmes d économie d énergie cela peut l endommager S il y a une lumière bleue sur le réfrigérateur ne la regardez pas avec des outils optiques Pour les réfrigérateurs contrôlés manuellement attendez au moins 5 minutes pour allumer le réfrigérateur après une coupure de courant Si ...

Page 121: ...inflammable Par conséquent veuillez prendre garde à ne pas endommager le système de refroidissement et les tuyauteries lors de son utilisation ou de son transport En cas de dommages éloignez votre produit de toute source potentielle de flammes susceptible de provoquer l incendie de l appareil De même placez le produit dans une pièce aérée Ne tenez pas compte de cet avertissement si le système de r...

Page 122: ...ur Avant de commencer à faire fonctionner votre réfrigérateur vérifier les points suivants 1 L intérieur du réfrigérateur est sec et l air peut circuler librement à l arrière 2 Nettoyez l intérieur du réfrigérateur tel qu indiqué dans la section Entretien et nettoyage 3 Branchez le réfrigérateur dans la prise murale Lorsque la porte du réfrigérateur est ouverte l éclairage intérieur s allumera 4 V...

Page 123: ...rigérateur éloigné de toutes sources de chaleur des endroits humides et de la lumière directe du soleil 3 Une ventilation d air autour du réfrigérateur doit être aménagée pour obtenir un fonctionnement efficace Si le réfrigérateur est placé dans un enfoncement du mur il doit y avoir un espace d au moins 5 cm avec le plafond et d au moins 5 cm avec le mur Si le sol est couvert de moquette votre prod...

Page 124: ...Réversibilité des portes Procédez dans l ordre numérique 6 9 1 4 3 6 2 5 7 8 9 10 16 18 19 20 14 15 17 12 13 11 ...

Page 125: ...intérieur de votre appareil est soigneusement nettoyé Si deux congélateur réfrigérateurs sont installés côte à côte ils doivent être séparés par au moins 2 cm Lorsque vous faites fonctionner le réfrigérateur pour la première fois assurez vous de suivre les instructions suivantes pendant les six premières heures La porte ne doit pas être ouverte fréquemment Le réfrigérateur doit fonctionner à vide ...

Page 126: ...valeurs de réglage Cette fonction peut être utilisée pour les aliments placées dans le compartiment de réfrigération que l on souhaite refroidir rapidement Si vous souhaitez introduire de grandes quantités de produits frais dans le réfrigérateur nous vous recommandons d activer au préalable cette option L indicateur de réfrigération rapide restera allumé pendant que sa fonction est activée Pour an...

Page 127: ...ivre N utilisez jamais de sèche cheveux radiateurs électriques ou autres appareils électriques similaires pour dégivrer Epongez l eau de dégivrage située au fond du compartiment congélateur Une fois le dégivrage terminé séchez soigneusement l intérieur Branchez l appareil à la prise murale et rétablissez l alimentation électrique Le compartiment du surgélateur ne réalise pas de dégivrage automatiq...

Page 128: ...e logement de la lampe et dans d autres éléments électriques B En cas de non utilisation de votre réfrigérateur pendant une période prolongée débranchez le câble d alimentation sortez toutes les aliments nettoyez le et laissez la porte entrouverte C Inspectez les joints de porte régulièrement pour vérifier qu ils sont propres et qu il n y a pas de particules de nourriture C Pour retirer les balcon...

Page 129: ...nts ouverts Porte laissée entrouverte Réglez le thermostat à un niveau de froid supérieur Réduisez les temps d ouverture de la porte ou utilisez la moins fréquemment Couvrez les aliments dans des récipients ouverts à l aide d un matériau adapté Essuyez la condensation à l aide d un tissu sec et vérifiez si elle persiste Le compresseur ne fonctionne pas Le dispositif de protection thermique du comp...

Page 130: ... ont peut être été laissées entrouvertes Vérifiez que les portes sont bien fermées Le réfrigérateur est réglé à une température très basse Réglez la température du réfrigérateur à un degré supérieur et attendez jusqu à ce que la température soit bonne Le joint de la porte du réfrigérateur ou du congélateur peut être sale déchiré rompu ou mal en place Nettoyez ou remplacez le joint Tout joint endom...

Page 131: ...ides se produisent dans le réfrigérateur de par ses principes de fonctionnement Cela est normal et n est pas un défaut Le réfrigérateur produit des bruits semblables à du vent Les ventilateurs sont utilisés pour refroidir le réfrigérateur Cela est normal et n est pas un défaut Condensation sur les parois intérieures du réfrigérateur Un temps chaud et humide augmente la formation de givre et de con...

Page 132: ...4578336388 AE EN ES PT DE PL RU EL FR ...

Reviews: