background image

EN

Owner’s manual

14

STORAGE

• 

Before storing the appliance, make sure it is clean, dry and 
disconnected from the power supply.

• 

Store the appliance in a dry, cool place, out of the reach of children.

• 

Store the appliance with the protective cap assembled to prevent 
damage to the blades.

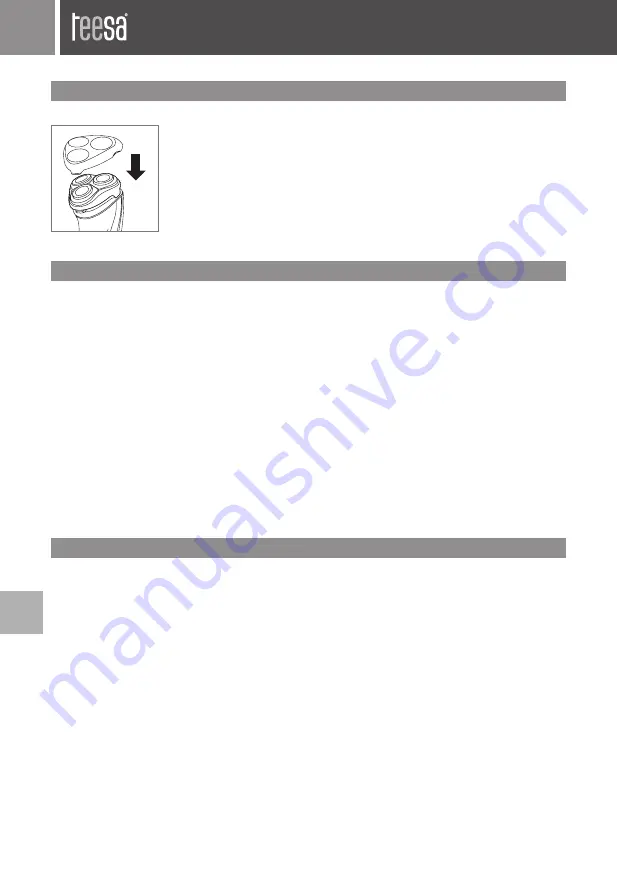
REPLACING SHAVING HEAD

Notes:

• 

It is recommended to replace shaving head every 18 months.

• 

Replace damaged shaving blades immediately.

• 

Always replace the shaving head with the original Teesa shaving head (TSA0073).

• 

Shaving head is available to be bought from the online store Teesa.pl or lpelektronik.com.

1.  Make sure the appliance is turned off and disconnected from power supply.
2.  Press the shaving head release button to open the shaving head.
3.  Pull the shaving head off the appliance.
4.  Insert the lug of the new shaving head into the slot in the top of the appliance. Close 

the shaving head.
Note: If the shaving head does not close smoothly, check if you have inserted the 
shaving  blades properly and if the retaining frame is locked.   

SPECIFICATIONS

Main features

Three floating blades adjusting to all face shapes
Built-in pop-up trimmer perfect for  trimming sideburns and moustache
High-quality steel blades
Protection against beard pulling when low battery
Wet and dry usage
Five LED battery indicators
Cord and cordless use
Quiet operation
Easy to clean
Ergonomic design
Anti-slip grip

Technical data

Power: 8 W
Protection class: IPX7

Summary of Contents for TSA0515

Page 1: ...DE EN PL RO SK Rotary shaver TSA0515 Instrukcja obs ugi Manual de utilizare Owner s manual N vod na pou itie Bedienungsanleitung...

Page 2: ......

Page 3: ...cy g owic z ostrzami Buton de eliberare cap de b rbierit Uvo ovacie tla idlo hlavice s fr zkami Taste Ein Aus Power button Przycisk zasilania Buton alimentare Hlavn vyp na LED Anzeige LED indicators W...

Page 4: ...die f r ihre Sicherheit verantwortlich ist in einer vorsichtigen Art und Weise und die alle Sicherheits Vorkehrungen verstanden hat und befolgen wird Kinder sollten nicht mit diesem Ger t spielen 6 B...

Page 5: ...t voll aufzuladen was Ihnen etwa 120 Minuten Rasierzeit bietet LED Anzeigen 1 W hrend des Ladungsvorgangs blinken abwechselnd alle LED 2 Wenn die Batterieladung unter 10 sinkt blinkt die erste LED ro...

Page 6: ...t mit einem Tuch Handtuch oder Papiertuch denn diese die Rasierklingen besch digen kann Reinigen Sie das Ger t nach jedem Gebrauch Regelm ige Reinigung sorgt f r eine bessere Leistung Nach dem Sie das...

Page 7: ...inigen Hinweis Nicht mehr als eine Klinge und Scherkorb gleichzeitig reinigen da sie alle passende Sets sind Die Rasierleistung kann sich verschlechtern wenn die Klinge in den falschen Scherkorb geste...

Page 8: ...teckten Schutzkappe aufbewahren um eine Besch digung der Rasierklingen zu verhindern RASIERKOPF ERSETZEN Hinweise Es wird empfohlen Rasierkopf alle 18 Monate zu ersetzen Besch digte Rasierklingen sofo...

Page 9: ...sollten sich an Ihren Lieferanten wenden und die Bedingungen des Verkaufsvertrags konsultieren Dieses Produkt darf nicht zusammen mit anderem Gewerbem ll entsorgt werden Hergestellt in China f r LECHP...

Page 10: ...his device 6 Use only the included AC charger to charge the device 7 Do not use this appliance if it s not operating properly or has been dropped into water Do not attempt to repair this appliance you...

Page 11: ...level reaches 20 first indicator stops flashing and lights white while the second one starts flashing 5 When the battery is fully charged all five LED indicators light white OPERATION Shaving 1 Press...

Page 12: ...excess foam and dirt Cleaning with cleaning brush Cleaning shaving head 1 Make sure the appliance is turned off and disconnected from power supply 2 Clean the outside of the shaving head by brushing...

Page 13: ...te Exercise caution while cleaning the blades as they are sharp 7 Clean the guard with the brush 8 Put the blade back into the guard 9 Put the blade back into the corresponding blade holder in the sha...

Page 14: ...turned off and disconnected from power supply 2 Press the shaving head release button to open the shaving head 3 Pull the shaving head off the appliance 4 Insert the lug of the new shaving head into...

Page 15: ...hold users should contact either the retailer where they purchased this product or their local government office for details of where and how they can take this item for environmentally safe recycling...

Page 16: ...czenia niezb dnego do obs ugi tego urz dzenia Nale y poinstruowa dzieci aby nie traktowa y urz dzenia jako zabawki Nale y poinstruowa dzieci aby nie traktowa y urz dzenia jako zabawki 6 Do adowaniaurz...

Page 17: ...a zajmuje oko o 60 minut co pozwala na oko o 120 minut golenia Wska niki LED 1 Podczas adowania wszystkie wska niki LED migaj naprzemiennie 2 Kiedy poziom na adowania akumulatora jest ni szy ni 10 pie...

Page 18: ...iczn gdy mo e to doprowadzi do uszkodze Urz dzenie nale y czy ci po ka dym u yciu Regularne czyszczenie zapewnia lepsze rezultaty golenia Po zako czeniu golenia z u yciem pianki nale y przep uka g owi...

Page 19: ...raz z os onk Uwaga Nale y czy ci ka de ostrze wraz z os onk pojedynczo poniewa tworz one dopasowane zestawy Umieszczenie ostrza w niew a ciwej os once mo e przyczyni si do obni enia skuteczno ci golen...

Page 20: ...kn uszkodzenia ostrzy wYMIANA G OwICY Z OSTRZAMI Uwagi Zalecane jest aby wymienia g owic z ostrzami co 18 miesi cy Nale y niezw ocznie wymieni uszkodzon g owic z ostrzami G owic z ostrzami nale y zaws...

Page 21: ...y w firmach powinni skontaktowa si ze swoim dostawc i sprawdzi warunki umowy zakupu Produktu nie nale y usuwa razem z innymi odpadami komercyjnymi WyprodukowanowCHRLdlaLECHPOLELECTRONICSSp zo o Sp k u...

Page 22: ...au primesc instructiuni cu privire la folosirea aparatului de la o persoana responsabila de siguranta acestora 6 Folosi i doar nc rc torul AC inclus pentru a nc rca dispozitivul 7 Nu utiliza i aparatu...

Page 23: ...elul bateriei ajunge la 10 lumina ro ie devine alb si clipe te 4 C nd nivelul bateriei ajunge la 20 primul indicator se opre te din p lp it i lumineaz alb n timp ce al doilea indicator ncepe s clipeas...

Page 24: ...cu spuma de b rbierit cl ti i capul de b rbierit sub jetul de ap cald pentru a cur a excesul de spum i mizeria Cur area cu peria de cur at Cur area capului de b rbierit 1 Asigura i v c aparatul este o...

Page 25: ...izat Not Cur a i cu aten ie lamele deoarece sunt ascu ite 7 Cur a i garnitura cu periu a 8 Pune i lama napoi n garnitur 9 Pune i lama napoi n suportul de lame corespunz tor Not Asigura i v c crest tur...

Page 26: ...aparatul este oprit i deconectat de la priz 2 Ap sa i butonul de eliberare a capului de b rbierit pentru a deschide capul de b rbierit 3 Scoate i capul de b rbierit 4 Introduce i noul cap de b rbierit...

Page 27: ...electronica Marcajale de pe acest produs sau mentionate in instructiunile sale de folosire indica faptul ca produsul nu trebuie aruncat impreuna cu alte reziduuri din gospod arie atunci cand nu mai es...

Page 28: ...je hra ka 6 Na nab janie pou vajte v lu ne iba pribalen origin lny adapt r 7 Nepou vajte zariadenie ak nepracuje spr vne Je zak zan vlastnoru ne prev dza opravyzariadenia Ibaopr vnen osobyakvalifikov...

Page 29: ...a na bielo pri om druh indik tor za ne blika 5 Ak je bat ria plne nabit v etky indik tory svietia na bielo POU VANIE Holenie 1 Pre zapnutie stroj eka stla te hlavn vyp na 2 Holiacimi hlavami prech dza...

Page 30: ...odpojen od elektrickej z suvky 2 Vy istite vonkaj iu as hlavice pomocou kefky 3 N sledne stla te uvo ovacie tla idlo hlavice s fr zkami a otvorte holiacu jednotku 4 Dodanou kefkou o istite holiacu je...

Page 31: ...ostr 7 N sledne kefkou tie vy istite puzdro 8 Po vy isten vlo te fr zku do spr vneho puzdra 9 N sledne holiacu hlavicu vlo te sp do zodpovedaj ceho otvoru holiacej jednotky Pozn mka Skontrolujte i dr...

Page 32: ...od elektrickej z suvky 2 N sledne stla te uvo ovacie tla idlo hlavice s fr zkami a otvorte holiacu jednotku 3 Uchopen m za hlavicu a potiahnut m holiacu jednotku vytiahnite zo zariadenia 4 V stupok n...

Page 33: ...itie materi lnych zdrojov Dom ci spotrebitelia by sa mali informova u predajcu kde tento v robok zak pili ako ho spr vne recyklova alebo kde by ho mohli odovzda k recykl cii Priemyseln pou vatelia by...

Page 34: ...34 Notes...

Page 35: ......

Page 36: ...www teesa pl...

Reviews: