


Problem
Possible cause
Solution
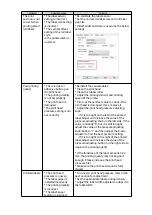
The print
position is not
correct when
printing small
roll labels
* The label sensor
setting is incorrect
* The label size setting
is incorrect
* The vertical offset
setting of the roll label
style
in the printer driver is
incorrect
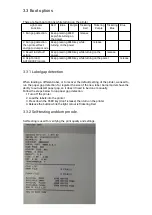
* Re-calibrate the label sensor
* Set the correct roll label size and roll label
gap size
* If BarTender software is used use the below
settings
Poor printing
quality
* There is dust or
adhesive build up on
the print head
* The printing density
is not set properly
* The print head is
damaged
*The print head
pressure setting is not
set correctly
* Reinstall the consumables
* Clean the print head
* Clean the rubber roller
* Adjust the printing density and printing
speed of the printer
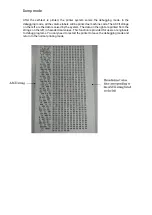
* Print out the self-test value to check if the
print head is damaged. If yes, replace it
* Adjust the print head pressure adjusting
knob
- If it is too light on the left of the printed
label, adjust and increase the value of the
pressure adjusting knob on the left side. If the
value is already "5", but it is still too light,
adjust the value of the pressure adjusting
knob back to "1" and then adjust the Z-axis
adjuster to find the best pressure setting
- If it is too light on the right of the printed
label, adjust and increase the value of the
pressure adjusting button on the right side to
improve the printing quality
* If the thickness of the label exceeds 0.22
mm, the printing quality may not be good
enough. Please increase the print head
pressure first
* Make sure the print head mount is fully
closed
Crinkled labels
* The print head
pressure is uneven
* The label paper is
installed incorrectly
* The printing density
is incorrect
* The label paper
feeding is incorrect
* For uneven print head pressure, refer to the
next section for adjustment
* Set the appropriate label printing density
* Adjust the label width adjuster to adapt it to
the label width