Tecknet X600 Manual Download Page 4

12-Month Battery Life

The mouse consumes little power and offers a long battery life up to 

12 months without changing battery. However please note that the 

actual battery life may vary with using conditions.

Install the Battery

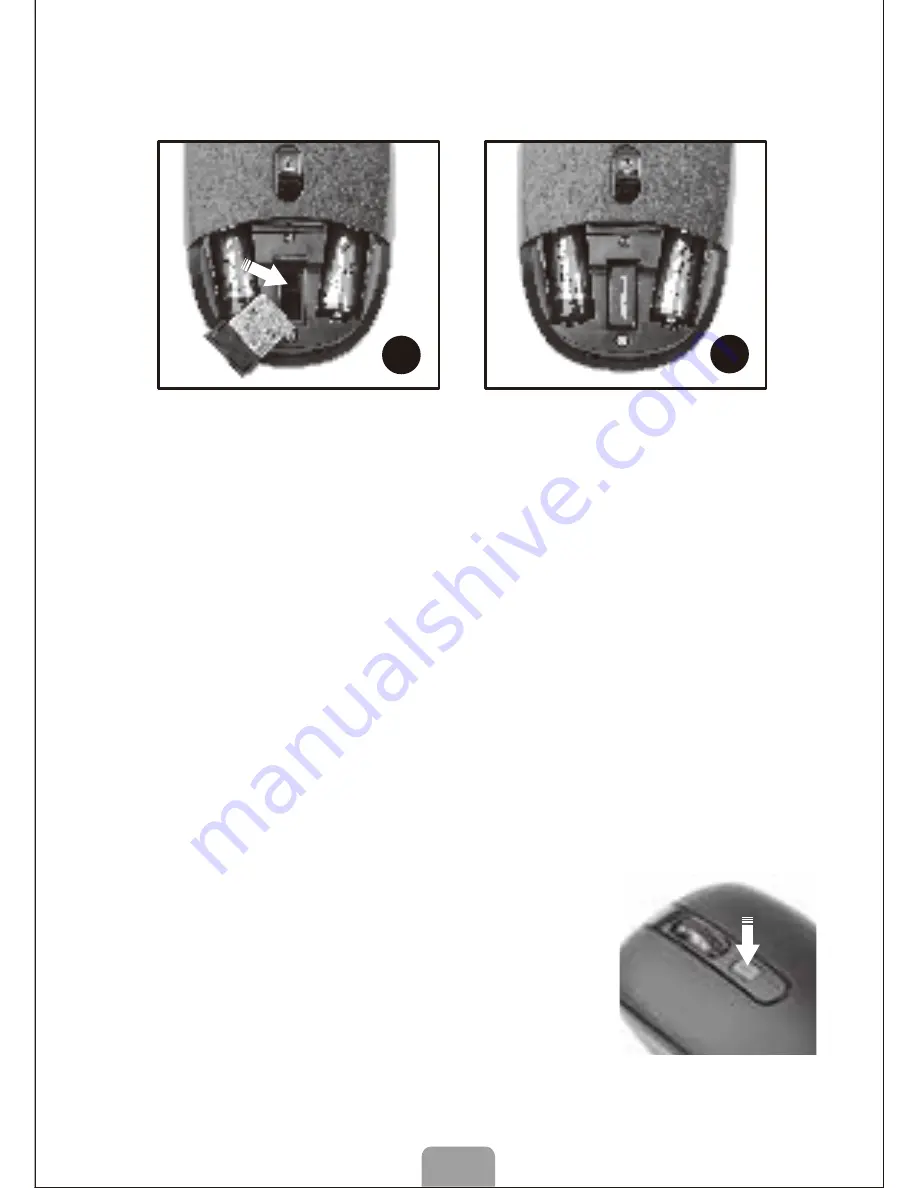
The RF 2.4GHZ optical mouse uses two  AAA batteries (Batteries is 

not 

included).

1. Press the button at the bottom of the mouse as shown in the picture 

    below. The batteries compartment cover will open. 

2. 

Take out the batteries compartment cover on the bottom of the mouse. 

3. Insert the batteries into the compartment, ensuring they correspond


    with the polarity markings. 

4. Replace the battery cover.

5. 

The red LED of the power indicator at the top of the mouse will flash 

    for 10 seconds.

Note: Make sure that the polarity of the batteries is correct. The positive (+) and 

negative (-) ends of each battery must match the positive (+) and negative (-) 

markings in the battery housing.

USB Nano Receiver

The receiver can be removed and stored at the bottom of the mouse 

as shown in below pictures.

Intelligent Power Saving (IPS)


The mouse is equipped with Intelligent Power Saving (IPS) function.

•  When the USB Nano receiver is disconnected or the PC is switched 

   off, the mouse will be switched off automatically for the purpose of 

   power-saving.

•  When your mouse is not operated for 3 seconds, it will automatically


   drop to the first level of IPS. To wake the mouse, click any button.

•  When your mouse is not operated for 10 seconds, it will 

   automatically drop to the second level of IPS. To wake the mouse, 

   click any button.

•  When your mouse is not operated for 8 minutes, it will automatically


   drop to the third level of IPS, e.g. sleep model. To wake the mouse, 

   click any button.

DPI Switch

The mouse supports 2000 DPI, 1500 DPI and 1000 DPI. To switch to 

either setting, press the DPI button.

•  The default setting is 1000 DPI.

•  Short press the DPI button on the top of the 

   mouse once to switch from 1000 DPI to 1500 DPI, 

   the scroll wheel LED will flash twice. 

•  Short press the DPI button on the top of the 

   mouse once again to switch from 1500 DPI to 

   2000 DPI, the scroll wheel LED will flash three 

   times. 

•  Short press the DPI button on the top of the 

   mouse once again to switch from 2000 DPI to 

   1000 DPI, the scroll wheel LED will flash once. 

2

1

Take out the receiver

Store the receiver

DPI Switch

03

Summary of Contents for X600

Page 1: ...rd Mouse Manual SKU X600 Caution To use this device properly please read the user s guide before installation For German French language user manual please download from our website www tecknet co uk Sorry for the inconvenience ...

Page 2: ...the mouse under a different operating system the mouse may either not work or lose its enhanced features and function as a standard three button mouse only Supplied with the Product 1 Cordless Mouse 1 x Cordless Keyboard 1 USB Nano Receiver 1 User Manual 1 Warranty Card 3 Button Mouse The mouse is featured with three buttons and one scroll wheel as shown in below picture 1 Left Click Button 2 Righ...

Page 3: ...n the bottom of the mouse 3 Insert the batteries into the compartment ensuring they correspond with the polarity markings 4 Replace the battery cover 5 The red LED of the power indicator at the top of the mouse will flash for 10 seconds Note Make sure that the polarity of the batteries is correct The positive and negative ends of each battery must match the positive and negative markings in the ba...

Page 4: ...To wake the mouse click any button When your mouse is not operated for 8 minutes it will automatically drop to the third level of IPS e g sleep model To wake the mouse click any button DPI Switch The mouse supports 2000 DPI 1500 DPI and 1000 DPI To switch to either setting press the DPI button The default setting is 1000 DPI Short press the DPI button on the top of the mouse once to switch from 10...

Page 5: ...t release both buttons until you have completed step 3 or press the key of ESC and K at the same time 3 Plug the USB Nano receiver into a free USB port of your computer within 15 seconds 4 Then release both buttons 5 After that the red scroll wheel LED will flash the mouse will finish the manual syncing and should work within 3 5 seconds When reconnect the keyboard the lower power indicator will f...

Page 6: ...install the batteries again Verify that your computer s power management features are turned off Check that the Nano receiver s USB connector is firmly attached to the USB port of your computer Still not working Please try restoring the factory default settings Manual Syncing Steps The USB Nano receiver is recognized by Windows Windows 2000 2003 XP Vista Win 7 Win 8 Win8 1 but the cursor does not ...

Page 7: ...equency transmission and may slow down the mouse presenter s response time or cause the mouse to fail temporarily I can not use the mouse while another cordless mouse is in use what should I do Reset the identification code See Restoring factory default settings Manual Syncing Steps Disclaimer Every effort has been made to ensure that the information and procedures in this guide are accurate and c...

Page 8: ...RF 2 4GHz Cordless Keyboard Mouse www tecknet co uk TECKNET P O Box 122 ...

Reviews: