background image

English   

- 29 -

IF YOU NEED ANY ASSISTANCE OR A CUSTOMER REFERENCE NUMBER PLEASE CONTACT THE TECHWOOD HELP LINE ON 0845 543 0485

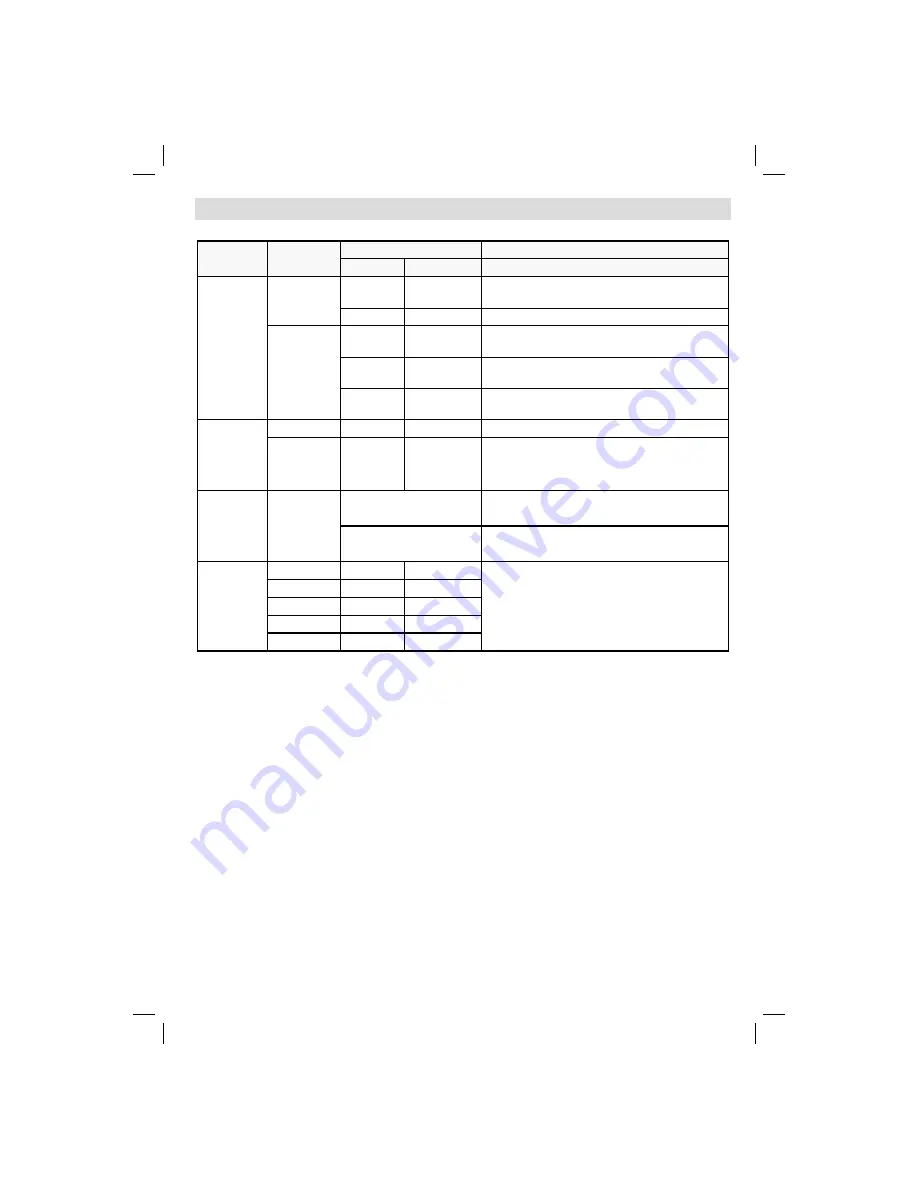
Appendix C: Supported File Formats for USB Mode


Media

File 

Extension

Format

Remarks

Video

Audio

(Maximum resolution/Bit rate etc.)

Movie

.mpg/ .dat/ 

.vob .mpe

MPEG1

MPEG Layer 

1/2/3

MPEG2

MPEG2

.avi

XviD/ 3ivx

PCM/MP3/

WMA

XviD Verson up to: 1.1.2 

MPEG4

PCM/MP3/

WMA

Support ASP(GMC warping points only support 1)

MS ISO 
MPEG4

PCM/MP3/

WMA

Support SP and ASP

Music

-

-

PCM

Sample Rate: 8K ~ 48KHz

.mp3

-

MPEG 1/2

Layer 1/ 2/

3 (MP3)

Sample Rate: 8K ~ 48KHz, Bit Rate: 

32K~320Kbps

Photo

.jpg

.jpeg
.bmp

.gif

Baseline JPEG

WxH = 14592x12288, Up to 179 Mega-pixel

Support format: 444 / 440/ 422/ 420/ Grayscale

Progressive JPEG

Up to 4 Mega-pixel

Support format: 444/ 440/ 422/ 420/ Grayscale

External 

Subtitles

.srt

Support Text File Format, but do not support 

Picture File Format

.smi
.sub
.psb
.ass

Note: Necessary bitrates for some video types are higher than USB limits. For this reason, some video types cannot be 
played.

01_MB46_[GB]_(01-TV)_1900UK_IDTV_NICKEL15_22742W_10071406_50181370.indd   29

01_MB46_[GB]_(01-TV)_1900UK_IDTV_NICKEL15_22742W_10071406_50181370.indd   29

03.12.2010   16:22:02

03.12.2010   16:22:02

Summary of Contents for 22742

Page 1: ...OPERATING INSTRUCTIONS 22742 Full HD 1080P DVD COLOUR TELEVISION WITH REMOTE CONTROL IF YOU NEED ANY ASSISTANCE OR A CUSTOMER REFERENCE NUMBER PLEASE CONTACT THE TECHWOOD HELP LINE ON 0845 543 0485 ...

Page 2: ...ervicing 3 Waste Disposal 3 Information for Users in European Union Countries 4 Disconnecting the Device 4 Headphone Volume 4 Installation 4 LCD Screen 4 Warning 4 Connection to a Television Distribution System Cable TV etc from Tuner 4 Overview of the Remote Control 5 LCD TV and Operating Buttons 6 Viewing the Connections Back Connectors 6 Viewing the Connections Side Connectors 7 Power Connectio...

Page 3: ...atically to standby mode PLL Frequency Search PC input Plug Play for Windows 98 Windows 7 ME 2000 XP Vista Game Mode Introduction Thank you for choosing this product This manual will guide you for the proper operation of your TV Before operating the TV please read this manual thoroughly Please do keep this manual in a safe place for future references This device is intended to receive and display ...

Page 4: ...out the legal regulations which apply in your area Don t try to recharge batteries Danger of explosion Replace batteries only with the same or equivalent type device even when the usage of electronic devices is familiar to you Notice especially the chapter SAFETY PRECAUTIONS Carefully keep the handbook as future reference When selling the device or giving it away absolutely give these direction fo...

Page 5: ...System Cable TV etc from Tuner Device connected to the protective earthing of the building installation through the mains connection or through other apparatus with a connection to protective earthing and to a television distribution system using coaxial cable may in some circumstances create a fire hazard Connection to a cable distribution system has therefore to be provided through a device prov...

Page 6: ...de Yellow Feature Current language in DTV 18 mode Menu On off 19 Blue Install Favourite mode in DTV mode 20 OK Select analogue TV mode Hold in TXT 21 mode Channel List DTV mode Cursor right Subpage in TXT mode 22 Cursor down TXT Downpage 23 Volume up 24 Volume down 25 Mute 26 Teletext Mix 27 Subtitle in DTV mode TXT Subtitle analague 28 TV mode FAV Favourite Selection in DTV mode 29 Media Player b...

Page 7: ... that has component output Connect the YPbPr to PC cable between the PC INPUT on the TV and the component video outputs of your device S PDIF Coaxial Out 3 outputs digital audio signals of the currently watched source Dolby D Audio is bypassed while in media browser mode only RF Input connects to an antenna or a cable system 4 Note that if you use a media recorder you should connect the aerial cab...

Page 8: ...se an appropriate audio cable between the connected device s audio outputs and the TV s audio inputs Note If you connect a device to the TV via the VIDEO or PC YPbPr cable you should also connect your device with an audio cable to the AUDIO INPUTS of the TV to enable audio Headphone jack is used for connecting an external headphone to the system 5 Connect to the HEADPHONE jack to use headphones Po...

Page 9: ...eature allows you to display play music photo or video files stored in a USB stick It is possible that certain types of USB devices e g MP3 Players may not be compatible with this TV You may back up your files before making any connections to the TV set in order to avoid any possible data loss Note that manufacturer will not be responsible for any file damage or data loss The TV supports only FAT3...

Page 10: ...w HDMI input Scart socket YPbPr to PC cable optional Component audio inputs DVD Player Note These methods of connection perform the same function but in different levels of quality It is not necessary to connect by all three methods Using Side AV Connectors You can connect a range of optional equipment to your LCD TV Possible connections are shown below Note that cables shown in the illustration a...

Page 11: ... you have connected external systems to your TV you can switch to different input sources Press SOURCE button on your remote control for directly changing sources or Select Source option from the main menu by using or button Use then or button to highlight an input and press button to select Note With the or buttons you can set Off or On When Off is selected this source does not appear in the OSD ...

Page 12: ...d on the screen To select the Yes or No option highlight the item by using or buttons and press the OK button The IDTV will automatically tune to the UHF or VHF for EU countries transmission channels searching for digital terrestrial TV broadcasts and displaying the names of channels found This process will take about a few minutes After Automatic Search is completed the following message asking f...

Page 13: ...menu and use or button to set Subtitle to the desired language Note You can enable subtitles by pressing the GREEN button of the remote control Press GREEN button again to disable subtitle function If Subtitle is on and a language option is set pressing the button causes the following warning message display on the screen for UK only Digital Teletext for UK only Press the button The digital telete...

Page 14: ... the name and number of the selected channel will be displayed in the top left and top right of the channel display at the top right of the screen respectively Moving the channels in the channel list Press or buttons to select the channel that will be moved Press or buttons to select the Move item on Channel List menu Following OSD will be displayed next to OK item to indicate that enter a number ...

Page 15: ...umeric buttons on the remote control The lock icon will now be displayed next to the selected channel Repeat the same operation to cancel the lock Setting Favourites To set a favourite you should highlight the Favourites item at the bottom of the Channel List menu Then press OK button and Edit Favourite List menu appears on the screen How to Add a Channel to a Favourites List By pressing or button...

Page 16: ...ns The CAM should be correctly inserted it is impossible to insert fully if reversed The CAM or the TV terminal may be damaged if the CAM is forcefully inserted Connect the TV to the mains supply switch on and then wait for few moments until the card is activated SomeCAMsmayrequirethefollowingsetup Pleaseset theCAMbyenteringtheIDTVmenu ConditionalAccess then pressing the OK button CAM set up menu ...

Page 17: ...TV automatically powers up at 3 00 A M each day and searches for any new information which may be broadcasted and will download this to your receiver automatically This operation will normally take approximately 30 minutes Note Your TV may start in First Time Installation mode after OAD update Parental Control Use or buttons to go to Parental Lock option Press OK button to enter the menu A dialog ...

Page 18: ...ture by pressing the or buttons Preferred Language Optional By pressing the or buttons the preferred audio description language is being changed This setting can be used only if it is available Relative Volume Optional Using this option the Audio Description volume level can be increased or decreased relatively according to the general volume Language In this menu the user can adjust the preferred...

Page 19: ...ears on the screen Highlight Yes or No by using or buttons and press OK button to confirm If Yes is selected automatic search starts Selecting No cancels automatic search After search is completed for digital channels a message asking whether to search for analogue channels appears on the screen Press the OK button to search for analogue channels The following menu appears on the screen for analog...

Page 20: ... in Automatic Search section Media Browser To display Media Browser window press either MENU button on the remote control and then select Media Browser by pressing or button Press OK button to continue Media Browser menu contents depending on the contents of your USB drive will be displayed Also when you plug a USB device the following screen will be displayed Select YES by pressing or button and ...

Page 21: ... video playback Stop button Stops the video playback Pause button Pause the video playback Rewind button Goes backward Forward button Goes forward Menu MENU button Sets subtitle Audio You can set subtitles by using INFO button before starting the playback or by using MENU button during the playback Note Selected subtitles may not be displayed correctly in some cases In order to display movie subti...

Page 22: ...t In equalizer menu thepresetcanbechangedtoFlat Music Speech Movie and User Selectthedesiredfrequencybypressing or button and increase or decrease the frequency gain by pressing or button Press the MENU button to return to the previous menu Note Equalizer menu settings can be changed only when the Equalizer Mode is in User Balance This setting is used for emphasizing left or right speaker balance ...

Page 23: ...d to On By pressing or button select Blue Background Press or button to set Blue Background as On or Off Menu Timeout To set a specific display timeout for menu screens set a value for this option Press or button to select Menu Timeout Use or button to change menu timeout to Off 15 sec 30 sec or 60 sec TXT Teletext Language Press or button to select TXT Language Use or button to change TXT Languag...

Page 24: ...arch item is highlighted Store Press or button to select Store Press or OK button to store the settings Stored will be displayed on the screen Program Table Select Program Table by pressing or button Press to display Program Table By moving the cursor in four directions you can reach 20 programmes in the same page You can scroll the pages up or down by pressing the navigation buttons to see all th...

Page 25: ...image to ensure best results H Horizontal Position This item shifts the image horizontally to right hand side or left hand side of the screen Select H Position item by using or button Use or button to adjust the value V Vertical Position This item shifts the image vertically towards the top or bottom of the screen Select V Position item by using or button Use or button to adjust the value Phase De...

Page 26: ...g PRESETS button you can change Picture Mode settings in accordance with your viewing requirements Available options are Dynamic Natural and Cinema Note This feature cannot be set while in PC VGA mode Zoom Modes You can change the aspect ratio image size of the TV for viewing the picture in different zoom modes Press SCREEN button to directly change the zoom mode Available zoom modes are listed be...

Page 27: ...e Please note that ghosting may occur while displaying a persistent image LCD TVs image persistence may disappear after a short time Try turning off the TV for a while To avoid this do not leave the screen in still picture for extended periods No Power If your TV system has no power please check the main power cable and connection to the mains socket outlet Poor Picture Have you selected the corre...

Page 28: ...ESA 2 640 480 72 37 9 VESA 3 640 480 75 37 5 VESA 4 800 600 56 35 2 VESA 5 800 600 60 37 9 VESA 6 800 600 70 43 8 7 800 600 72 48 1 VESA 8 800 600 75 46 9 VESA 9 832 624 75 49 7 MAC 10 1024 768 60 48 4 VESA 11 1024 768 70 56 5 VESA 12 1024 768 72 57 7 13 1024 768 75 60 0 14 1152 864 75 67 5 VESA 15 1152 870 75 68 9 MAC 16 1280 768 60 47 7 VESA 17 1366 768 60 47 7 18 1280 960 60 60 0 VESA 19 1280 1...

Page 29: ...80P 60Hz O 576I 50Hz O 576P 50Hz O 720P 50Hz O 720P 60Hz O 1080I 50Hz O 1080I 60Hz O 1080P 24Hz X 1080P 25Hz X 1080P 30HZ X 1080P 50HZ O 1080P 60HZ O X Not Available O Available Note In some cases a signal on the LCD TV may not be displayed properly The problem may be an inconsistency with standards from the source equipment DVD Set top box etc If you do experience such a problem please contact yo...

Page 30: ... 8K 48KHz mp3 MPEG 1 2 Layer 1 2 3 MP3 Sample Rate 8K 48KHz Bit Rate 32K 320Kbps Photo jpg jpeg bmp gif Baseline JPEG WxH 14592x12288 Up to 179 Mega pixel Support format 444 440 422 420 Grayscale Progressive JPEG Up to 4 Mega pixel Support format 444 440 422 420 Grayscale External Subtitles srt Support Text File Format but do not support Picture File Format smi sub psb ass Note Necessary bitrates ...

Page 31: ...emodulation COFDM with 2K 8K FFT mode FEC all DVB modes Video MP ML PAL 4 3 16 9 Audio MPEG Layer I II 32 44 148kHz NUMBER OF PRESET CHANNELS 200 CHANNEL INDICATOR On Screen Display RF AERIAL INPUT 75 Ohm unbalanced OPERATING VOLTAGE 220 240V AC 50 Hz AUDIO German Nicam Stereo AUDIO OUTPUT POWER WRMS 10 THD 2 x 2 5 POWER CONSUMPTION W 60 W max 1 W Standby PANEL 22 wide display DIMENSIONS mm DxLxH ...

Page 32: ...ich is coloured blue or black must be connected to the terminal which is marked with the letter N or coloured Black The wire which is coloured brown or red must be connected to the terminal which is marked with the letter L or coloured Red For continued protection against risk of fire replace only with same type and rating of fuse ASTA approved 5A 250VAC fuse CAUTION TO PREVENT ELECTRIC SHOCK DISC...

Page 33: ...rding to disc content LPCM audio via coaxial and optical digital audio outputs optional Multi Audio up to 8 support According to disc content Multi Subtitle up to 32 support According to disc content Multi Angle up to 9 support According to disc content 8 level parental control Fast forward and rewind in 5 different speeds 2x 4x 8x 16x 32x Slow motion playback in 4 different speeds 1 2x 1 4x 1 8x ...

Page 34: ...emove before using it Do not expose the disc to direct sunlight or heat sources such as hot air ducts or leave it in a car parked in direct sunlight as the temperature can rise quickly and damage the disc After playing store the disc in its case On cleaning Before playing clean the disc with a cleaning cloth Wipe the disc from the center out Do not use solvents such as benzine thinner commercially...

Page 35: ...le playing a file you should press STOP button three times to eject Overview of the Remote Control Standby 1 Numeric buttons 2 Return back 3 Language selection Set language 4 Display time DVD menu 5 Clear 6 Stop 7 No function 8 Rapid Reverse 9 Rapid advance 10 Info 11 Zoom 12 Repeat 13 Root 14 Menu 15 Title 16 OK Select 17 Navigation Buttons 18 Subtitle 19 Angle 20 Search mode 21 Play 22 Pause 23 ...

Page 36: ...layback Press repeatedly to switch between modes LANG Audio language X X MENU Displays TV menu OK SELECT Enter View Play REPEAT Displays repeat options RETURN Returns back to the previous menu if available ROOT Goes back to the root folder if available SEARCH MODE Direct selection of scenes or time Selects the desired file Selects the desired file SUBTITLE Subtitle on off Press repeatedly to switc...

Page 37: ...gs If a language is selected not supported by the 7 disc the subtitle language will automatically be set to the disc s priority language Usually a circulation will happen while switching 8 to another language that is you can cancel the subtitle by pressing this button a number of times until Subtitle Off appears on the screen When the power is turned on or the disc is 9 removed the language heard ...

Page 38: ... Troubleshooting The picture quality is poor DVD Make sure the DVD disc surface is not damaged Scratch fingerprint etc Clean the DVD disc and try again See instructions described in Notes on Discs to clean your disc properly Ensure that the DVD disc is in the drawer with the label uppermost A damp DVD disc or condensation may effect the equipment Wait for 1 to 2 hours in Stand by to dry the equipm...

Page 39: ... greater capacity than a single 1 2 mm thick disc Since the two thin discs are adhered to each other there is the potential to achieve double sided play sometime in the future for even longer duration play Subtitles These are printed lines appearing at the bottom of the screen which translate or transcribe the dialogue They are recorded on the DVD discs Time Number This indicates the playtime whic...

Page 40: ... ig i tal an d M P E G 2 S y s tem Var io u s s c r een an d au d io fu n c t io n s c a n b e eas ily s el ec t ed t h r o u g h th e o n s c r een m enu A n L P is r ec o r d ed as an an alo g s ig n al w ith m o r e d is t o rtio n C D is r e c o r d e d as a D ig ita l S ig n al w ith b et ter au d i o q u ality les s d is t o r t io n an d les s d et erio rat io n o f au d io q u alit y o v e...

Page 41: ...50181370 ...

Reviews: