Technika SH340T User Manual Download Page 12

UNDERSTANDING THE PICTURE MENU

The PCTURE MENU enables you to set up your camera to take the best picture.

You can adjust:

Picture Quality Exposure Value: White Balance

Image Size (

):

: Take pictures in singles or in

threes (

): Set a Delayed picture (

r): Record the date and time of the picture (

).

burst mode

Selftime

Time Stamp

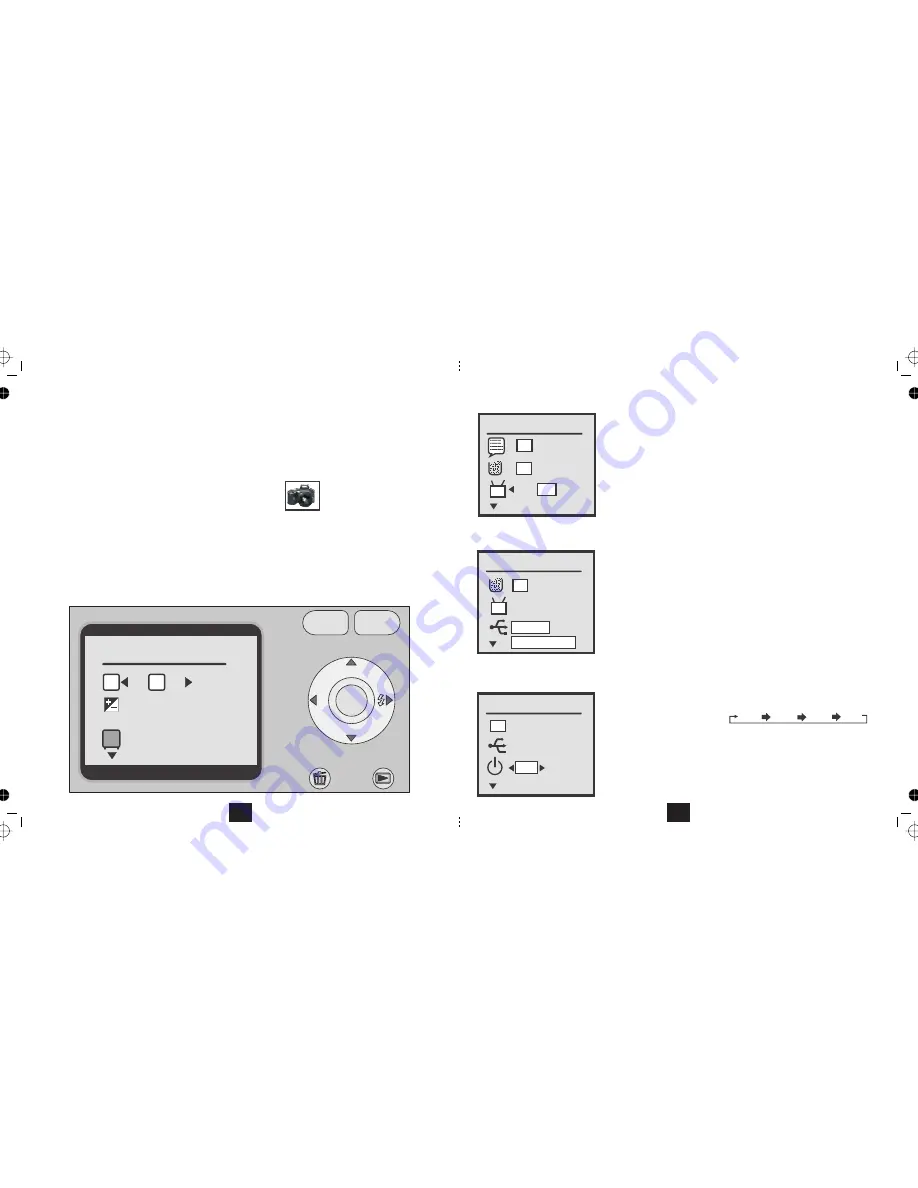
• Switch the camera on by pressing the

button. Wait for the welcome screen to load.

ON/OFF

Press the

button, if necessary to select the Snapshot Icon

MODE

• Select the item you want to change with the

buttons. The highlight moves with each key press

• Select the new value with the with the

buttons. The highlight moves with each key press

• After making your changes press the

key to exit.

MENU

MODE

MENU

DISP

OK

2M

5M

AWB

Picture Quality

2048x1536

3M

3M


Press the

button. The PCTURE MENU will display

MENU

10

to select

Press

TV Output.

OK.

PAL and NTSC.

NOTE: If you have a standard UK television, you must select PAL as the

TV may not be able to recognise the camera if set to NTSC.

to toggle between

Press

to confirm and return to the list of items

Press

to confirm and exit Setup.

MODE

TV Output

USB Connection

Format Storage

Setting the TV System

Setting the USB Connection

to select

Press

USB Connection.

OK.

to toggle between

and

PC Cam

Mass Storage

PC Cam:

You can use the camera as a webcam by connecting the camera to a

USB port on your computer but you cannot upload or download files.

Mass Storage:

In this mode you can upload and download files to your

computer but cannot use the camera as a webcam.

Check this setting before connecting the camera to the computer!

Auto Power Off

OK

OK

NTSC PAL

PAL

PC Cam

OK

Mass Storage

PAL

PC Cam

1 MIN

Press

to select

Press

Auto Power Off.

OK.

Press

to toggle between:

30 SEC

1 MIN

3 MIN

5 MIN

This setting governs how long the camera stays on. After the set period, if there
is no activity the camera will power off to conserve battery power.

Press

Press


Press

Press


27

Press

to confirm and return to the list of items

Press

to confirm and exit Setup.

MODE

Press

to confirm and return to the list of items

Press

to confirm and exit Setup.

MODE

Summary of Contents for SH340T

Page 1: ...Tesco Stores Ltd Delamare Road Cheshunt Herts EN8 9SL SH340T 3 1 MP Digital Camera User Guide...

Page 2: ...ERA SOFTWARE Page 29 TRANSFERRING FILES FROM CAMERA TO PC Page 30 INSTALLING THE CAMERA AS A WEBCAM Page 31 USING THE CAMERA AS A WEBCAM IN WIN XP Page 32 INSTALLING USING PHOTO EXPLORER 8 Page 33 TRO...

Page 3: ...ranty innowayaffectsyourconsumerrights Producedafter13thAugust2005 Waste electrical products should not be disposedofwithhouseholdwaste Please recycle where facilities exist Check with your Local Auth...

Page 4: ...drive on connection allowing you to upload and view your pictures Installation of the driver is necessary to upload to a PC and view your files Refer to Page 29 2 TROUBLESHOOTING If your camera does n...

Page 5: ...andsaveittoafolderon thePCharddrive 5 Close Click toexitthemenu NowunplugthecamerafromthePC 3 4 5 34 8 9 10 11 DISP OK 19 20 21 18 22 7 12 13 14 15 16 17 23 24 CAMERA LAYOUT 1 Lens 2 Wrist Strap Hook...

Page 6: ...ENU DISP OK Snapshot Audio Recorder Video Cam CAPTURE MODE MODE SCREEN 4 Installing and Using Ulead Photo Explorer 8 Photo Explorer 8 SE BASIC enables you to access archive and catalogue all the image...

Page 7: ...d Image Size If you do not see this icon and a card is inserted you should format the card See P 26 Macro Mode if selected Burst Snapshot if selected Timed Snapshot if selected 25 01 2007 USINGTHECAME...

Page 8: ...USY 5M 0354 5M 0354 READY BUSY READY 5M 0354 5M 0354 Because the flash needs to be charged the rate at which you take successive pictures is reduced Battery life is reduced when using flash photograph...

Page 9: ...camera processes the image and the picture you have taken appears on the screen After a while the screen clears and you may now take another picture The pictures remaining indicator on the monitor sc...

Page 10: ...ximumZoomis4 0 8 INSTALLING THE CAMERA SOFTWARE The utilities disc supplied with this camera include The camera driver Ulead Photo Express 5 SE Installing the Camera Driver DO NOT CONNECT THE CAMERA T...

Page 11: ...Setup screen To exit the Setup Screen MODE Press the button PC Cam 5 MIN 50 5 MIN OK 50 50 Restore default System settings Continue OK OK 50 50 O7 01 23 01 Press Press 50 60 Press Yes OK No MENU 28 P...

Page 12: ...to recognise the camera if set to NTSC to toggle between Press to confirm and return to the list of items Press to confirm and exit Setup MODE TV Output USB Connection Format Storage Setting the TV S...

Page 13: ...T Large resolutions offer higher picture definition but only if you are printing large pictures The downside is that large formats take up more space and need more processing time which shortens batte...

Page 14: ...ime has elapsed the camera will take the picture The Selftimer will reset to Off when you switch the camera off Time Stamp Select with the Time Stamp keys You can overprint your snaps with the Date th...

Page 15: ...plays MODE Navigate to the icon using the Camcorder buttons Press the button to confirm OK The Camera will now enter Camcorder mode Line up your subject and press the Shutter The Action Icon will disp...

Page 16: ...MODE Press the key to return to the Video Camera mode or press to exit 14 PLAYING BACK AUDIO RECORDINGS SWITCH THE CAMERA AND THE HI FI OR TV SET OFF Connect the jack plug of the supplied A V lead to...

Page 17: ...d the TV off then unplug the connecting lead You can carry out all the functions of the camera using the TV screen This includes taking and viewing still and video images recording and playing audio f...

Page 18: ...Protect Screen Press to select ON OFF Protected or Not Protected Press to return to the previous screen MENU Protecting a video or a picture prevents it being erased You can select which images on the...

Page 19: ...OK YES NO MENU 25 01 2007 12 30 2048x1536 50 50 20 Viewing one picture at a time to move back a picture Press to move forward one picture Zoom and Pan to increase Zoom to decrease Zoom Press to the p...

Page 20: ...Press to delete the picture OK Press to return to thumbnail view MENU 18 Video Playback Press the button to begin play Press the button to pause Press the button to resume play During Play button to...

Reviews: