Technika MC-429ID Owner'S Handbook Manual Download Page 21

19

  SETTING THE TIMER

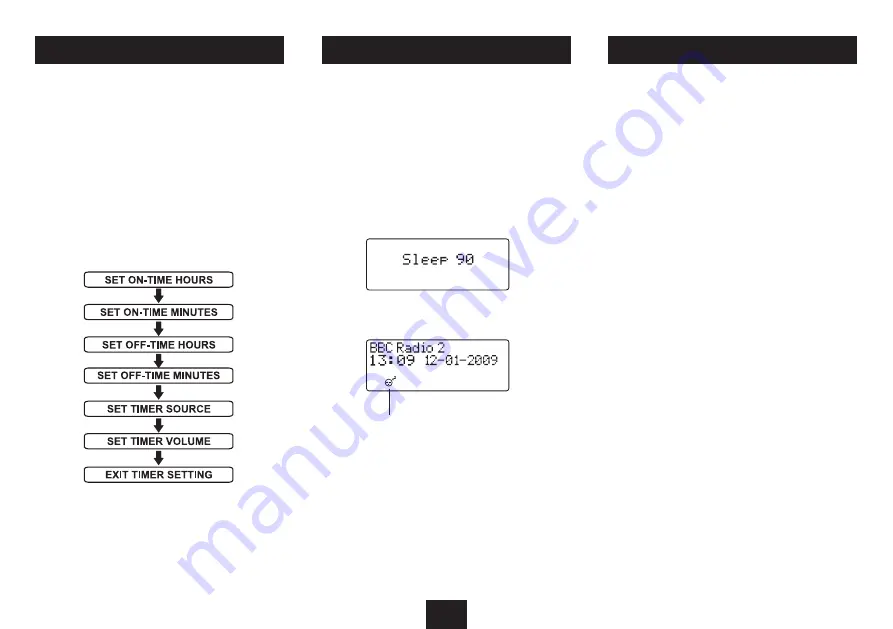
Your system includes a timer that enables you to set times for 
the system to switch on and switch off automatically.

To set the timer:

Press the 

• 

TIMER

 button on the remote control to step 

through  each  stage  in  timer  setting,  shown  in  the 
sequence below.
To  make  changes  to  a  setting,  press  the 

• 

{

  or 

}


button.
Press  the 

• 

TIMER

  button  to  confirm  each  setting  and 

move on to set the next.

Activating the timer:

When timer setting is complete, the timer can be switched 
on or off by pressing the 

TIMER

 button.

The Timer symbol shows on the display when the timer is 
activated.

  SLEEP MODE

THE SLEEP FUNCTION

The  Sleep  function  allows  you  to  program  your  system  to 
switch itself off after a set period in 10 minute steps from 90 
minutes down to 10 minutes.

To activate the Sleep function:

Press the 

• 

SLEEP

 button.

The display will show Sleep 90.

Now  press  the 

• 

SLEEP

  button  repeatedly  until  your 

required sleep time (in minutes) appears on the display.

When sleep mode is set, the sleep symbol will appear on the 
display to confirm that sleep mode is set.

Your system will continue to play, then will set to Standby 
when the sleep time expires.

To check the Sleep time remaining:

Press the 

• 

SLEEP

 button during Sleep mode.

The Sleep time remaining will be shown on the display.

To cancel the Sleep function:

Press the 

• 

SLEEP

 button repeatedly until the sleep symbol 

disappears, or set the unit to Standby..

Sleep symbol


SYSTEM RESET

DAB is a terrestrial system and frequencies in different areas 
vary. If you move the radio to another part of the country 
performing a Full Scan may not be enough to re program the 
radio you may need to reset the radio.

To restore the factory settings:

Set the system to DAB mode.

• 

Press and 

• 

hold

 the 

MEMORY/CLOCK

 button on the front 

panel until the display flashes ‘Factory Reset’.
Press the 

• 

/,

/SCAN

 button to confirm factory reset.

The unit will now scan for DAB broadcast stations in your 
area.
After reset the settings are returned to the factory defaults 
and all the presets are erased.

Summary of Contents for MC-429ID

Page 1: ...MC 429ID Owner s Handbook Mini DAB CD MP3 audio systemwith iPod dock ...

Page 2: ......

Page 3: ...rates uses and can radiate radio frequencyenergyand ifnotinstalledandusedinaccordance with the instructions may cause harmful interference to radio communication However this is no guarantee that interference will not occur in a particular installation If this equipment does cause harmful interference to radio or televisionreception whichcanbedeterminedbyturningthe equipmentoffandon theuserisencou...

Page 4: ...ce for example use the L Band 1452 1492 MHz Germany uses both bands Your radio can tune Band III Countries in Europe that use Band III include Belgium Denmark Holland Italy Norway Portugal Spain Sweden Switzerland Your radio will tune stations in all these countries Your radio cannot receive French or German stations broadcasting in the L Band though FM services are available all over Europe Being...

Page 5: ... at the same height and with at least 150mm between each speaker and the main unit Connecting the speakers Locate the block of 4 speaker terminals on the back of 1 the unit Lift the latches on the left channel speaker terminals as 2 shown in the drawing Feed the wires from the left speaker into the two 3 terminals observing the colour code with the black striped wire connecting to the bottom black...

Page 6: ... Aux In jack 1 Menu touchpad 1 Stop button 1 Memory clock touchpad 1 Skip back button 1 Function touchpad 1 Play Paus Scan button 1 Standby touchpad 2 Headphone jack 2 Left speaker connections 2 Right speaker connections 2 Main power cable 2 DAB FM aerial wire CONTROLS CONNECTIONS FRONT TOP VIEW BACK VIEW NOTE This symbol indicates a touch sensitive area of the front panel Lightlytouchinthisareato...

Page 7: ...or information c Play symbol d Timer set symbol e Sleep symbol f Disc loaded symbol g Pause symbol h Repeat mode symbol i Repeat folder symbol 1 Repeat All symbol 1 Shuffle symbol 1 Aux mode symbol 1 FM mode symbol 1 MP3 format symbol 1 WMA format symbol 1 DAB mode symbol ...

Page 8: ...sed batteries with regard to the recycling regulations in yourarea DoNOTshortcircuitbatteriesorthrowthemintowater the general rubbish or in a fire Weak batteries can leak and damage the remote control Replace them in good time a Aux mode button b Mute button c Timer button d Next button e Stop button f Volume up button g Volume down button h Bass button i Sleep button 1 Numeric keypad 1 EQ button ...

Page 9: ...ghtduringclocksetting Press the or buttons to select 24 hour or 12 hour mode for the clock Press the CLOCK ADJ PROGRAM button The display will show the time currently set with the hours digitsflashing Press the or buttons to set the hours digits to the correct time Press the CLOCK ADJ PROGRAM button The display will show the time currently set with the minutes digitsflashing Press the or buttons t...

Page 10: ...on to browse the list of stations on the display When you find the station name you want to listen to press the ENTER button DAB and FM presets Your radio can store up to 10 of your favourite stations as presets numbers 0 9 on both the DAB and FM bands for quick recall To store a preset Tune to the station you want to store as a preset From the remote control press and hold the NUMBER 0 9 button f...

Page 11: ...ed SpeechandNews are often broadcast at a lower Bit Rate music needs a higher Bit Rate for good fidelity SIGNAL ERROR RATE This Signal Error Rate is a measure of the signal quality The lower the figure the better the signal quality The Signal Error Rate display is helpful when setting up the aerial wire Move the wire to minimise the readiong on your favourite stations FM DISPLAY MODES Some FM stat...

Page 12: ...progress Thenumberofservicesfoundduringthe scanwillbeshownattherightsideofthedisplay After running a scan the radio will re tune to the last tuned station or if this is not available the first station found in alphabetical sequence To select a multiplex press the ENTER button The selected multiplex number will be displayed with if present themultiplexnameandsignalstrength Press the or button to re...

Page 13: ... number or two numbers if the number is greater than 9 Press the SCAN button to skip to your chosen track Fast search To fast search through a track press and hold the or button The player will fast search through the track at high speed in thechosendirectionuntilthebuttonisreleased REPEAT AND SHUFFLE FUNCTIONS You can repeat a single track the whole disc or select shuffle to play the tracks in a ...

Page 14: ...aying the play and pause buttons work as normal and you can skip between tracks in the program by pressing the or button Clearing a program If the CD is playing press the STOP button to stop the disc Once the disc has stoppped press the STOP button again TheProgramwillclearfrommemory NOTE Opening the disc loading door will also clear the program Repeat function When a program is stored you can set...

Page 15: ...e centre spindle with the label side upward Once in place press the centre of the disc until it clicks into place on the turntable Close the lid and press the OPEN CLOSE area until it latches shut After a few seconds the disc will read and the disc data will be displayed Unloading a disc If the disc is playing press the STOP button and wait a few seconds for the disc to stop Press the OPEN CLOSE a...

Page 16: ...ton will replay the current track Fast search To fast search through a track press and hold the or button The player will fast search through the track at high speed in thechosendirectionuntilthebuttonisreleased Ifthemusicfilesonthediscareorganisedintofoldersyoucan change between folders To change folders if there are more than 1 Touch the FOLDER M or N touchpad or press the FOLDER PRESETUPorDNbut...

Page 17: ...ncrease toP 02 Repeat the previous four steps to store the next and subsequent tracks in your program sequence Playing the program When you have finished entering all tracks in your program press the SCAN button to start the program playing Clearing a program If the CD is playing press the STOP button to stop the disc Once the disc has stopped press the STOP button again TheProgramwillclearfrommem...

Page 18: ...eadphonesocketoftheiPod and the other end to the AUX IN jack on the front panel Before docking your iPod you must fit the correct iPod adaptor to the docking bay Each iPod adaptor matches the shape of a particular iPod and is necessary to ensure that your iPod is securely held when docked CONNECTING OTHER iPod MODELS INC SHUFFLE To listen to your iPod follow the instructions on page 15 for playing...

Page 19: ...buttons To select menu items press the ENTER button From the iPod menu you can select from Music Photo or Video playback then select from tracks playlists pictures and movies that are stored on your iPod iPod repeat modes Press the PLAY MODE button on the remote control repeatedly to cycle through Repeat 1 Repeat All or Repeat Off modes on theiPod the modeset willdisplay on theiPod screen DOCKING ...

Page 20: ...tem of an iPod or other personal audio player with the remote control of the audio system if it is connected via the AUX IN jack PLAYING VIA THE AUX JACK EQ BASS BOOST You can change the equalisation of the sound or boost the level of bass to suit your taste To select an EQ response Press the EQ button on the remote control repeatedly to cycle through the EQ options optimised as shown below Aseach...

Page 21: ...til your required sleep time in minutes appears on the display When sleep mode is set the sleep symbol will appear on the displaytoconfirmthatsleepmodeisset Your system will continue to play then will set to Standby when the sleep time expires To check the Sleep time remaining Press the SLEEP button during Sleep mode TheSleeptimeremainingwillbeshownonthedisplay To cancel the Sleep function Pressth...

Page 22: ...is product must not be connected to earth CARE AND MAINTENANCE WARRANTY SPECIFICATIONS YourTesco appliance is covered by a warranty for 12 months from the date of purchase If a fault develops during this period please contact theTESCO electrical help line on 0845 456 6767 Please have your original purchase receipt with you when you call This warranty in no way affects your con sumer rights UK Wast...

Page 23: ......

Page 24: ...Tesco Stores Ltd Delamare Road Cheshunt Herts EN8 9SL Technika Helpline 0845 456 6767 Calls cost up to 4p per minute from a BT landline other providers may vary MC429IDV0 1 ...

Reviews: