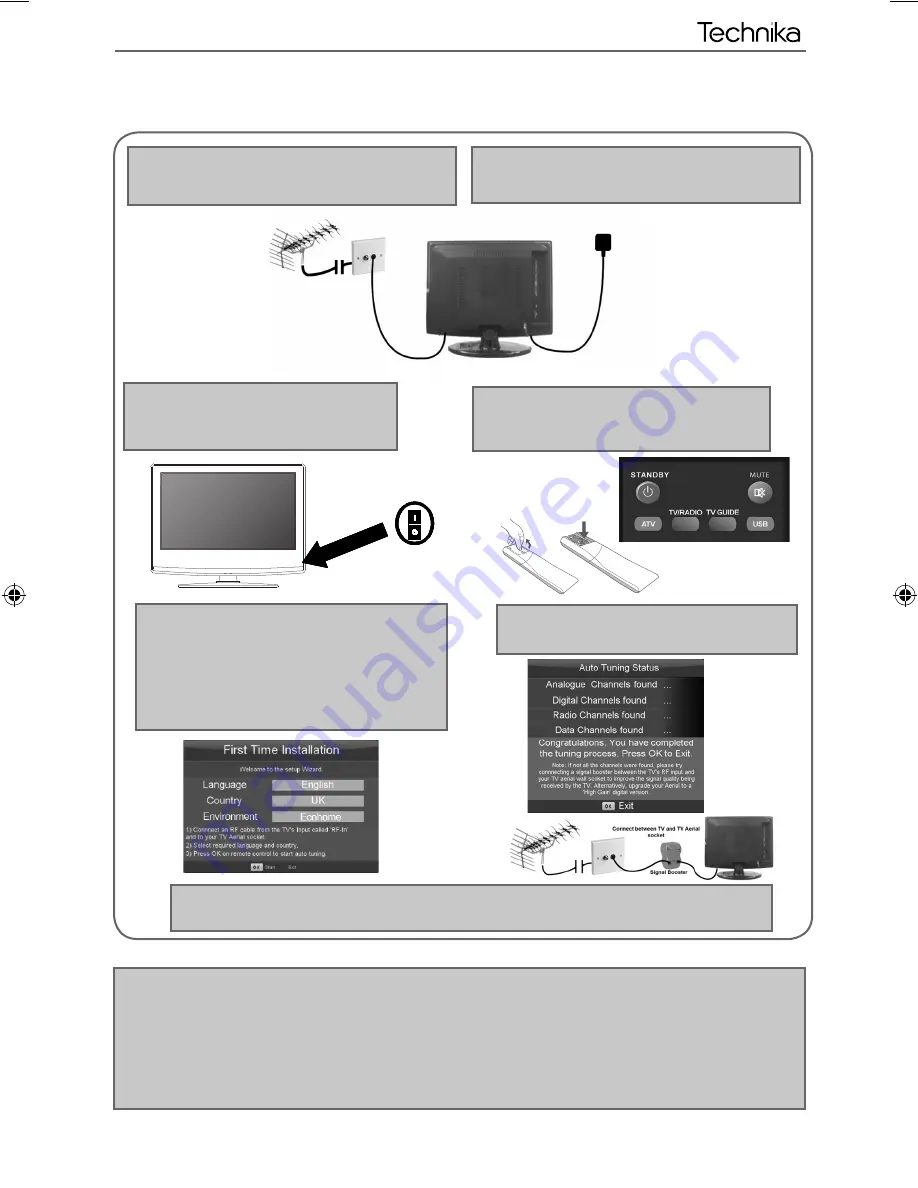
background image

11

11

GETTING STARTED  INITIAL SET UP

Getting Started - Initial Set Up

1) Using the RF cable supplied, connect the TV 
to the TV Aerial wall socket (Fig A)

2) Connect the power cable to the Electrical 
outlet (Fig B)

6) After tuning the following screen will 
appear. 

If you are missing channels, the reason for this is likely to be signal strength, you should 
consider connecting signal booster and re-tuning the TV.  

Fig A

Fig B

4) Insert the batteries supplied into the 
Remote control and press the Standby 
button to power on the TV

3) Switch on the television using the 
power on/off switch.

Power on/off

5) You will now be welcomed with the initial set-up 
screen. 
Ecohome mode: Select this mode for the most 
energy effi cient TV set up*
If it does not appear, on the remote control, please 
press [MENU] then 8-8-8-8 and the menu will appear.
Press OK on the remote control and tuning will start. 

*As part of our ongoing development to reduce power consumption, we have added an extra function to this Television 
called ‘Ecohome’ (you will see this during the fi rst time installation set up). Power consumption using the Ecohome 
function is approximately 15% lower than some other modes. The picture brightness is reduced using the Ecohome 
function. If this function is not suitable for your viewing environment, you can select other modes as necessary.  (Please 
note, ‘Professional’ mode is for optimum default picture settings, however, power consumption is approximately 15% 
higher than ‘Ecohome’ mode) 
Please refer to the user guide section ‘Picture settings’ in order to change the mode to one that maybe more suitable for 
your environment. There is also a shortcut button on the remote control called ‘P-Mode’ should you wish to change to 
another mode.

User Guide - Technika - LCD 40-271.indd   Sec1:11

User Guide - Technika - LCD 40-271.indd   Sec1:11

18-Nov-11   10:40:32 AM

18-Nov-11   10:40:32 AM

Summary of Contents for LCD40-271

Page 1: ...LCD40 271 Full HD LCD TV with Freeview USB Media Player Model No User Guide ...

Page 2: ...on top of the power cable as the weight of the television may damage the cable and cause a safety hazard Never place mobile phones speakers or any other device which may cause magnetic or radio interference with the television If interference is apparent move the device causing the interference away from the television To disconnect the apparatus from the mains please use the all pole mains switch...

Page 3: ...tationary Moving or low contrast graphics are less likely to cause ageing of the screen Time Displays Teletext Do not view a stationary page for long period of time TV DVD Menus e g Listings of DVD disk content Pause Mode Do not leave the TV in pause mode for long periods of time e g When watching DVDs or videos Important Once shadow image screen burn occurs it will never disappear and is not repa...

Page 4: ...Up 11 TV Buttons and Input Source Menu 12 Remote Control 13 Connections 14 15 TV Menu Operation 16 21 Channel Menu 16 Picture Menu 17 Sound Menu 18 Time Menu 19 Feature Menu 20 Setup Menu 21 PC Operation 22 23 7 Day TV Guide 24 USB Mode Media Player 25 General Information 26 30 Using your your TV with a Sky digital set top box 26 Frequently Asked Questions 27 Technical Specifications 28 Index 29 ...

Page 5: ...rrectly The safest way to package your item in the event of warranty service repair is in it s original box packaging WHAT IS INCLUDED IN THE BOX Accessories Included with this TV are the following accessories 1 x User Guide 1 x Quick Start Guide 2 x AAA Batteries 1 x TV 1 x RF Cable 1 x Remote Control What is included in the box User Guide Quick Start Guide 1 x Stand plus screws ...

Page 6: ...sure the notch is facing upwards into the hole in the stand c 2 Slot the stand c into the TV neck a with 66mm plastic ring b inside 3 Align 68mm plastic ring d making sure the notch is facing downwards with the hole at the bottom of the TV stand 4 Align the holes in metal plate e with the holes in the bottom of the TV stand 5 Secure the stand using 7 screws f ...

Page 7: ...he picture below Detaching the stand and wall mounting 2 Although there are no live parts exposed when removing the stand in the event of wall mounting the TV for aesthetic purposes included in the accessory pack is a cover plate which can be clipped into the underside of the TV fig 1 fig 2 For optimum viewing if wall mounting the TV higher than eye level the TV should be tilted downwards so that th...

Page 8: ... control please press MENU then 8 8 8 8 and the menu will appear Press OK on the remote control and tuning will start As part of our ongoing development to reduce power consumption we have added an extra function to this Television called Ecohome you will see this during the first time installation set up Power consumption using the Ecohome function is approximately 15 lower than some other modes T...

Page 9: ... 3 Press OK B Using the buttons on the Television 1 Press SOURCE 2 Scroll up down using CH CH buttons to the input source you require 3 Press Vol to change input source to the one selected TV Buttons and Source Menu Displays the input source menu Displays Menu OSD Volume up and menu right Volume down and menu left Programme Channel up and menu up Programme Channel down and menu down Standby Power ...

Page 10: ...reen menus and adjust the system settings to your preference MENU To display OSD menu EXIT To exit all menus NUMBER BUTTONS 0 9 to select a TV channel directly To return to the previous channel viewed FAV To display favourites menu VOL To increase decrease the sound level SUBTITLE To switch the dialogue at the bottom of the screen on off ASPECT To switch the screen between the different picture fo...

Page 11: ... COAX Audio Out Digital Coax output COMPONENT HD Component input YPbPr VIDEO Video input R L AUDIO Video Component audio input RF IN RF TV Aerial Input HEADPHONES 3 5mm Headphone output A B C D E F G H I J K N M Connecting a DVD Player Recorder Video Recorder or Cable Satellite Box TVs Input Source should be set to SCART Connections RF IN SCART TV Aerial Wall Socket SCART OUT RF IN RF OUT DVD or V...

Page 12: ...d audio with minimal loss of quality TVs Input Source should be set to HDMI Option 2 via Component cable If you are supplied with a cable from the device which has RED GREEN BLUE RED WHITE connectors you must connect via Component for picture and by phono cable for sound TV Source should be set to Component Connections Component HD Component Green Blue Red Audio L R White Red Audio In L R Camera o...

Page 13: ...digital signal Analogue Manual Tuning Allows you to manually tune your analogue signal Programme Edit Allows you to delete skip and add favourite channels To access this menu press MENU button on the remote control To enter a menu press OK If you wish to make changes to any of the default settings use the scroll buttons To confirm any settings press OK button To exit this menu at anytime press EXIT...

Page 14: ...ck and white Brightness Increase or decrease the brightness of the picture Colour Increases the colour from black and white Tint Lets you increase or decrease the level of tint within the picture Sharpness Increase or decrease the sharpness of the picture Colour Temperature Choose from the following presets Normal Default settings Warm Increases red within the picture Cool Increases blue within th...

Page 15: ...movies Personal Selects your personal sound settings Sports Emphasises sound for sports Digital Output This is the digital COAX Audio output Choose from the following options Off Off Auto Selects the best settings automatically PCM Select this option if you are connecting to a Stereo Hi fi via coax cable Pulse code modulation PCM is a digital representation of an analogue signal To access this menu...

Page 16: ...ime Allows you to set a specific time for your TV to turn off On Time Allows you to set a specific time for your TV to turn on the channel it will then display the source it will be on and also the volume This function can then be toggled to repeat every day or a certain day Time Zone Change your current time zone Sleep Timer Lets you set the sleep timer so the television automatically switches off ...

Page 17: ...ted into the COMMON INTERFACE PORT CI Card In System Lock Allows you to lock or unlock the menu You will be asked to enter a 4 digit password use the button to quit the password input Use the button to clear Default password is 0000 To access this menu press MENU button on the remote control To enter a menu press OK If you wish to make changes to any of the default settings use the scroll buttons ...

Page 18: ...ilable to download This menu lets you install the new software firmware onto the television Further details of how to do this will be issued with the firmware Contact the helpline or refer to the product support section of the website Menu language Allows you to change the language of the menu Auo Automatically displays the best picture format So the picture is in the correct position May have black...

Page 19: ...der 6 Left click on the drop down for Screen refresh rate and select 60 Hertz if you experience picture noise or flickering select 50 hertz or 70 hertz 7 Click on Apply then click Yes and the settings will be saved 8 Now switch off your computer and connect the television as shown 9 Switch on the TV select the input source to VGA PC and re start your PC Connecting a Laptop In addition to the above ...

Page 20: ...the television to be used as a computer monitor H Offset Changes the horizontal position of the picture V Offset Changes the vertical position of the picture Size increase picture size Phase To adjust delay time of phase in order to reduce the noise of picture Position Reset Changes back to the original settings Tip If the computer is left in active for a period of time the television will switch ...

Page 21: ...el You can view the start and end time of all programmes and on all channels for the next 7 days and set reminders 1 Press TV GUIDE The following 7 Day TV Guide will appear 2 Navigate through the menu using You can now Set a reminder by pressing GREEN View a previous day by pressing YELLOW View the next day by pressing BLUE 3 Press EXIT to exit the 7 day TV Guide ...

Page 22: ...only has 1 partition you will only see 1 item 3 You can now access the item Press OK to view 4 While viewing you control the item using or by pressing i and using and OK USB mode offers playback of various different types of content that you have saved on your USB Memory Stick On switching to USB source the above menu screen will appear The content will be divided into Photo Music Movie and Text b...

Page 23: ...tore the Sky box channel if you still have and use analogue channels 1 5 you may for example decide that channel 6 is the best option for you 3 Press the corresponding number on the remote control to select the desired analogue channel chosen as per point 2 above 4 On the TV remote control press Menu Now navigate through the menus to select Manual Tuning or Analogue Manual tuning refer to the Tuni...

Page 24: ... enough digital signal it is not possible to use a portable indoor type aerial This may change once the analogue signal is switched off in 2012 and the Digital signal strength is increased TV I have re tuned my television but when I switch it off it is not storing the channels Complete a first time installation please refer to the set up menu section of the manual for how to do this VCR DVD Recorde...

Page 25: ...consumption 110 240V 50 60Hz 135W 220W ecomode max 0 5W in Standby Dimensions including stand mm 984W x 660H x 260D mm Net weight Kgs 15kg General Information Compatible files in USB Mode Media File Ext Codec Video Audio Movie mpg Mpeg 1 Mpeg 2 MP3 WMA Max Resolution 1920x1080 Max Data rate 40Mbps avi Xvid MJPEG MPEG 4 SP ASP ts Mpeg 2 Max Resolution 1920x1080 Max Data rate 40Mbps mov Mpeg 4 SP ASP...

Page 26: ...ed Questions 27 Getting Started 11 Horizontal Position PC 23 Language 21 Manual Search 16 Noise Reduction 17 Operating the TV with a universal or Sky BSKYB remote control 26 Phase PC 23 Picture Mode 17 Remote control 13 Reset to default 21 Sharpness 17 Sleep Timer 19 Sound Mode 18 Source Menu 12 System Lock 20 Technical Specifications 28 Treble 18 TV buttons 12 TV Guide 24 USB Mode Media Player 25 ...

Page 27: ...30 ...

Page 28: ...31 31 ...

Page 29: ...TEC MAN 0002 ...

Reviews: