background image

OSD Menu

13

OSD Menu

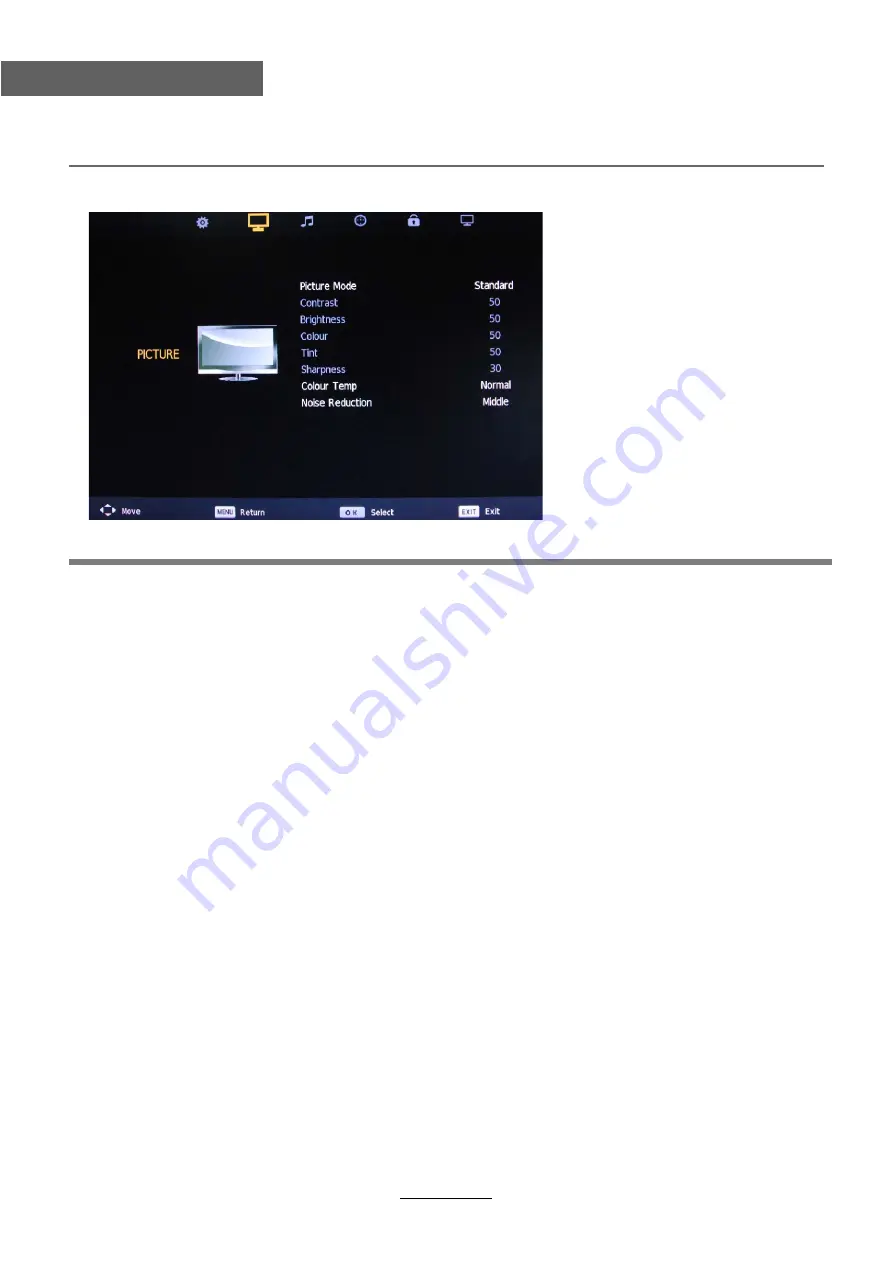
2. PICTURE menu

Description

Picture Mode: 

Choose from Standard, Dynamic, Personal and Mild.

Note: Contrast, Brightness, Colour and sharpness are only available and can be adjusted in 

the User mode option in the Picture Mode Settings.

Contrast:

Controls the difference between the brightest and darkest regions of the picture.

Brightness:

Controls the overall brightness of the picture.

Colour:

Control the color.

Sharpness:

Increase this setting to see crisp edges in the picture; decrease it for soft edges.

Tint:

Controls the tint ( NTSC mode only).

Colour Temperature:

 Choose from Cool, Normal and Warm.

Noise Reduction:

 Choose interference noise modes form Off, Low, Middle, High and Default.

Summary of Contents for LCD230R

Page 1: ...23 LCD TV with DVD and Digital MPEG4 DVB T Tuner LCD230R ...

Page 2: ......

Page 3: ... Back View 7 Names of each part Front View Accessories 6 Remote control 8 9 Basic Operation Basic Operation 10 OSD Menu 1 CHANNEL Menu 11 12 2 PICTURE Menu 13 4 TIMER Menu 15 5 LOCK Menu 16 17 6 SETUP Menu 18 Multimedia Operation Multimedia Operation 19 21 3 SOUND Menu 14 Trouble shooting 31 Specifications 32 Maintenance and Service DVD operation 22 30 DVD operation ...

Page 4: ...1 Safety Precautions Power Supply ...

Page 5: ...2 Safety Precautions Installation ...

Page 6: ...3 Safety Precautions Use and Maintenance ...

Page 7: ...4 SafetyPrecautions Important Safety Instructions ...

Page 8: ...5 Safety Precautions Important Safety Instructions ...

Page 9: ...on the following illustration User Guidance Information Names of each part INPUT Display the input source menu MENU Display exit the OSD menu CH Scan through channels VOL Adjust the volume POWER Turn on standby the TV set Remote Control BD 15R 01 POWER MUTE SUBTITLE TV RADIO EPG CHAN LIST FAV NICAM A2 DTV DVD INPUT MENU TV TXT CANCEL REVEAL LAN ZOOM SUB T HOLD SIZE SUBPAGE INDEX EXIT VOL CH 1 2 3 ...

Page 10: ...video output terminal of DVD YPbPr Connect them to the YPbPr video output terminal of DVD with the coverter cable USB USB jack for update and Media HDMI1 2 Connect it to the HDMI of DVD or other equipment VGA For PC display Connect it to the D Sub 15 pins analog output connector of the PC PC IN Connect it to the audio output terminal of PC SCART Connect them to the SCART video output terminal of D...

Page 11: ...s to display the input source menu INFO Display brief information concerning the current channel Display in DVD mode Press to display the current mode s information you are view Cursor left right up down Cursor buttons used in menus OK CONFIRM BUTTON for menu 0 9 Choose channel directly Return to the previous channel viewed PICTURE Select the picture mode SOUND Select the sound mode EPG To show th...

Page 12: ...rent subpage Load eject DVD disc Play pause DVD program Stop DVD program DVD fast reverse DVD fast forward DVD previous chapter DVD next chapter Buttons for DVD operation Cancel the Teletext display Press to see top half of page double size Press again to see the bottom half of page double size Press again for normal size SUBPAGE Press to subpage again to cancel Select DVD disc language Adjust pic...

Page 13: ...remote control to enter Note Before you select the input source make sure the connections are prepared Basic OSD Menu operation Press MENU button to display the OSD menu as below Use button to select the main menu and press button to enter the submenu In the submenu use or press OK button to enter the submenu Press MENU button to return to the upper menu Press EXIT button to exit the menu display ...

Page 14: ...ning CADTV DVB C DTV DVB T Manual Tuning Press OK button to enter the CADTV DTV Manual Tuning menu and press OK button to start searching Press button to manual search ATV Manual Tuning Press OK button to enter the ATV Manual Tuning menu Current CH Select a Channel for storing the programme Color System Select from PAL and AUTO Sound System Select from I BG DK Search Fine Tune Press button to fine...

Page 15: ...kip Select a channel and press the BLUE button to label the channel as long as the channel has a skip label it will be skipped when searching through the channels with the CH buttons CI Information Please contact your pay perview provider who can supply a viewing card and cam unit with instructions for their use Software update OAD Turn off on the software update function from OAD Signal Informati...

Page 16: ...ngs Contrast Controls the difference between the brightest and darkest regions of the picture Brightness Controls the overall brightness of the picture Colour Control the color Sharpness Increase this setting to see crisp edges in the picture decrease it for soft edges Tint Controls the tint NTSC mode only Colour Temperature Choose from Cool Normal and Warm Noise Reduction Choose interference nois...

Page 17: ...Can be adjusted when the sound mode is set to Personal Controls the relative intensity of lower pitched sounds Balance To adjust the balance of the left and right sound track or turn off the volume of the left and right sound track Auto Volume Control the volume of the programme automatically when you turn on the function by selecting On SPDIF MODE Select the spdif mode AD Switch Turn on off the A...

Page 18: ...ws you to setup the sleep timer among 10min 20min 30min 60min 90min 120min 180min 240min and off Auto Standby According to the latest ERP regulation this unit will switch off itself automatically if no change in status within the last 4 hours of operation OSD Timer Allows you to select the time for OSD menu displays on the screen ...

Page 19: ...Turn on off the Lock System function Note You should enter the code to operate the menu original code is 0000 Set Password Set pin code If the Pin code has been changed you must enter the present code New Enter the new password Confirm Enter the new password ...

Page 20: ...channels that have been locked Use and buttons to select the channel and press the GREEN button on the remote control to lock the channel Parental Guidance Allows you to select the Parental Guidance mode Key Lock Lock the buttons on the TV set when you turn on the function ...

Page 21: ...o select subtitle language Hearing Impaired Turn on off the Hearing Impaired function Aspect Ratio Choose from 4 3 16 9 Zoom1 Zoom2 Blue Screen Turn on off the blue screen function when there s no signal First Time Installation Display the First Time Installation menu SW INFORMATION To show software information Reset Press OK button to restore factory default Software update USB Allows you to upda...

Page 22: ...on the file to delete the file Basic Operation 2 Select the file type mains menu you want to view and insert USB device you will find the name of the device display on the screen 3 Press button to select the the USB device and press OK button to enter 1 Press the INPUT button on the remote control to display the input source menu select Media source by the buttons and press OK button to enter the ...

Page 23: ...ess OK button to cancel the list displaying Info Display the information of the file Rotate Rotate the photo clockwise counterclockwise Zoom Out In Zoom out in the photo Move View Move the photo in Zoom in mode Press button to select the option on the menu and press OK button to change Pause Play pause the music FB FF Fast backward fast forward Prev Next Play the previous next file Stop Stop the m...

Page 24: ...y the information of the movie Slow Forward Play the movies at slow speed press button to cancel Step Forward Step quickly through the movie by using this option Goto Time Program the movie form the time you set Zoom out in Zoom out in the movie screen Aspect Ratio Select the aspect ratio of the screen display Move View Move the photo in Zoom in mode Press button to select the option on the menu a...

Page 25: ...een will show NO DISC Do not touch the playing surface Hold the disc around the outside with your fingers and place the disc into the slot The player will automatically draw the disc into the player To Eject the disc press the EJECT button on the TV or the button on the remote control Insert Disc according to picture next to disc slot Audio 4 3 pan scan 4 3 Letter Box Wide 22 ...

Page 26: ...DVD Operation DVD Operation 23 ...

Page 27: ...DVD Operation DVD Operation 24 ...

Page 28: ...DVD Operation DVD Operation 25 ...

Page 29: ...DVD Operation DVD Operation or NO disc 26 ...

Page 30: ...DVD Operation DVD Operation 27 ...

Page 31: ...DVD Operation DVD Operation 28 ...

Page 32: ...DVD Operation DVD Operation 29 ...

Page 33: ...compressed data that needs proper handling 1 Hold the disc with fingers by outer edge and or the center spindle hole Do not touch the discs surface 2 Do not bend or press the disc 3 Do not expose the disc to direct sunlight or heating sources Stere discs in cabinet vertically and in dry condition Prevent exposure to Direct sunlight Heat or exhaust from a heating device Extreme humidity Clean the d...

Page 34: ...reen size Stripes appear on the screen Stop using wireless telephones hair driers and electric drills and it shakes The screen does not move Press the PAUSE button Check if the Pause button is pressed on external equipment Screen appears Voice is not heard 1 Press the MUTE button 2 Increase the sound level by pressing volume adjustment button 3 Check if sound terminal of external input is connecte...

Page 35: ...G DK I Band UH VH Sound Analog stereo NICAM A2 1000 Pages DVB standard y co ply with DVB and MPEG 2 MPEG4 H 264 standard Video decoder MPEG 2 MPEG4 H 264 QPSK 16QAM 64QAM M 2K 8K Bandwidth 7 8MHz V CI x 1 Playback formats Supported Media System Semi conductor Laser S N DVD Audio dynamic range RF IN 75 IEC75 SCART Euro 21pin IN analog sound Component Video IN YPbPrx 1 VGA IN D SUB 15 Pin x 1 PC Aud...

Page 36: ...1920x1080 Max Solution 1920x1080 Max Resolution 1024x768 Max Resolution 8192x8192 Max Resolution 6500x6500 Max Resolution 3000x3000 Max Resolution 1500x1500 Pixel Depth 1 4 8 16 24 32 bpp Max Solution 720x576 Max Data Rate 40 Mbps Max Data Rate 20 Mbps Sample Rate 8K 48KHz Sample Rate 16K 48KHz Bit Rate 32K 320Kbps Bit Rate 32K 442Kbps Channel Mono Stereo Channel Mono Stereo Max Data Rate 40 Mbps ...

Page 37: ...are prohibited Annual energy consumption is calculated on the basis of the On mode Home Standard mode power consumption operating 4 hours a day and 365 days a year Measured according to IEC 62087 Ed 2 The power consumption of On mode varies depending on setting the TV displays 1920 H x 1080 V This TV set may contain lead only in certain parts or components where no technology alternatives exist in...

Reviews: